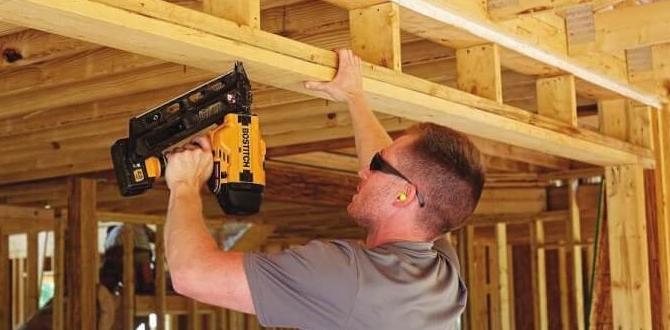
Imagine you have a big DIY project in mind. Maybe it’s building a treehouse or making a new bookshelf. You want it to be perfect, but how do you make it strong and neat? Enter the pneumatic finish nailer! This magical tool can help you achieve stunning results without the mess.
Do you know that a pneumatic finish nailer uses air pressure to drive nails? It’s quick and powerful. You can work faster and focus on your creative ideas. Plus, it makes your projects look professional. Whether you are an expert or a beginner, this tool can be your best friend in DIY tasks.
Have you ever struggled with hammering nails straight? It can be frustrating! With a pneumatic finish nailer, you won’t have that problem. You simply point and shoot. The nails go where you want them, every time. Isn’t that cool? Get ready to dive into the world of pneumatic finish nailer equipment and transform your DIY adventures!
Table of Contents
Essential Pneumatic Finish Nailer Equipment For Diy Projects

Pneumatic Finish Nailer Equipment for DIY Projects
Using a pneumatic finish nailer can elevate your DIY skills to the next level. This powerful tool drives nails quickly and precisely, making tasks like crown molding or furniture assembly a breeze. Why struggle with hand tools when speed and accuracy are at your fingertips? A fun fact: these nailers use compressed air, cutting down on fatigue! Whether you’re a beginner or an expert, exploring pneumatic nailers could transform your projects into professional-looking masterpieces.What is a Pneumatic Finish Nailer?
Definition and functionality of a pneumatic finish nailer. Comparison with other types of nailers (manual and electric).A pneumatic finish nailer is a tool that uses air pressure to drive nails into wood. This makes it fast and easy to join pieces of wood together. These nailers are perfect for finishing work, like trim or molding. They work much quicker than manual or electric nailers, which can take more effort to use.
- Pneumatic Finish Nailer: Uses air pressure. Fast and less effort.
- Manual Nailer: Uses hand strength. Slow and tiring.
- Electric Nailer: Runs on electricity. Can be heavy and needs a power source.
What are the benefits of using a pneumatic finish nailer?
Using a pneumatic finish nailer means you can work faster and more efficiently. You save time and reduce hand fatigue. This tool also creates cleaner finishes compared to manual or electric nailers.
Key Features of Pneumatic Finish Nailers
Important specifications to consider (nail size, depth adjustment, etc.). Benefits of using pneumatic technology in nailers.Pneumatic finish nailers are like superheroes for DIY projects! They come with cool features that make nailing easier. One important point is nail size; these gadgets can usually handle nails from 1” to 2.5”. You can also adjust the depth, so your nails don’t poke out like an unsightly cactus!
Pneumatic technology makes it quicker and more efficient. It helps to shoot nails with less effort, leaving you with more time for the fun stuff, like celebrating your masterpiece. Think of it as the power of a small dragon in your toolbox!
| Feature | Description |
|---|---|
| Nail Size | Accommodates nails from 1” to 2.5” |
| Depth Adjustment | Lets you control how deep nails go |
| Pneumatic Power | Fires nails with air pressure |
With these features, you’ll nail it every time! Who knew home improvement could be this much fun?
Choosing the Right Pneumatic Finish Nailer for Your DIY Projects
Different types and brands available in the market. Factors to consider based on project needs and budget.Many brands offer great pneumatic finish nailers. Popular names include Dewalt, Bostitch, and Hitachi. Each brand has different models for various needs. Here are factors to think about:
- Size: Choose a lighter model if you plan to work for long hours.
- Power: Check if it fits light or heavy tasks.
- Budget: Select a nailer that meets your budget while still ensuring good quality.
Find the right tool for your DIY project. It can make your work easier and more fun.
What should I consider when buying a pneumatic finish nailer?
Consider size, power, and your budget to find the right nailer. It’s important to match the tool to your project needs.
Essential Accessories for Pneumatic Finish Nailers
Recommended air compressors and their specifications. Additional tools and safety equipment to enhance usability.Using a pneumatic finish nailer can be a blast, but you need the right buddies to make the magic happen. First up, you need an air compressor. A model that delivers at least 2.6 CFM at 90 PSI will keep your nailer happy. Aim for a portable one if you’re into DIY adventures! Safety first! Grab some goggles and ear protection to keep yourself injury-free. And don’t forget a proper nail gauge. It’s like having a ticket to the best show in town!
| Air Compressor | CFM at 90 PSI | Recommended Features |
|---|---|---|
| Makita MAC2400 | 4.2 | Portable, Oil-lubricated |
| Bostitch BTFP02012 | 2.6 | Lightweight, Quiet |
How to Use a Pneumatic Finish Nailer Safely
Best practices and safety precautions to follow. Common mistakes to avoid during operation.Using a pneumatic finish nailer can be fun, like a superhero with a superpower! But safety comes first. Always wear safety goggles and ear protection. Keep your hands away from the nozzle. Make sure to check for leaks—nail guns should not have any hisses like a snake!
| Best Practices | Common Mistakes |
|---|---|
| Wear protective gear. | Aim at the wrong angle. |
| Check for proper pressure. | Neglect maintenance. |
| Hold the tool steady. | Use without reading instructions. |
Always follow instructions, or you might nail your foot to the floor—ouch! Remember to disconnect the tool when you’re not using it, just like you’d lock up your favorite toy. Stay safe, and happy nailing!
Maintenance Tips for Pneumatic Finish Nailers
Routine maintenance tasks to ensure longevity and performance. Troubleshooting common issues and solutions.Taking care of your pneumatic finish nailer is like feeding a pet; it needs regular attention! Routine maintenance includes cleaning the tool, checking for air leaks, and keeping all moving parts lubricated. Imagine trying to run a race in squeaky shoes—no fun! If your nailer jams often, check for stuck nails or debris. Keeping it clean can save you a lot of headaches (and maybe a few nails). Here’s a quick peek at common issues:
| Issue | Solution |
|---|---|
| Jams | Clear debris and check for misaligned nails. |
| Low power | Inspect air supply and fittings. |
| Bad air leaks | Tighten connections or replace worn parts. |
Keeping your equipment in top shape means more time nailing and less time troubleshooting. Plus, who wouldn’t want a happy nailer?
DIY Project Ideas Using a Pneumatic Finish Nailer
Creative and practical applications for home improvement. Stepbystep guides for popular projects.Have you ever thought about turning your home into a DIY wonderland? Using a pneumatic finish nailer can make this easy! You can create cozy furniture or beautiful wall art in no time. Imagine building a stunning picture frame or a small bookshelf! These fun projects give your home a fresh look. Follow simple steps, and let your creativity shine. Need ideas? Explore the table below for popular projects:
| Project | Description |
|---|---|
| Picture Frame | Create a custom frame for your favorite art. |
| Bookshelf | Build a small shelf for books or plants. |
| Wall Art | Craft unique pieces to hang on your walls. |
Ready to get started? Grab your tool, and let’s make something amazing together! Remember, every great project starts with a single nail!
Cost Considerations: Is a Pneumatic Finish Nailer Worth It?
Analyzing the cost versus benefits for DIY enthusiasts. Longterm investment value compared to manual tools.Many DIY enthusiasts wonder if a pneumatic finish nailer is a good choice. This tool can save time and effort compared to manual methods. Its speed is a big plus. With one squeeze, you can quickly secure materials. Investing in a pneumatic tool can also lead to better results. Over time, you might find that it pays off.
- Faster project completion
- Improved accuracy
- Less physical effort
- Long-term cost savings
Overall, if you do many projects, a pneumatic finish nailer can be worth the investment.
Is a pneumatic finish nailer cost-effective?
Yes, a pneumatic finish nailer can save money over time by speeding up projects and reducing the need for manual tools. This means less time and effort for your DIY tasks.
Conclusion
In summary, a pneumatic finish nailer is great for DIY projects. It saves time and ensures strong connections. You can quickly complete tasks like furniture building or trim work. Always remember safety first when using this tool. Explore online tutorials or guides to learn more about techniques. Grab your own pneumatic nailer and start creating today!FAQs
Sure! Here Are Five Related Questions On The Topic Of Pneumatic Finish Nailer Equipment For Diy Projects:Sure! A pneumatic finish nailer uses air to shoot tiny nails into wood. It helps you build things easily. You can use it for projects like making furniture or fixing shelves. Just remember to wear safety glasses, so your eyes stay safe. It’s a fun tool that helps your DIY projects look great!
Sure, I can help with that! Please provide the question you’d like me to answer.
What Are The Key Features To Look For When Choosing A Pneumatic Finish Nailer For Diy Tasks?When choosing a pneumatic finish nailer, look for a few key features. First, check the size of the nails it uses; shorter nails are good for small projects. Next, see if it has an adjustable depth for nailing deeper or shallower. A lightweight design is easier to handle and carry. Lastly, make sure it has a safety feature to prevent accidents.
How Do You Properly Maintain A Pneumatic Finish Nailer To Ensure Its Longevity And Performance?To keep your pneumatic finish nailer working well, first, always clean it after using. You can wipe off dust and dirt with a cloth. Next, check the air hose for cracks and make sure it’s connected tight. Add a few drops of oil to the tool regularly. This helps keep it running smoothly!
What Are The Advantages Of Using A Pneumatic Finish Nailer Compared To A Traditional Hammer And Nails For Diy Projects?Using a pneumatic finish nailer is easier and faster than using a hammer and nails. You just pull the trigger, and the nail goes in! This saves your hands from getting tired. It also makes sure the nails go in straight, which looks nicer. Plus, there’s less chance of hurting yourself with a nail gun.
What Types Of Nails Are Compatible With Pneumatic Finish Nailers, And How Do They Differ In Use?Pneumatic finish nailers use special nails called finish nails. These nails are usually smaller and thinner than regular nails. You can choose different lengths, like 1 inch or 2.5 inches, to fit what you’re working on. They help you attach wood pieces smoothly, making sure you don’t see big holes. This is great for making furniture or fixing things!
What Safety Precautions Should Be Taken When Using A Pneumatic Finish Nailer In Diy Projects?When you use a pneumatic finish nailer, always wear safety glasses to protect your eyes. Keep your fingers away from the pointed end to avoid getting hurt. Make sure to check for anything in the way before you shoot a nail. Always point the nailer away from yourself and others. Finally, never try to clear jams with the nailer still plugged in.