Have you ever tried to nail something in a tight corner? It can be tricky, right? That’s where angled nailers come in!
These handy tools help you reach those awkward spaces easily. Imagine finishing a project without any frustration. Sounds great, doesn’t it?
In this guide, we will explore angled nailers for tight corners. You will learn how they work and why they are important. Plus, we’ll share tips and tricks to make your projects easier.
Did you know that the right angled nailer can save you hours of work? Let’s dive into the world of these tools and discover how they can make your life simpler!
Table of Contents
Angled Nailers For Tight Corners Guide: Efficient Solutions

Understanding Angled Nailers for Tight Corners
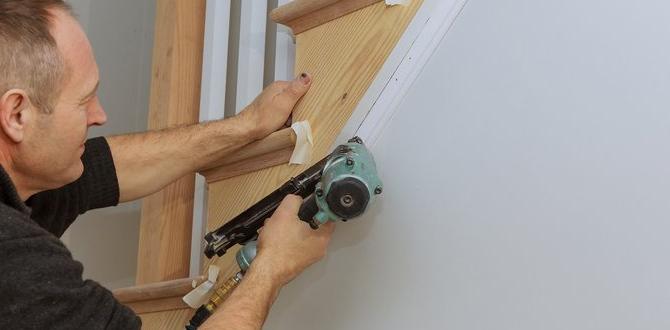
Angled nailers are handy tools for working in tight spaces. Do you struggle to reach corners while nailing? These nailers can help you finish projects faster. They allow you to drive nails at a 45-degree angle, making it easier to get into tricky spots. Did you know that using the right nailer can save you time and effort? Plus, they help create clean and professional-looking finishes. Discover how angled nailers can simplify your next DIY project!
Understanding Angled Nailers
Definition and purpose of angled nailers. Key features that distinguish angled nailers from straight nailers.
Angled nailers are special tools used in construction and woodworking. They help drive nails into tight spots that a regular nailer can’t reach. These tools are perfect for corners, making projects easier.
Key features of angled nailers include:
- Holds nails at an angle for tight spaces.
- Better reach in corners and edges.
- Lightweight and easy to handle.
Unlike straight nailers, angled nailers offer more flexibility and control, making them a favorite for professionals and DIYers alike. Using an angled nailer can save time and effort in your projects!
What are angled nailers used for?
Angled nailers are primarily used for fastening materials in hard-to-reach areas, like corners and edges.
Benefits of Using Angled Nailers for Tight Corners
Improved maneuverability in confined spaces. Enhanced precision and accuracy in nailing.
Using angled nailers in tight corners is like having a magician’s wand. They make tricky spots easier to reach. This improved maneuverability means you can nail with flair, even in cramped areas. Plus, angled nailers offer better precision. No more awkward angles! Each nail goes in just right, making your project look sharp. You’ll impress friends and family, maybe even the dog. And let’s face it, nobody likes crooked nails!
| Benefit | Description |
|---|---|
| Improved Maneuverability | Easier to work in tight spots. |
| Enhanced Precision | Nails go in straight every time! |
Types of Angled Nailers
Pneumatic vs. cordless models. Different gauge options and their applications.
There are two main types of angled nailers: pneumatic and cordless. Pneumatic nailers need a compressor to work, giving you lots of power. However, they come with hoses that can trip you up like a clumsy puppy. On the other hand, cordless models run on batteries, offering more freedom but may run out of juice when you least expect it.
Different nail gauges come with different uses. For lighter tasks, 18-gauge nailers are perfect, like a tiny superhero. For sturdy projects, 16-gauge nailers step up to the plate. Here’s a simple breakdown:
| Gauge | Common Uses |
|---|---|
| 18-gauge | Crafts and trim work |
| 16-gauge | Framing and decks |
Choosing the right type and gauge can make your projects easier and more fun! Remember, less struggle means more time for snacks!
Key Features to Consider
Depth adjustment settings for varied material thickness. Magazine capacity and loading mechanism.
Choosing the right angled nailer means paying attention to some key features. First, think about depth adjustment settings. This feature helps you nail different thicknesses of materials easily. Next, consider the magazine capacity and how it loads nails. A bigger magazine means fewer reloads. Look for a simple loading mechanism to save time. Always aim for quality and ease while nailing tight corners.
What depth adjustment settings should I look for?
Look for tools that allow you to change the depth easily. This helps with different materials and keeps your work neat.
Why is magazine capacity important?
A bigger magazine saves time by holding more nails. This means fewer interruptions during your project.
Top Angled Nailers for Tight Corners in 2023
Review of leading products on the market. Comparison of features, pros, and cons.
In 2023, several angled nailers stand out for reaching those pesky tight corners. First up, we have the DeWalt DWFP55126. It’s lightweight and has a great depth adjustment feature. Next, don’t miss the Hitachi NT65MA4, perfect for precision tasks. The Bostitch BTFP71917 combines power and ease of use, while the Paslode 905600 is known for its fantastic battery life. Here’s a quick comparison:
| Product | Features | Pros | Cons |
|---|---|---|---|
| DeWalt DWFP55126 | Depth adjustment | Lightweight | Can jam easily |
| Hitachi NT65MA4 | Precision nail placement | Excellent for trim work | Hard to find replacement parts |
| Bostitch BTFP71917 | Quick-release feature | Powerful performance | A bit heavy |
| Paslode 905600 | Long battery life | Great mobility | Higher price range |
Choosing the right one can make you the nail-slinging superhero of your home project!
Techniques for Nailing in Tight Corners
Best practices to ensure proper angle and placement. Tips for avoiding common mistakes during nailing.
Nailing in tight corners can be tricky. Here are some tips to help you nail it right:
- Ensure your angled nailer is set to the correct angle.
- Start by placing nails about an inch away from the corner for good stability.
- Keep your hand steady to avoid missing the target.
- Avoid using too much force, which can damage the materials.
Remember, practice makes perfect! Don’t rush, and take your time to get the angles just right.
What are common mistakes while nailing?
Many people drive nails too deep or at the wrong angle. Taking your time to practice will help avoid these errors.
Maintenance and Care for Angled Nailers
Routine maintenance tasks for longevity. Troubleshooting common issues.
To keep your angled nailer working well, do some simple tasks regularly. First, clean the tool after each use. Remove dust and nails to prevent jams. Second, check the air supply. Low air pressure can cause problems. Third, lubricate moving parts as needed. This helps them work smoothly. If you face issues, like nails not firing, check the air connection or clear any blockages.
How can I troubleshoot my angled nailer?
If your angled nailer has problems, try these steps:
- Make sure it is plugged in or the battery is charged.
- Look for any blockages.
- Check if nails are loaded correctly.
- Inspect the air supply and fittings.
With proper care, your nailer can work for many projects.
Safety Tips for Using Angled Nailers
Essential safety gear to use. Important safety practices to follow during operation.
Using angled nailers can be a real game-changer, but safety comes first! Always wear protective goggles to shield your eyes from flying debris. Don’t forget your earplugs too, because nail guns can be as loud as a rock concert! Before firing, double-check that your hands are clear. Misplaced fingers make for a very unhappy day! Also, keep children and pets far away. Safety is cool; it keeps everyone happy!
| Essential Safety Gear | Importance |
|---|---|
| Protective goggles | Protects eyes from debris |
| Earplugs | Reduces noise exposure |
| Gloves | Protects hands from injuries |
Remember to read the manual like it’s a thrilling novel before starting! It’s full of juicy safety tips. Stay safe and nail it right!
Frequently Asked Questions
Common queries about angled nailers. Expert answers and recommendations.
People often wonder about angled nailers and their quirky uses. One big question is, “Can they fit in tight corners?” The answer is a resounding yes! These tools are specially designed to reach those sneaky spots where regular nailers can’t go. Another common query is about nail size. A typical recommendation is to use nails between 1 ¼ inches to 2 ½ inches for stability. Remember, the right nail size is key to avoiding mishaps—and nobody wants their project to look like a jigsaw puzzle!
| Question | Answer |
|---|---|
| Can angled nailers handle thicker materials? | Absolutely! They excel at penetrating tough surfaces. |
| Are angled nailers heavy? | Not really! They’re surprisingly lightweight for such powerful tools. |
Using an angled nailer? You’re in for a treat! These tools not only save time but also keep your fingers safe. Just remember to practice safety first, so you don’t end up with a nail in your shoe instead of your project!
Conclusion
In summary, angled nailers are perfect for tight corners because they are easy to maneuver. They help you finish projects neatly and quickly. Remember to choose the right nail size and angle for the best results. We encourage you to practice using your angled nailer and explore more guides to improve your skills. Happy nailing!
FAQs
Sure! Here Are Five Related Questions On The Topic Of Angled Nailers For Tight Corners:
Angled nailers help us place nails in tight corners easily. They have a special shape that makes it simple to work in small spaces. You hold the nailer and pull the trigger to drive in the nail. These tools are great for building furniture or fixing things at home. Remember to wear safety gear when using them!
Sure! Please provide the question you want me to answer, and I’ll help you with a clear and simple response.
What Are The Advantages Of Using An Angled Nailer Compared To A Straight Nailer For Tight Corners?
Using an angled nailer helps you reach tight corners better than a straight nailer. The angle lets you drive nails in places that are hard to reach. This means you can finish your projects faster and make them look nicer. Plus, it’s easier on your hands because you don’t have to squeeze as hard!
How Do I Choose The Right Size And Type Of Nails For My Angled Nailer When Working In Confined Spaces?
To choose the right nails for your angled nailer, first look at the nail size. Smaller nails are better for tight spaces. You should use nails that are made for your specific nailer, usually called “stick nails.” Check the tool’s guide to find out what size works best. Always pick nails that are the right type for the job, like for wood or finishing.
What Features Should I Look For In An Angled Nailer To Ensure It Performs Well In Tight Corners?
When choosing an angled nailer for tight corners, look for a lighter weight. This makes it easier to handle. A shorter nose helps you fit into small spaces better. You should also choose a model that has good power for driving nails deep. Finally, a quick-release magazine makes it easier to load nails quickly.
Are There Specific Techniques Or Tips For Effectively Using An Angled Nailer In Corners And Hard-To-Reach Areas?
Yes, there are some good tips for using an angled nailer in tight spots. First, hold the nailer at the right angle so it reaches into corners easily. You can also move things around to make space if needed. Be careful and steady when you pull the trigger. Lastly, practice on scrap wood if you can, so you feel comfortable before you start!
What Safety Precautions Should I Take When Using An Angled Nailer In Tight Spaces To Avoid Accidents?
When using an angled nailer in tight spaces, always wear safety glasses to protect your eyes. Keep your fingers away from the tip of the nailer so you don’t get hurt. Make sure the tool is pointed away from you and others when you use it. Keep your workspace clean and free of clutter to avoid tripping. Lastly, check that the nailer is in good condition before you start.