Have you ever dreamed of having your own shed? Imagine a cozy space for all your tools or a spot to work on fun projects. Building a lean to shed can make that dream come true. It’s a simple, yet satisfying project. You may wonder, how do I even start? That’s the great news! This article will show you how to make a lean to shed step by step.
Did you know that a lean to shed can fit nicely against your house? This design saves space while offering plenty of storage. Plus, it’s easy to build! You don’t need to be a master carpenter. With some basic tools and a bit of time, you can create something special.
What if you could organize your yard or garage? Anyone can create a useful, beautiful shed. This guide will transform your ideas into reality. Let’s dive in and explore how to make a lean to shed!
Table of Contents
How To Make A Lean To Shed: A Step-By-Step Guide

How to Make a Lean to Shed: A Step-by-Step Guide
Building a lean-to shed can be a fun project for any DIY enthusiast. First, gather materials like wood, nails, and a saw. Then, choose a flat spot in your yard. Did you know a lean-to shed needs just three walls? This design makes it easier to build and saves space! Follow steps to create a solid foundation and structure. Soon, you’ll have a handy storage space that blends with your yard. Enjoy your new shed!Understanding Lean to Sheds
Definition and characteristics of lean to sheds. Advantages of lean to sheds over other shed designs.Lean-to sheds are simple structures with one sloped roof that leans against a wall. They are known for their efficient design and easy construction. Unlike other sheds, they use less wood and can fit snugly against a building. This saves space! One of the biggest perks is that they are often cheaper to build. They also look charming, like a cozy little nook in your yard. Who wouldn’t want their own mini hideout?
| Characteristic | Lean-to Shed | Traditional Shed |
|---|---|---|
| Roof Type | Single sloped | Two slopes |
| Building Cost | Lower | Higher |
| Space Efficiency | Great | Good |
Planning Your Lean to Shed
Choosing the right location and size for your shed. Taking measurements and creating a blueprint.Finding the right spot for your shed is key. Look for a flat area that is dry and well-drained. Make sure it’s not too close to trees, as they can cause shade and falling leaves. Consider how big you want your shed. This helps you decide how much space you need.
Next, measure the area. Use a tape measure to find the length and width. Drawing a simple blueprint can help you see the layout better. Plan ahead to avoid mistakes later on!
How do I choose the right size for my shed?
Choose the size based on what you will store and the space available. Think about tools, bikes, or other items.Tips to consider:
- Think about the items you’ll keep.
- Leave extra space for walking around.
- Check local rules for building size limits.
Gathering Materials and Tools
List of essential materials required for construction. Recommended tools for building a lean to shed.Before you start building, gather the right materials and tools. Here’s what you need for your lean-to shed:
- Materials:
- Wood for the frame
- Roofing material
- Screws and nails
- Paint or wood sealant
- Tools:
- Hammer
- Saw
- Drill
- Tape measure
- Level
Make sure you have everything ready. This will help your project go smoothly!
What are the essential materials needed for a lean-to shed?
You will need wood, roofing material, screws, and paint to build a sturdy shed.
What tools should I have for building a lean-to shed?
Have a hammer, saw, drill, tape measure, and level handy to make building easier.
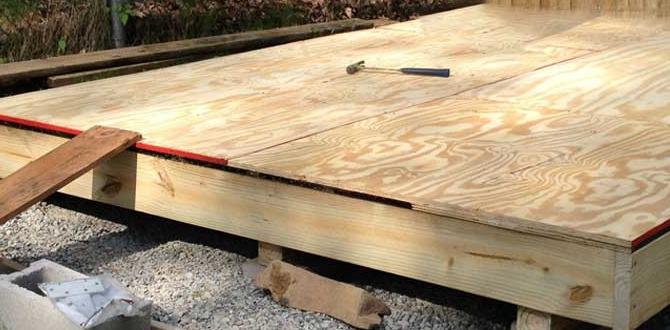
Preparing the Site
Clearing the area and leveling the ground. Setting up a solid foundation (options like concrete blocks or wood beams).Start by clearing the area where you want your shed. Make sure it’s free of rocks, sticks, and those pesky dandelions that seem to pop up everywhere! Next, it’s time to level the ground. You want it to be as flat as a pancake, or maybe even flatter. Having a solid foundation is key. You can use concrete blocks or wood beams. Concrete blocks are like the superheroes of foundations. They’re strong! Wood beams? They’re like any sturdy friend—helpful and reliable!
| Foundation Option | Pros | Cons |
|---|---|---|
| Concrete Blocks | Very strong, weather-resistant | Can be heavy, requires precise placement |
| Wood Beams | Easy to work with, lightweight | May rot over time if not treated |
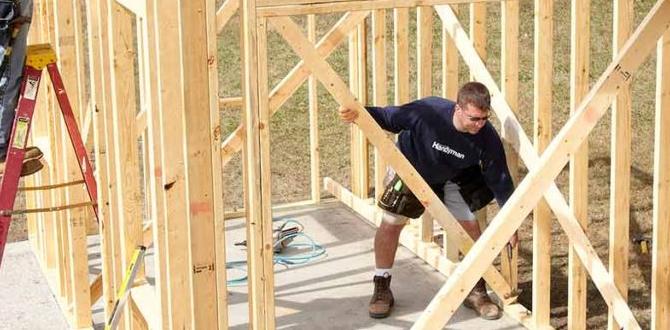
Constructing the Frame
Stepbystep process for building the wall frames. Tips for ensuring structural stability during assembly.First, gather your materials and tools. Use sturdy wood for the wall frames. Start by cutting your wood to the right sizes. Create two vertical pieces for each wall and connect them with horizontal ones. Make your frame look like a rectangle—no one wants a wobbly shed!
When assembling, check the corners for 90-degree angles. A little tip: use a square for this! Stability is key. You can add diagonal bracing for extra strength. Remember, it’s not a competition—no need to rush. Slow and steady will win the structural race!
| Step | Action |
|---|---|
| 1 | Gather materials |
| 2 | Cut wood pieces |
| 3 | Create vertical and horizontal frames |
| 4 | Check angles |
| 5 | Add diagonal braces |
Building frames may seem tricky, but with care and these tips, your shed will be rock solid! And hey, no one wants their shed to dance in the wind, right?
Adding the Roof
Options for roofing materials (metal, shingles, etc.). Instructions on how to correctly install the roof.Choosing the right roofing material is important. You can pick from metal, shingles, or polycarbonate. Each has its benefits. For example, metal lasts a long time. Here’s how to install the roof properly:
- Make sure the roof frame is strong.
- Lay down underlayment for extra protection.
- Attach the roofing material carefully, ensuring no gaps.
- Seal around edges to prevent leaks.
Always wear safety gear while working! Happy building!
What are the best roofing materials for a shed?
The best roofing materials for a shed are metal, shingles, and polycarbonate. Each protects well and suits different styles.
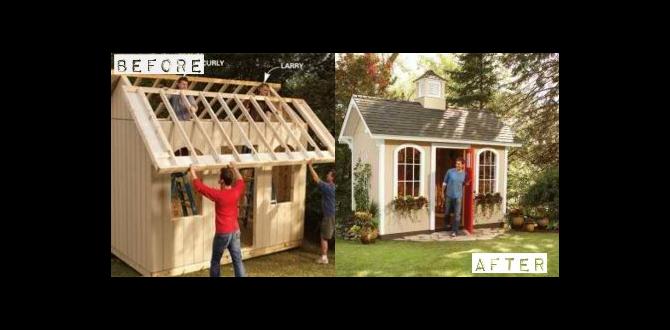
Finishing Touches
Painting or staining the exterior for durability. Installing doors and windows for increased functionality.To give your shed a final flair, think about painting or staining it. This will not only make it look snazzy but also add protection from the weather. Colors can make your shed pop, like a cupcake with sprinkles!
Next up, install doors and windows. They’re like the eyes and smiles of your shed. Doors provide easy access, while windows bring in light. Plus, who wouldn’t want their shed to be a little more lively?
| Task | Benefit |
|---|---|
| Painting/Staining | Durability and Appeal |
| Installing Doors | Functionality |
| Adding Windows | Natural Light |
So, let’s get crafty and make that lean-to shed shine! After all, it deserves some pampering too!
Maintaining Your Lean to Shed
Best practices for regular maintenance and upkeep. Tips for prolonging the lifespan of your shed.Keeping your shed in tip-top shape is key to its longevity. Regularly check for cracks or leaks; think of them as little parties for water and pests — and you don’t want to invite them! Use a broom to sweep away dust and cobwebs. Also, a splash of paint every few years can be like sunscreen for your shed. It protects against the harsh sun and keeps it looking snazzy.
| Maintenance Tip | Frequency | Why It Matters |
|---|---|---|
| Inspect for Damage | Monthly | Find problems early! |
| Clean Floors | Every 2 months | No more spooky dust bunnies! |
| Paint Touch-Ups | Every 3 years | Keep it fresh and protected! |
Follow these best practices to ensure your lean-to shed stays strong and stylish. Remember, a happy shed leads to happy tools!
Conclusion
In summary, building a lean-to shed is easy with the right steps. Start by planning your design, gathering materials, and following a clear guide. You can create extra storage space in no time. Don’t forget to check local rules and safety tips. Now, grab your tools and start your project! For more ideas, keep reading about DIY sheds.FAQs
What Materials Are Needed To Build A Lean-To Shed From Scratch?To build a lean-to shed, you need some basic materials. First, get wood for the frame and walls. You will also need roof panels or shingles to keep it dry. Don’t forget nails, screws, and a hammer to put it all together. Finally, you may want paint or stain to make it look nice.
How Do You Determine The Right Location And Site Preparation For A Lean-To Shed?To find the best spot for your lean-to shed, choose a flat area that drains well. Avoid places where water pools after rain. Clear away any plants, rocks, or dirt. Make sure it’s close enough to your home for easy access. This way, your shed will be useful and last a long time!
What Are The Key Steps In Constructing The Frame Of A Lean-To Shed?To build the frame of a lean-to shed, start by choosing a flat spot for the shed. Next, measure and mark where the walls will go. Then, make the bottom part of the frame using strong wood. After that, add vertical posts to hold up the walls. Finally, connect the top part of the frame to complete the basic structure.
How Do You Install The Roofing And Ensure It Is Waterproof For A Lean-To Shed?To install the roofing on your lean-to shed, first, measure the roof area and get the right materials. Next, place the roofing panels on the rafters, starting from the bottom and working your way up. Use nails or screws to secure the roofing tightly. To make it waterproof, add flashing around the edges and seams. Finally, check for any gaps and seal them with roofing tape or sealant.
What Are Some Tips For Organizing And Maximizing Storage Space Within A Lean-To Shed?To organize your lean-to shed, start by clearing everything out. Group similar items together, like tools or sports gear. Use shelves to keep things off the floor and make them easy to see. Hanging hooks or pegboards work well for tools and bikes. Lastly, label boxes so you can find things quickly!