Have you ever dreamed of building something with your own hands? Imagine having a sturdy wood shed in your backyard. It sounds exciting, right? A wood shed can be a great spot to store tools, garden supplies, and more. Plus, it’s a fun project that you can tackle yourself.
But where do you start? Building a wood shed can seem tricky at first. With the right guidance, it becomes easy and enjoyable. In this step-by-step guide, we will show you how to build a wood shed from scratch. You don’t need to be a master builder to create something strong and lasting.
Did you know that a well-constructed shed can even increase your property value? It’s true! A wood shed is not just practical; it’s a valuable addition to your home. So, are you ready to roll up your sleeves and get started? Let’s dive into the process together!
Table of Contents
How To Build A Wood Shed: Step-By-Step Guide To Construct A Sturdy Wood Shed Building A Wood Shed Can Be A Rewarding Project That Not Only Provides You With Extra Storage Space But Also Enhances The Aesthetic Of Your Yard. In This Step-By-Step Guide, We Will Walk You Through The Process Of Constructing A Sturdy Wood Shed, From Planning And Gathering Materials To Completion And Maintenance. Whether You Are Looking For A Small Tool Shed Or A Larger Storage Space, This Guide Is Designed To Help You Create A Functional And Long-Lasting Structure. Let’S Get Started! 1. Planning Your Wood Shed Before You Start Building, It Is Crucial To Plan The Size And Design Of Your Shed. Consider The Following: – **Purpose:** What Will You Store In Your Shed? Tools, Gardening Supplies, Or Larger Equipment? – **Size:** Measure The Space Available In Your Yard, And Decide On The Dimensions Of The Shed Accordingly. – **Style:** Choose A Design That Complements Your Home And Landscape. 2. Gathering Materials And Tools Once You Have A Plan In Place, Gather The Necessary Materials And Tools. You Will Typically Need: – **Wood:** Pressure-Treated Lumber For The Base And Walls, Plywood For The Roof And Walls, And Trim For Aesthetic Finishes. – **Hardware:** Nails, Screws, Hinges, And A Lock For The Door. – **Tools:** A Saw, Hammer, Drill, Level, Measuring Tape, And A Square. 3. Preparing The Foundation A Stable Foundation Is Essential For A Sturdy Wood Shed. Here Are Some Common Options: – **Concrete Slab:** Provides A Solid Base And Is Durable. – **Wooden Skids:** Elevate The Shed Off The Ground, Preventing Rot. Make Sure The Foundation Is Level And Square. 4. Building The Frame Start By Constructing The Frame Of The Shed. Use The Pressure-Treated Lumber To Create The Base, Walls, And Roof Supports: – **Base:** Construct A Rectangle To The Dimensions Of Your Shed. – **Walls:** Erect Vertical Studs At Intervals, Securing Them With Nails. – **Roof:** Add Overhead Supports And Ensure Proper Slope For Water Runoff. 5. Installing Walls And Roof Once The Frame Is Ready, It’S Time To Attach The Walls And Cover The Roof: – **Plywood:** Cut And Attach Plywood To The Exterior Walls And Roof Supports. – **Roofing Material:** Choose From Options Like Shingles, Metal, Or Lightweight Roofing Panels Based On Your Budget And Preference. 6. Finishing Touches Now That The Structure Is Complete, Focus On The Aesthetics And Functionality: – **Door:** Build Or Install A Sturdy Door, Ensuring It Swings Open Easily. – **Windows:** Consider Adding Windows For Natural Light. – **Paint/Stain:** Apply A Protective Coat To The Wood To Withstand The Elements. 7. Maintenance Tips To Ensure The Longevity Of Your Wood Shed: – **Regular Inspections:** Check For Any Signs Of Wear Or Structural Damage. – **Repaint/Stain:** Refresh The Protective Coating Every Few Years. – **Pest Control:** Watch For Signs Of Pests And Take Preventive Measures. Conclusion Building A Wood Shed Is An Achievable Diy Project With The Right Planning, Materials, And Tools. Following These Steps Will Help You Construct A Sturdy And Functional Structure That Meets Your Needs For Years To Come. Make Your Backyard Organized And Efficient With This Practical Addition! Good Luck With Your Woodworking Adventure!

How to Build a Wood Shed: Step-by-Step Guide to Construct a Sturdy Wood Shed
Building a wood shed can be a fun and rewarding project. Start by choosing the right location and materials. You’ll need wood, nails, and tools like a saw and hammer. Planning saves time, so sketch your design first. Did you know a well-built shed can increase your property value? Step-by-step, gather support beams and frame the walls. Then, put on the roof and finish with paint. Enjoy your new storage space!Planning Your Wood Shed
Choosing the right location for your shed. Determining the size and specifications.Choosing a spot for your wood shed is like picking the perfect place for a picnic. You want it flat, dry, and sunny (but not too sunny!). Look for a space with good drainage to keep everything nice and dry. Next, think about the size! Will it hold your tools, or maybe some secret garden gnomes? Measure the area carefully to avoid an awkward tight squeeze later. Here’s a helpful table to guide you:
| Size Considerations | Purpose |
|---|---|
| 6×8 ft | Tools and supplies |
| 8×10 ft | Extra storage for lawn equipment |
| 10×12 ft | Workshop area |
With the right spot and size in mind, you’re on your way to shed success! Happy building!
Designing Your Shed
Popular wood shed designs and styles. Tips for designing a functional layout.Many choose popular styles for their wood sheds. Some like a classic A-frame shape. Others prefer a modern flat roof. Think about what looks good in your yard. A well-designed shed makes a difference. Consider these tips for a smart layout:
- **Plan for space:** Make sure you have room for tools.
- **Think about access:** Place doors where you can easily reach inside.
- **Add windows:** They let in light and help with ventilation.
Remember, your shed should be useful and fit your style!
What are popular wood shed designs?
A-frame and flat-roof styles are common choices. Many people like the traditional look of an A-frame. Flat roofs are neat and easy to build.
Foundation Preparation
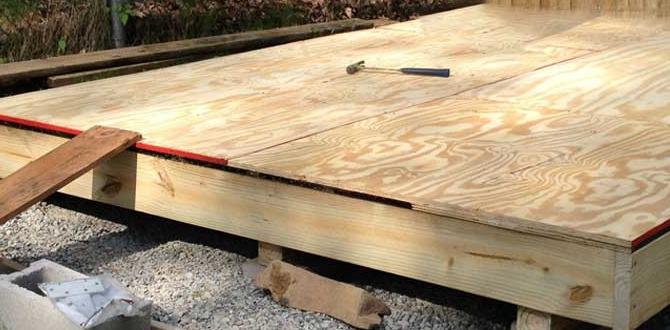
Importance of a solid foundation. Stepbystep instructions for laying a foundation.A solid foundation is like a superhero cape for your wood shed. Without it, your shed might just flop like a pancake! First, pick a flat area and clear away grass and debris. Next, mark the shed’s outline with stakes and string. Excited yet? Now dig about 6 inches deep. This is where the magic happens! Fill the hole with gravel for drainage. You want your shed dry, not swimming. Finish by leveling it with a tamper. Voilà! You have a strong base! Now, let’s shake our rubber boots and build that woodshed!
| Step | Action |
|---|---|
| 1 | Choose a flat area |
| 2 | Mark the outline |
| 3 | Dig 6 inches deep |
| 4 | Add gravel |
| 5 | Level the foundation |
Building the Frame
Constructing the base frame. Adding vertical supports and framing walls.Start by building a strong base frame. Use sturdy wood planks. Make sure it’s level. This will hold your shed up for years. Next, add vertical supports at each corner. These give strength and stability. Then, frame the walls between the supports. Choose two-by-four boards for the framing. This makes the structure tough and reliable. Your wood shed will be safe and secure!
How do you build a strong frame for a wood shed?
To build a strong frame for a wood shed, use sturdy materials like pressure-treated wood. Also, ensure all corners are square and use proper fasteners for better strength.
Roof Construction
Choosing the right roofing style. Stepbystep process for installing the roof.Picking the right roof style matters for your wood shed. Common choices are gable, flat, and shed roofs. Each has its own look and function. To install the roof, follow these steps:
- Measure the shed for the right size.
- Cut roofing materials to fit.
- Secure the roof frame using strong nails or screws.
- Add your roofing layer, like shingles or metal sheets.
- Seal any gaps to keep water out.
With these steps, your roof will be sturdy and protect your shed.
What is the best roofing material for a wood shed?
The best roofing material depends on your needs. Metal roofs are durable and last long. Asphalt shingles are cheaper but may not last as long. Choose what works best for you and your budget!
Wall and Door Installation
Installing wall panels securely. Tips for crafting and installing doors.Time to raise the walls and hang the door! First, lay out your wall panels like a puzzle. Make sure to install them securely using nails or screws, so they don’t wobble like a jelly on a plate. Now, for the door, measure twice but cut once! Cut the wood to size, then add hinges. Don’t forget to make sure it swings like a pro. You want it to open smoothly—like magic, not like a stubborn mule!
| Tip | Description |
|---|---|
| Secure Walls | Use screws for strength. |
| Measuring | Check your dimensions twice! |
| Door Hinges | Install for smooth opening. |
Finishing Touches
Painting and sealing your wood shed. Adding shelving and storage solutions.Your wood shed is almost complete! Now, it’s time for some finishing touches. Start by painting and sealing your shed. This protects it from rain and sun. Choose a nice color to make it look great! Next, consider adding shelves and storage solutions. These help you keep tools and supplies organized. Here are some ideas:
- Add shelves for easy access to tools.
- Use hooks for hanging items like bikes or garden tools.
- Add bins for small items like nails and screws.
These steps will make your shed not only strong but also very useful!
How can I protect my wood shed?
To protect your wood shed, use good paint and sealant. This keeps moisture away and prevents rot. Regular maintenance will keep it looking great for years!
Maintenance Tips for Longevity
Regular upkeep and inspection. Best practices for weatherproofing and protection.Keeping your wood shed in great shape requires a bit of love. Regular upkeep is key. Check for loose screws or pesky termites about once a month—nobody wants squatters in their shed! For weatherproofing, use a high-quality sealant every year. It’s like sunscreen for wood—who wants a sunburn? Cover your shed with a tarp during heavy storms. Here’s a handy table with quick tips:
| Task | Frequency |
|---|---|
| Inspect for damage | Monthly |
| Apply sealant | Annually |
| Clear debris | Seasonally |
Following these steps will help your shed last longer. Remember, a happy shed means a happy owner!
Conclusion
In conclusion, building a sturdy wood shed is rewarding and fun. Start by planning your design and gathering materials. Follow each step carefully, from laying the foundation to adding the roof. Remember to check for safety, too! Now that you have the basics, it’s time to get building. For more tips, keep reading or ask a friend for help!FAQs
What Materials And Tools Are Necessary For Constructing A Wood Shed?To build a wood shed, you need some basic materials like wood boards, nails, and a roof covering. You will also need a door, windows, and paint if you want to decorate it. For tools, gather a hammer, a saw, a screwdriver, and a measuring tape. A level will help make sure everything is straight. Don’t forget safety glasses to protect your eyes while you work!
How Do I Determine The Ideal Size And Design For My Wood Shed?To find the right size for your wood shed, think about how much wood you will store. Measure that amount using a tape measure. Next, check the space in your yard. You want to make sure the shed fits and leaves room for walking. For design, choose a style you like that matches your home. You can even draw a picture to help you decide!
What Are The Essential Steps For Preparing The Foundation Of A Wood Shed?To prepare the foundation for your wood shed, start by choosing a flat, dry area. Next, you should measure and mark the size of the shed with stakes and string. Then, dig out the grass and dirt to make a level space. After that, add gravel or concrete blocks for support. Finally, make sure it’s all even and ready for your shed!
How Can I Ensure That My Wood Shed Is Properly Ventilated And Insulated?To keep your wood shed ventilated, make sure to add vents near the top and bottom. This helps fresh air flow through. For insulation, use materials like foam or fiberglass to keep it warm. Make sure to seal any gaps so air doesn’t escape. Check your shed often to make sure it’s working well!
What Finishing Touches Can I Add To Make My Wood Shed More Functional And Visually Appealing?You can make your wood shed look nice and work better! First, add hooks on the walls for tools. You could paint it a bright color to make it fun. Putting in some shelves can help keep things organized. You can also plant flowers around the shed to make it pretty.


