Imagine Dad with his toolbox, ready to fix things around the house. He chuckles, grabbing those shiny little brads called finish nails. These are his secret helpers to make baseboards look perfect. Do you wonder why they’re so special? That’s because finish nails hold everything tight without showing! They sneak into wood, leaving spotless walls and floors.
It’s like when magic hides in plain sight. Finish nails do their job without being seen. Mom doesn’t even notice they’ve changed anything, but somehow, everything looks complete. Have you ever wondered why baseboards stay smooth and neat? These little guys are the reason!
Now, close your eyes and picture this: a world where baseboards hang loosely, looking sad. But with finish nails, they stay right where they should. Can you see the difference? Knowing these nails’ magic makes you a home repair wizard, just like Dad.
Table of Contents
Choosing The Right Finish Nails For Baseboards

Finish Nails for Baseboard
Finish nails are small but mighty when it comes to securing baseboards. They have a small head, making them perfect for a neat finish. Imagine trying to hang a picture with a giant nail—it’s messy, right? Finish nails solve that problem. They’re usually 1 to 2.5 inches long, just right for holding trim in place without a fuss. Did you know builders prefer these nails for their clean look? Next time you see tidy baseboards, thank these clever little nails!
Selecting the Right Size and Gauge
Explanation of size and gauge importance. Recommended sizes and gauges for baseboard installation.
Choosing the right size and gauge for nails is key. Nails that are too big can split wood. Tiny nails might not hold well. The gauge, which is the nail’s thickness, matters. For baseboards, 16-gauge and 18-gauge nails are best.
- 16-gauge: Good for thicker baseboards.
- 18-gauge: Ideal for thinner baseboards.
When installing baseboards, measure how thick they are to select the perfect nail. This way, your baseboards will stay sturdy and neat.
What happens if you use the wrong nail size?
If you use the wrong nail size, your baseboards may fall or crack. Nails that are too long can damage walls. Short nails won’t secure the board well. Always check size and gauge before you start the job. This makes your work look good and last longer.
Materials and Finish Nail Compatibility
Matching nail types to baseboard materials. Considerations for different wood types and synthetic materials.
Choosing the right finish nails for a baseboard is like picking a magic wand for your walls. The nails should match the baseboard material for a perfect fit. Softwoods like pine are best friends with smaller nails, while sturdy hardwoods demand stronger ones. Synthetic materials, like MDF, have special requests. They prefer thin, delicate nails to avoid splitting. Remember, nails that keep baseboards in place prevent “wall-melodrama.” So, match wisely!
| Material Type | Recommended Nail |
|---|---|
| Softwood (Pine, Cedar) | 1.5-inch nails |
| Hardwood (Oak, Maple) | 2-inch nails |
| Synthetic (MDF, PVC) | Thin gauge |
Using the right nails helps avoid that awkward “uh-oh, my baseboard is loose!” moment. Well-installed baseboards can save time for soccer practice instead of home repairs. Keep it simple, and your walls will thank you!
Tools Required for Installation
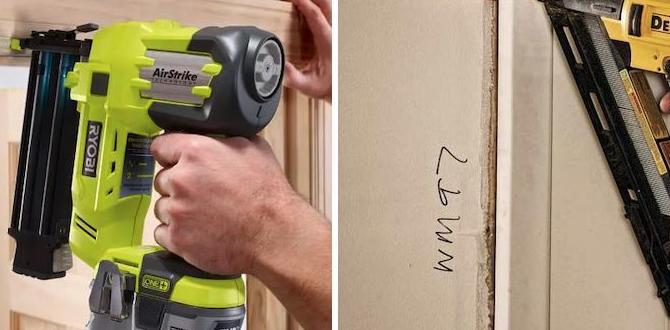
Essential tools for installing finish nails. Pros and cons of using nail guns versus hammering.
When installing finish nails, you need specific tools to make the process smooth and quick. A nail gun can be your best friend. It’s fast, saves time, and doesn’t leave your arm feeling like you’ve wrestled a bear! However, if you’re old-school, a trusty hammer is always ready for action. While using a hammer gives you control, it may take more time and effort. Nail guns might seem magical, yet they can be pricier and noisy. Below is a simple guide to the tools you might need:
| Tool | Pros | Cons |
|---|---|---|
| Nail Gun | Fast, Efficient | Expensive, Loud |
| Hammer | Control, Traditional | Slow, Requires Effort |
Remember, even if you’re clumsy with a hammer, practice makes perfect! As the old saying goes, “The nail that sticks out gets hammered down!”
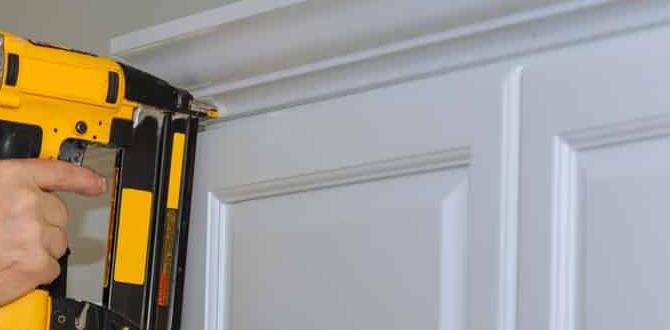
Step-by-Step Baseboard Installation
Preparing the workspace and measuring baseboards. Detailed guide on nailing techniques for a clean finish.
First, clear the workspace to prepare for a neat baseboard installation. Find and measure each wall where you plan to place the baseboards. Mark each measurement, being precise. Next, position the baseboard. Use a sturdy hammer or nail gun. Carefully place finish nails along the top and bottom edges. This ensures a snug fit without gaps.
How do you measure baseboards accurately?
Use a measuring tape and write down each length. Measure from corner to corner. Check each measurement twice. This prevents mistakes. A small error can leave gaps.
Why are finish nails ideal for baseboards?
Finish nails are thin and leave small holes. This makes them perfect for a clean look. The holes hide easily with paint or filler.
For a smooth final touch, ensure each nail head is slightly below the surface. Use wood filler to cover them. Sand the area for a smooth finish, then paint. This gives a polished and professional appearance.
Common Mistakes and How to Avoid Them
Troubleshooting common installation errors. Tips for achieving a professional look.
While installing baseboards, some mistakes can lead to a messy look. Avoid using the wrong nail size. Small nails might not hold well, and big nails can split the wood. What should you do? Use a nail gun for a smooth finish. Keep nails evenly spaced and align baseboards with the wall. Check for any gaps and fill them with putty. Finally, sand and paint for a neat look.
What size finish nails should you use for baseboards?
The best size for finish nails in baseboards is 1.5 to 2 inches. This size helps secure the board without damaging it.
How can you avoid splitting the wood during installation?
To prevent splitting, pre-drill nail holes slightly smaller than the nails. This way, the wood expands around the nail instead of cracking.
Why is it important to fill gaps?
Filling gaps with putty ensures the baseboard looks seamless and professional. It hides imperfections and results in a clean finish.
- Tip 1: Use painter’s tape to protect walls when painting.
- Tip 2: Sand the putty evenly for a smooth surface.
Maintenance and Repairs
Strategies for maintaining baseboards with finish nails. How to address nail pops and other common issues.
Keeping your baseboards in good shape can be simple. Use finish nails to secure them tightly. A common problem is nail pops. To fix them, simply tap the nail back in and cover with paint. Check your baseboards for any scratches or **damages** once a year. If you find any, you should fix them. Keep them clean by dusting and wiping them regularly. This helps to keep them looking nice and neat.
How can I prevent nail pops in baseboards?
To prevent nail pops, use the right-sized nails. The correct size holds the board tight. Make sure to hammer nails in straight. This makes them stay put longer. You can also use glue to add extra hold. Doing these things can stop the problem before it starts.
Are there any quick fixes for scuffed baseboards?
Yes, you can fix them fast. Scuff marks can be removed using a damp cloth. Gently rub the spot with the cloth. For deeper scratches, use wood filler to fill in the marks. After that, paint over it to match the baseboard. These simple tricks can make your baseboards look new quickly.
Frequently Asked Questions
Answers to common questions about using finish nails for baseboards. Advice on purchasing and sourcing quality finish nails.
Curious about those tiny, mighty nails for your baseboards? Finish nails are here to save the day. Let’s tackle the big question: how many do you need? For every foot of baseboard, two to three finish nails do the trick. But wait, are they easy to find? Yes! Head to your local hardware store, or click away online. Tips on quality? Keep an eye for steel nails—they’re strong and reliable. Need advice on their size? Finish nails often come in gauges like 15 or 16. Want to have some fun? Picture them as the superheroes of the nail world, ensuring no baseboard runs away!
| Question | Answer |
|---|---|
| How many nails per foot? | 2 to 3 nails |
| Best place to buy? | Hardware stores or online |
| Best gauge? | 15 or 16 |
Conclusion
Finish nails are great for attaching baseboards. They’re thin, strong, and leave small holes. Using them is easy with a hammer or nail gun. Remember to choose the right size. Now, try fixing a baseboard yourself or learn more online for more tips.
FAQs
What Size Finish Nails Are Recommended For Installing Baseboards?
When you put up baseboards, use finish nails that are about 2 inches long. These nails are just the right size to hold the boards in place. They make sure everything stays neat and tight to the wall. You can use a hammer or a nail gun to put them in.
Can I Use A Finish Nailer For Attaching Baseboards, And Which Type Is Best?
Yes, you can use a finish nailer to attach baseboards. A finish nailer is a tool that helps you put nails into wood quickly and easily. The 16-gauge finish nailer is the best choice for baseboards because it’s strong and leaves small holes. Just remember to wear safety goggles, so you protect your eyes.
What Is The Proper Method For Spacing Finish Nails When Nailing Baseboards?
When you nail baseboards, space the nails about every 16 to 24 inches apart. Make sure you put nails near the corners too. This keeps the baseboard snug against the wall. Be careful not to use too many nails, or it might look messy.
How Do I Choose Between Galvanized And Non-Galvanized Finish Nails For My Baseboard Project?
To pick the right nails, think about where the baseboards are. Choose galvanized nails for damp places; they don’t rust. Use non-galvanized nails inside where it’s dry. This helps keep your baseboard strong and nice-looking.
What Are The Common Mistakes To Avoid When Using Finish Nails For Baseboard Installation?
When using finish nails for baseboard installation, don’t use nails that are too long. They might stick out the other side. Make sure not to place nails too close to the ends of the boards. That can cause the wood to split. Always aim the nail straight to keep the board flat on the wall.