Have you ever wondered what makes a crown installation perfect? The secret often lies in the nails used during the process. Choosing the best nails for a crown install can truly change the game.
Imagine standing back and admiring your work, knowing every detail, including the nails, is just right. Did you know that using the wrong nails can lead to fixing problems later? That’s frustrating!
In this article, we’ll explore the top choices for nails when installing crowns. You’ll find tips that can make your project smoother. Let’s dive into the best nails to use and discover how they can help you achieve that flawless finish you dream about.
Table of Contents
The Best Nails For Crown Install: A Comprehensive Guide
Choosing the right nails for a crown install is crucial for a strong hold. Use finish nails, preferably 1.5 to 2.5 inches long, for the best results. They won’t damage the wood and provide a clean finish. Did you know that using the wrong nails can lead to gaps? This leads to extra work later. Always consider the material of the crown and the wall for proper fitting. Seeking the best nails makes your project easier and more durable!
Understanding Crown Molding and Its Installation
Definition and purpose of crown molding. Importance of proper installation techniques.
Crown molding is a decorative trim placed where the walls meet the ceiling. Its job? To jazz up a room and add elegance. It’s like the cherry on top of your home’s sundae! But watch out—installing crown molding needs special care. If done wrong, it can look sloppy. Using the best nails for crown install ensures a snug fit and a polished look.
| Type of Nail | Best Use |
|---|---|
| Finish Nails | For sleek, hidden installation |
| Brad Nails | Great for lightweight molding |
| Trim Screws | For added strength and stability |
Proper installation techniques are key. They can turn a standard job into a showstopper. Remember, the right tools and nails can save you from a moldy mess—no one wants that!
Factors to Consider When Choosing Nails for Crown Install
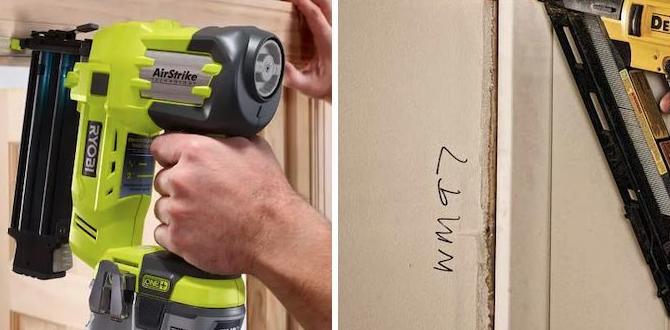
Material considerations: steel vs. stainless steel vs. coated nails. Length and gauge suitability for various crown molding styles.
Choosing the right nails for crown installation can be tricky, but it’s important! First, think about material. Steel nails are strong but can rust. Stainless steel nails are tough and won’t corrode. Coated nails are also good since they’re designed to resist rust and look neat. Next, think about length and gauge. Short, thick nails work best for heavy crown molding, while thinner, longer ones suit lighter styles. Remember, using the right nails will make your crown look like a million bucks!
| Material | Description |
|---|---|
| Steel | Strong but might rust. |
| Stainless Steel | Tough and rust-proof. |
| Coated | Great rust resistance and neat. |
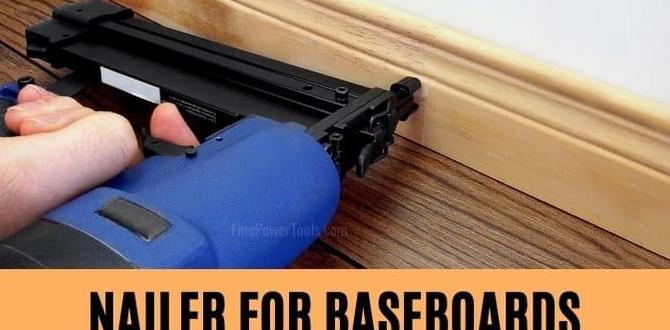
Tools Required for Crown Nail Installation
Essential tools needed for a proper installation. Recommendations on nail guns and manual tools.
To install crown molding like a pro, you need the right tools. First, a nail gun can speed things up and save your fingers from hammering. If you prefer the old-school style, a manual hammer works too, but be prepared for a workout! Don’t forget a good level to ensure things are straight—no one likes a wonky crown. Here’s a quick table of essentials:
| Tool | Purpose |
|---|---|
| Nail Gun | Fast and easy installation |
| Hammer | Manual option for nailing |
| Level | Check for straightness |
With these tools, you’ll crown your project in no time! And remember, measure twice, nail once! Your walls will thank you.
Step-by-Step Guide to Crown Molding Installation
Preinstallation preparations: measuring and cutting. Detailed installation process including nail placement.
Getting ready to install crown molding? First, grab your measuring tape. Measure the length of each wall where the molding will go. Remember, “measure twice, cut once!” You’ll save yourself from sending a piece flying across the room! For cutting, a miter saw works wonders. Cut at a 45-degree angle for the best fit. Don’t forget safety goggles – eye protection is a true hero!
Now for installation, let’s talk nail placement. Use finishing nails for secure attachment. Nail your corners first, ensuring they’re snug. For the rest, space your nails about 12 inches apart. This way, your crown molding stays put, even if your friends try to pull it down to impress you with their own DIY skills. Just kidding!
| Preparation Step | Action |
|---|---|
| Measure walls | Use a measuring tape |
| Cut corners | Use a miter saw at 45 degrees |
| Nail placement | Finish nails every 12 inches |
Stay focused, and soon you’ll have a crown molding masterpiece! Your friends won’t believe their eyes.
Common Mistakes to Avoid During Crown Installation
Misalignment and its impact on the final look. Incorrect nail usage and its consequences.
Installing crowns can be tricky, especially if you make some common mistakes. One major issue is misalignment. If your crown isn’t straight, it could look like a lopsided hat! This impacts the overall appearance, making it less attractive.
Using the wrong nails can also cause trouble. You might think, “What’s the big deal?” Well, incorrect nails can weaken the crown’s grip, leading to gaps and wobbling. It’s important to choose the best nails for crown install to ensure everything stays in place and looks fantastic!
| Mistake | Impact |
|---|---|
| Misalignment | Lopsided appearance |
| Wrong nails | Weak grip and gaps |
Maintenance Tips for Crown Molding
Keeping crown molding in good condition. When to reconsider nail integrity or replacement.
To keep crown molding looking its best, regular maintenance is key. Dust it often and wipe it down with a damp cloth. Check for cracks or paint wear; these can dull its shine. Reconsider nail integrity if you notice loose pieces or movement. If nails seem damaged, it’s smart to replace them. This ensures your molding sits well and remains strong.
How often should I check the crown molding?
Inspect your crown molding every six months to catch any problems early. Regular visits can save time and money on repairs.
Signs it’s time to replace nails:
- Nails pulling away from the wall.
- Cracks around the molding.
- Visible rust or damage on nails.
Conclusion
In summary, the best nails for a crown install are typically 18-gauge or 23-gauge. These nails provide strength and a neat finish. Always choose the right length for your project. For more tips, check out resources on home improvement or speak with a professional. Now, gather your materials and get started on your crown molding project!
FAQs
What Type Of Nails Are Recommended For Installing Crown Molding Securely?
For installing crown molding, you should use finishing nails. These nails are thin and strong. They help the molding stay in place without big holes showing. You can use 1.5 to 2.5-inch finishing nails for best results. Make sure to drive them into the wall and the molding.
Should I Use Finish Nails Or Brad Nails For Crown Molding Installation, And Why?
You should use finish nails for crown molding. They are stronger and hold better than brad nails. This helps keep the molding securely in place. Brad nails can bend or pull out too easily. So, finish nails will give you a nicer and safer look!
How Long Should The Nails Be For Properly Securing Crown Molding To The Wall And Ceiling?
For securing crown molding, you should use nails that are about 1.5 to 2 inches long. This length helps them hold strong in both the wall and the ceiling. Make sure the nails go deep enough, but not too deep. You want the crown molding to stay in place!
Are There Specific Materials Or Coatings For Nails That Work Best With Different Crown Molding Types?
Yes, some materials work better with different crown molding types. For wood molding, you can use wood nails or finish nails. If your molding is made of plastic, use plastic nails. The coating can be paint or stain that matches your molding. This helps make everything look nice and clean!
What Are The Advantages Of Using A Nail Gun Versus Hand Nailing When Installing Crown Molding?
Using a nail gun is faster than hammering nails by hand. It can also make sure the nails go in straight. This helps the crown molding stay up better. Plus, a nail gun is less tiring to use, so you can finish your work more easily.