Imagine stepping into a room with warm, beautiful wood flooring beneath your feet. It feels cozy and inviting, right? But how do you achieve that perfect look and sturdy feel? The answer often lies in the type of wood flooring glue down technique you choose.
Many people dream of having wood floors in their homes. They love the natural charm and elegance it adds to any space. However, the right glue is crucial. It holds everything together and keeps your floors standing strong for years. Have you ever wondered why some wood floors feel different? It could be the glue used in the installation.
In this article, we will explore various wood flooring glue down options. We’ll look at their benefits, tips for using them, and how to choose the best one for your home. Whether you’re a DIY enthusiast or planning to hire a professional, understanding wood flooring glue down can make a big difference in your project.
Table of Contents
Wood Flooring Glue Down: The Best Methods And Tips

Understanding Wood Flooring Glue Down
Wood flooring glue down methods ensure a firm and lasting bond between the floor and subfloor. This technique makes your floors stable and less prone to movement. Imagine walking on a smooth, secure surface without worries! Choosing the right glue is crucial for moisture resistance and durability. Did you know that properly glued floors can last many years without needing repairs? Learn the secrets to a successful installation and enjoy stunning wooden floors for years to come.Understanding Glue Down Wood Flooring
Definition and process of glue down installation. Types of wood flooring suitable for glue down methods.Glue down wood flooring is a method where wood planks are attached directly to the subfloor using strong adhesive. This process creates a firm and sturdy floor. It helps reduce noise and provides a smooth surface. Many types of wood are suitable for this method, including:
- Engineered hardwood
- Solid hardwood
- Laminate
Using glue down installation ensures a long-lasting finish. It is important to choose the right flooring for this method to achieve great results.
What is glue down wood flooring?
Glue down wood flooring is a popular option that creates a lasting bond with the subfloor using special adhesive.
Advantages of Glue Down Wood Flooring
Durability and stability benefits. Sound insulation properties.Choosing glue down wood flooring offers several benefits. First, it is durable and stable, making it perfect for busy areas in your home. It can handle heavy foot traffic without damage. Second, it provides excellent sound insulation, which helps keep your home quiet. Noisy footsteps won’t disturb family time or sleep. With glue down flooring, you get a strong and peaceful home environment.
What are the benefits of sound insulation in glue down wood flooring?
Glue down wood flooring reduces noise levels. It traps sounds, making your space quieter and more comfortable.
Key Benefits:
- Improved Comfort: Less noise equals a more relaxing home.
- Enhanced Privacy: Sounds from one room won’t disturb another.
Choosing the Right Adhesive
Types of adhesives: moisturecure, urethane, and pressuresensitive. Factors to consider when selecting glue for wood flooring.Picking the best glue for your wood floor is like choosing the right glue for a school project. You want it to stick, but not end up everywhere! First up, we have moisture-cure adhesives, great for damp areas and tough on humidity. Then there’s urethane adhesive, which is like the superhero of adhesive—it works on many surfaces. Lastly, pressure-sensitive glue is easy to apply and can be repositioned if you change your mind.
| Type of Adhesive | Best for |
|---|---|
| Moisture-Cure | High moisture areas |
| Urethane | Versatile surfaces |
| Pressure-Sensitive | Easy applications |
Think about your room’s climate and how much traffic it gets. For example, a busy kitchen may need a tougher glue. No one wants to see their beautiful floors lift up like a bad magic trick! Choose wisely, and your floors will stick around for a long time.
Preparation for Glue Down Installation
Subfloor assessment and preparation steps. Importance of acclimation for wood flooring materials.First, check the subfloor. Make sure it’s dry, clean, and level. A bumpy floor is like trying to walk on a trampoline – not fun! Next, let your wood flooring sit in the room for a few days. This process is called acclimation. Think of it as your boards getting to know their new home. They need time to adjust to the climate. If they don’t, they might expand or shrink, making your floor look wobbly. No one wants a floor that dances!
| Preparation Steps | Importance |
|---|---|
| Check for dryness | Prevents mold |
| Clean the surface | Enhances grip |
| Ensure it’s level | Avoids gaps |
| Acclimate wood | Reduces warping |
By following these steps, your glue down installation will shine brighter than your grandma’s favorite lamp!
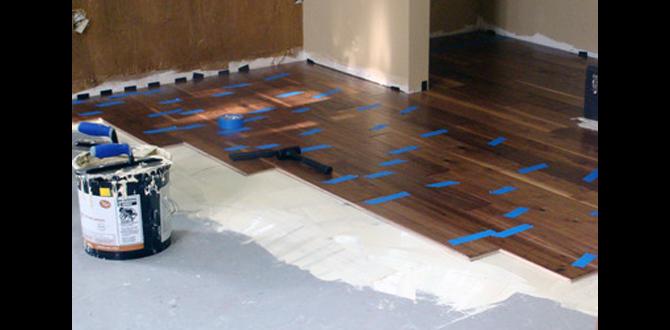
Step-by-Step Installation Process
Detailed installation procedure for glue down flooring. Common mistakes to avoid during installation.To install glue down wood flooring, start by preparing the surface. Make sure it’s clean and dry. Next, apply glue evenly, and lay the boards down. Press them firmly to secure. Now, don’t forget to leave small gaps around edges; flooring needs to breathe! Common mistakes include not measuring correctly and overusing glue. Remember, too much glue is like putting on too much frosting—nobody wants a sticky floor!
| Common Mistakes | How to Avoid |
|---|---|
| Not measuring accurately | Use a measuring tape and double-check |
| Overapplying glue | Apply a thin, even layer |
| Ignoring the gap | Leave space around edges for expansion |
Finishing Touches After Installation
Techniques for maintaining and sealing glue down wood floors. Recommendations for routine care and upkeep.After putting down your wood floors, it’s time for the finishing touches! First, make sure to seal them to keep dirt and moisture away. This helps your floor look nice and last longer. Regularly clean with a soft broom or a vacuum that won’t scratch. For spills, wipe them up right away to avoid sticky messes. Remember, your floors want to be pampered too!
| Routine Care Tips | Recommended Products |
|---|---|
| Sweep or vacuum regularly | Soft-bristle broom or vacuum |
| Wipe spills immediately | Soft cloths |
| Use a sealant every few years | Quality wood floor sealant |
Follow these tips and your glue-down wood floors will shine like stars on a clear night!
Common FAQs About Glue Down Wood Flooring
Addressing typical concerns and misconceptions. Tips for troubleshooting issues with glue down installations.Many people have questions about glue down wood flooring. Common worries include how strong the bond will be and if it’s easy to install. It’s important to know that the right glue can make your floor stick like a well-trained puppy. If you face issues, like squeaky floors, try checking for uneven surfaces. Here’s a quick table with some common questions and their answers:
| Question | Answer |
|---|---|
| How long does the glue take to dry? | Usually 24 hours, but check your glue’s instructions. |
| Can I install it on concrete? | Yes! Just make sure it’s clean and dry. |
| What if my floor bubbles? | Check for trapped air—flatten it out! |
With some patience and care, glue down wood flooring can be a great choice. So, roll up those sleeves and let’s make your floors fabulous!
Conclusion
In summary, glue-down wood flooring offers strength and stability for your home. It’s easy to install and keeps your floors flat. Remember to choose the right adhesive for your type of wood. If you’re planning a project, consider this method! For more tips, check out guides or videos on wood flooring installation. Happy DIYing!FAQs
What Are The Advantages Of Using Glue Down Wood Flooring Compared To Nail-Down Or Floating Installations?Glue-down wood flooring has some great benefits. First, it sticks firmly to the floor, which means it won’t move around. This makes it less likely to get gaps or creaks. Also, it’s better for places with lots of moisture, like basements. Finally, glue-down flooring can be cheaper to install than nail-down options.
How Do You Properly Prepare A Subfloor For Glue Down Wood Flooring Installation?To prepare a subfloor for glue-down wood flooring, start by cleaning it well. Make sure there is no dirt, dust, or debris. Next, check for any damage, like big holes or cracks, and fix those. Finally, make sure the subfloor is flat and even; you can use a leveling compound if needed. This prepares a good surface for your new flooring.
What Types Of Adhesive Are Recommended For Different Kinds Of Wood Flooring?For wood flooring, we can use different types of glue. For solid wood, you should use a strong urethane adhesive. For engineered wood, a good choice is a water-based glue. If you’re working with laminate flooring, special laminate glue works best. Be sure to follow instructions on the glue bottle for the best results!
How Do Temperature And Humidity Affect The Performance Of Glue Down Wood Flooring?Temperature and humidity can change how glue down wood flooring works. When it’s hot and humid, the wood may expand. This can make the glue less sticky. In cold or dry air, the wood might shrink. So, it’s important to keep the temperature and humidity just right for the best results.
What Steps Should Be Taken To Ensure A Successful Bond When Installing Glue Down Wood Flooring?To make sure the glue down wood flooring sticks well, start by cleaning the floor. Remove dirt and dust so the glue can stick better. Next, you should spread the glue evenly with a trowel. Then, carefully place the wood pieces on the glue, pressing down firmly. Finally, allow the glue to dry completely before walking on it.