Have you ever admired a beautifully finished piece of wood? The secret behind that glossy, rich look might be Danish oil. This special oil enhances wood’s natural beauty while protecting it. But what exactly is Danish oil? Discovering its benefits, uses, and application tips can transform how you care for your wooden items.
Imagine you have an old table that looks dull and tired. You can bring it back to life with Danish oil! This oil is easy to apply and gives wood a warm finish. It’s like giving your furniture a refreshing drink.
Many people love using Danish oil for its natural ingredients. It seeps into the wood, making it strong while highlighting its grain. Isn’t that neat? Knowing how to use this oil can help you make your wood projects shine.
In this article, we will dive into what Danish oil is, its benefits, and how to apply it like a pro. Are you ready to unlock the secrets of Danish oil? Let’s get started!
Table of Contents
What Is Danish Oil: Benefits, Uses, And Application Tips

What is Danish Oil: Benefits, Uses, and Application Tips
Danish oil is a popular finish for wood projects. It brings out the beauty of wood while protecting it. Some key benefits include its ease of application and quick drying time. You can use Danish oil on furniture, cabinetry, or even musical instruments. When applying, be sure to use clean, lint-free cloths. Did you know that Danish oil can also enhance the grain patterns in wood? It’s a favorite among woodworkers for good reason!
Understanding Danish Oil
Definition and composition of Danish oil. Historical background and origin of Danish oil.
Danish oil is a special finish made from a blend of natural oils, often with varnish. It seeps deep into wood, showing off the natural beauty while protecting it. Historically, this oil came from Denmark and was used by craftsmen for its durability and water resistance. Talk about a smart choice! Its unique recipe gives wood a warm glow, making it a favorite for furniture lovers.
| Ingredient | Function |
|---|---|
| Linseed Oil | Moisture resistance |
| Tung Oil | Durability |
| Varnish | Adds shine |
This combination creates an effective finish that not only looks great but also protects wood from the elements. No wonder it’s been a favorite for centuries!
Benefits of Danish Oil
Enhances wood appearance and natural beauty. Provides protection against moisture and stains.
Danish oil makes wood look beautiful and shiny. It highlights the natural grain of the wood, bringing out its true colors. Not only does it improve appearance, but it also protects the wood. Danish oil guards against moisture and stains, keeping furniture safe from scratches and spills.
- Enhances the wood’s natural beauty.
- Protects against moisture damage.
- Prevents staining from everyday use.
How does Danish oil protect wood?
Danish oil acts as a barrier, allowing your furniture to resist moisture and stains. This helps keep it looking fresh for a long time.
Common Uses of Danish Oil
Applications in woodworking and furniture making. Usage for kitchen utensils and cutting boards.
Danish oil is famous for its many uses in woodworking. It makes wood look rich and protects it too. Here are some common applications:
- Furniture Making: Danish oil enhances the grain of the wood in tables, chairs, and cabinets.
- Kitchen Utensils: It is safe for spoons, spatulas, and bowls, keeping them shiny and easy to clean.
- Cutting Boards: Danish oil helps prevent water damage and keeps boards looking fresh.
Using it is simple. Just apply, let it soak, and wipe off the extra. It makes everything last longer!
What is Danish oil used for?
Danish oil is used for protecting and beautifying wood surfaces. It works well on furniture, kitchen utensils, and cutting boards.
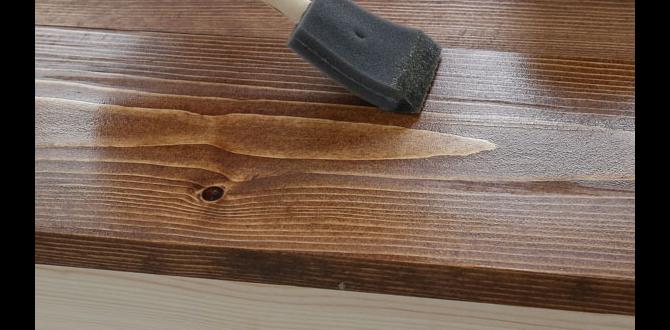
How to Apply Danish Oil
Stepbystep application process. Tips for achieving a smooth finish.
Applying Danish oil is easy and fun. Follow these simple steps:
- Start with clean wood. Wipe off dust with a cloth.
- Use a brush or cloth to spread the oil evenly.
- Let it soak for about 15 minutes.
- Wipe off any extra oil with a clean cloth.
- Wait for at least 24 hours before applying a second coat.
For a smooth finish, remember these tips:
- Sand lightly between coats with fine sandpaper.
- Use thin layers of oil for best results.
- Work in a well-ventilated area.
Maintenance and Care for Danish Oil Finishes
Cleaning methods for Danish oiltreated surfaces. Reapplication frequency and techniques for longevity.
Keeping Danish oil finishes looking great is key to their charm. For cleaning, simply wipe surfaces with a soft, damp cloth. Avoid harsh soaps; they’re like bringing a tiger to a tea party. You don’t want to scare off the finish! As for reapplication, every few months is best, but check your surface. If it starts to look dull, it’s time for a little love. Regular touch-ups help your wood live its best life.
| Care Task | Frequency |
|---|---|
| Wipe Down | Weekly |
| Reapply Danish Oil | Every 3-6 months |
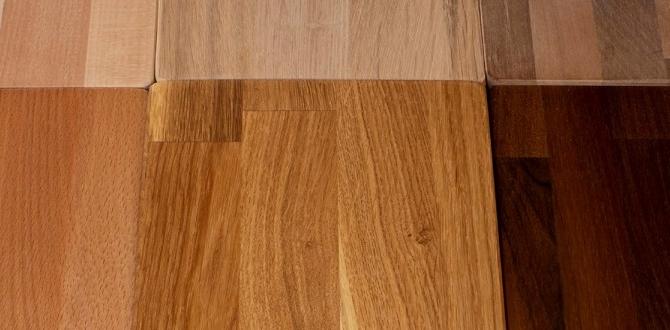
Comparison with Other Wood Finishes
Differences between Danish oil, polyurethane, and varnish. Pros and cons for each type of finish.
When we think about wood finishes, Danish oil, polyurethane, and varnish each have their own charm. Danish oil gives a warm glow and lets wood breathe. Polyurethane is tough and protects against spills, like an umbrella for your wood. Meanwhile, varnish creates a shiny shield but can be tricky to apply without looking like a toddler’s art project!
| Finish Type | Pros | Cons |
|---|---|---|
| Danish Oil | Natural look, enhances wood grain | Needs regular reapplication |
| Polyurethane | Durable, withstands scratches | Can look plastic |
| Varnish | High gloss, very protective | Can be hard to apply |
So, choose wisely! Each finish has its own quirks, just like a group of friends at a party. One might be the life of the party, while another keeps things low-key.
Frequently Asked Questions about Danish Oil
Common misconceptions and clarifications. Tips for troubleshooting application issues.
Many people wonder if Danish oil is the same as varnish. The truth is, it’s not! Danish oil brings out the wood’s beauty, while varnish sits on top like a crown. If your finish looks streaky, don’t worry! Just wipe off the excess oil and give it some time to dry. Always apply in thin coats. Want the shiny look? Add a few extra layers. Remember, patience is key. Good things often take time—like waiting for cookies to bake!
| Common Issues | How to Fix |
|---|---|
| Streaks | Wipe off extra oil! |
| Sticky Finish | Let it dry longer. |
| Patches | Apply more layers. |
Conclusion
In summary, Danish oil is a great finish for wood. It enhances colors and protects against damage. You can use it on furniture, floors, and other projects. Remember to apply it in thin coats and let it dry well. We encourage you to try Danish oil on your next woodworking project and explore more tips online for the best results!
FAQs
What Are The Main Components Of Danish Oil, And How Do They Contribute To Its Protective Qualities?
Danish oil mainly has three parts: oil, varnish, and thinner. The oil soaks into wood, making it strong and smooth. The varnish gives a shiny look and makes it extra tough. The thinner helps the oil spread easily. Together, they protect wood from water and dirt, keeping it looking nice.
What Are The Benefits Of Using Danish Oil Compared To Other Wood Finishes?
Danish oil has some great benefits. First, it soaks into the wood, making it stronger. It also gives a nice, natural look. Unlike some other finishes, it’s easy to apply and doesn’t need much time to dry. Plus, you can use it indoors safely!
In What Types Of Projects Or Surfaces Is Danish Oil Most Effectively Applied?
Danish oil works best on wood projects, like furniture and countertops. You can use it on tables, chairs, and cabinets. It makes the wood look nice and protects it from water. We can also use it on wooden toys and crafts to keep them safe and beautiful.
What Are The Best Practices For Applying Danish Oil To Achieve A Smooth And Even Finish?
To get a smooth finish with Danish oil, start by cleaning the wood well. Apply a thin layer of oil using a cloth or brush. Let it soak in for about 15 minutes, then wipe off the extra oil. After it dries, you can sand lightly for an even feel. Repeat this process until you like the look!
How Does The Drying Time Of Danish Oil Affect The Overall Finishing Process, And What Can Be Done To Optimize It?
The drying time of Danish oil is important because it tells us when we can add more layers. If it takes too long to dry, we have to wait before we can finish the project. To make it dry faster, you can use a fan or work in a warm room. This helps speed up the drying and keeps the project moving along!