Quick Summary:
Use a pin nailer for crafts by selecting the right nails, setting the depth correctly, and holding the tool firmly against the wood. This tool is perfect for delicate projects, trim work, and where hidden fasteners are essential, ensuring a clean, professional finish every time.
Hey there, fellow DIYer! Jack Shaffer here, your go-to guy for all things nailers and woodworking. Ever look at those intricate craft projects, miniature furniture, or delicate trim work and think, “How do they get those tiny nails in there without splitting the wood or leaving huge holes?” Well, guess what? You can too! The secret weapon for many of these beautiful creations is the humble, yet mighty, pin nailer. But like any tool, when you’re first starting out, it can seem a little intimidating. Don’t worry, though. This guide is designed to take you from pin-nailer novice to confident craft-maker in no time. We’ll cover everything you need to know to get those tiny nails flying accurately and safely into your projects. Stick around, and let’s make some magic happen!
Table of Contents
What is a Pin Nailer and Why Use One for Crafts?
A pin nailer is a specialized tool designed to drive extremely slender, headless nails, often called “pins.” These aren’t your typical framing or finishing nails. Think of them as super-thin, strong needles that provide just enough holding power for lighter applications. They leave behind a minuscule hole, often so small that it’s barely noticeable. This is what makes them absolutely perfect for craft projects where appearance is key.
Imagine you’re building a dollhouse, assembling small decorative boxes, attaching delicate trim to picture frames, or even working with balsa wood. Traditional nails or screws would be overkill, potentially splitting the material or leaving unsightly marks. A pin nailer, on the other hand, offers a way to secure pieces elegantly and nearly invisibly. It’s the tool of choice when you need to join small, thin pieces of wood or other materials without compromising the aesthetic of your finished piece. It’s about finesse, not brute force.
When is a Pin Nailer the Right Tool for Your Craft Project?
Pin nailers shine in specific situations where other fastening methods fall short. Here’s when you should consider reaching for yours:
- Invisible Fasteners: The primary reason! If you don’t want to see any nail heads or visible screw holes in your finished project, a pin nailer is your best friend.
- Delicate Materials: Working with thin wood, veneers, plywood, or even some plastics? Pin nailers have minimal impact, greatly reducing the risk of splitting or damaging the material.
- Small & Intricate Assemblies: Dollhouses, model building, intricate trim work, small decorative boxes, and furniture assembly.
- Attaching Small Trim or Moldings: Ideal for adding small decorative trim pieces to furniture, picture frames, or craft projects without visible fasteners.
- Temporary Clamping Assistance: While not their main job, sometimes a few strategically placed pin nails can help hold pieces together while glue dries, especially on lightweight projects.
- No Wood Glue Required (Sometimes): For very light-duty crafts, pin nails can sometimes provide sufficient hold on their own, though combining with glue is always best for strength.
Types of Pin Nailers and What to Look For
Just like other nailers, pin nailers come in a few flavors to suit different preferences and power sources. Knowing these will help you choose the right one for your needs:
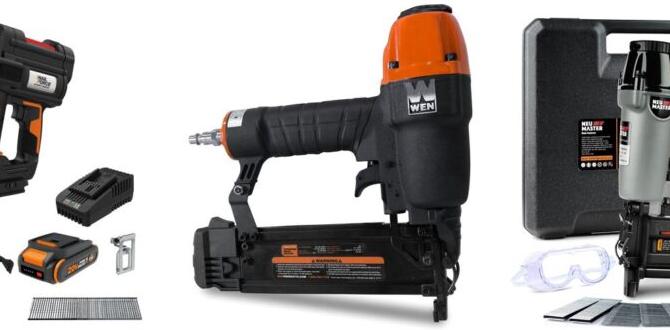
- Pneumatic Pin Nailers: These are the most common and generally the most powerful. They require an air compressor and a hose. They are durable, reliable, and offer excellent performance but come with the added equipment of an air compressor.
- Cordless Electric Pin Nailers (Battery-Powered): These offer the ultimate in portability. They have a battery, and some even have a built-in air mechanism. While convenient, they can be a bit heavier and might have a slightly higher cost upfront.
- Corded Electric Pin Nailers: Less common for pin nailers than other types, these plug directly into an outlet. They offer consistent power without a battery but tether you to an electrical source.
What to Consider When Buying:
- Nail Size Compatibility: Most pin nailers drive a range of 23-gauge (the thinnest) to 20-gauge pins. Ensure the model you choose fits the gauge of nails you’ll use most.
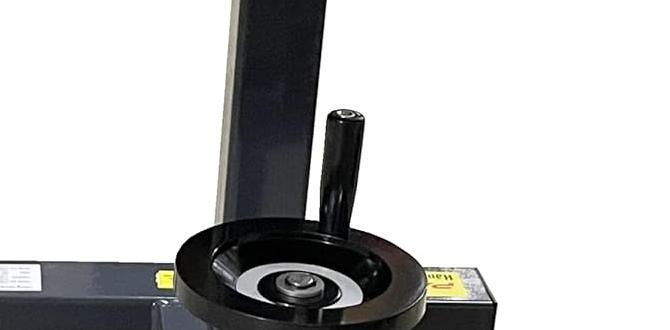
- Depth Adjustment: A crucial feature! This allows you to control how deep the pin sinks into the wood. You want it flush or slightly recessed, not proud or driven too deep.
- Trigger Lock: For safety, a trigger lock prevents accidental firing. Always look for this feature.
- No-Mar Tip: Some pin nailers come with a soft, protective nose piece to prevent marring delicate surfaces.
- Weight and Ergonomics: Especially if you’ll be using it for extended periods, ensure it feels comfortable in your hand.
- Brand Reputation and Reviews: Stick with reputable brands known for quality and customer support.
Essential Pin Nails: Sizes and Gauges Explained
The nails used in pin nailers are very specific. They are categorized by ‘gauge,’ which refers to their thickness, and ‘length.’ It’s vital to use the correct pins for your nailer and project.
Understanding Nail Gauges:
The gauge system works in reverse: a lower gauge number means a thicker nail. For pin nailers, the common gauges are:
- 23-Gauge: These are the absolute thinnest, virtually invisible pins. Perfect for the most delicate crafts, veneers, and where absolute discretion is needed. They don’t offer a lot of holding power on their own.
- 22-Gauge: Slightly thicker than 23-gauge, offering a bit more holding power while still being very discreet. A great all-around choice for many craft applications.
- 21-Gauge: Thicker still, these provide more grip. Good for slightly more robust crafts or when you need a bit more secure fastening without sacrificing too much in terms of visibility.
- 20-Gauge: The thickest gauge commonly used in pin nailers. These offer the most holding power among pin nails and are suitable for crafts that require a bit more strength, like attaching small decorative trim or assembling lightweight frames.
Nail Lengths:
Pin nails come in various lengths, typically from 1/2 inch up to 1-1/4 inches or sometimes longer. The key is to choose a length that:
- Is long enough to provide sufficient grip in both pieces of material you are joining.
- Does NOT go all the way through the second piece of material, especially if that surface will be visible.
- For example, if you are joining two pieces of 1/4-inch thick material, you might need a 1/2-inch or 5/8-inch pin.
Important Note: Always check your pin nailer’s manual to see the exact range of gauges and lengths it can accept. Using the wrong size nails can damage your tool or lead to misfires.
Safety First: Essential Precautions for Pin Nailing
Even though pin nailers are designed for delicate work, safety is always paramount. These are powerful tools, and taking the right precautions will ensure you use them without incident.
Here are the key safety tips:
- Always Wear Safety Glasses: This is non-negotiable. Even tiny pins can ricochet. Protect your eyes!
- Understand Your Tool: Read the manufacturer’s manual thoroughly. Know how to load it, operate it, and what its safety features are.
- Never Point the Nailer at Yourself or Others: Treat it like a loaded firearm. Keep the nose pointed in a safe direction at all times, especially when loading or handling.
- Engage the Trigger Lock: When not actively firing, always engage the trigger lock to prevent accidental discharge.
- Keep Fingers Away from the Nose: Do not place your fingers near the discharge point, not even when you think the tool is disarmed.
- Use the Correct Nails: As discussed, use only the gauge and length of pins specified for your nailer.
- Check for Air Leaks (Pneumatic): Before starting, check that your air hose is securely connected and that there are no leaks.
- Maintain a Firm Grip: Always hold the nailer with a firm, two-handed grip (if applicable) or a secure one-handed grip.
- Be Aware of Your Surroundings: Ensure no one is behind your work surface, as a pin could potentially pass through thin material.
- Disconnect Power When Not in Use: For pneumatic nailers, disconnect the air hose. For electric/battery models, remove the battery or unplug the tool when loading nails, clearing jams, or storing it.
Following these guidelines will help you use your pin nailer with confidence and keep you safe. For more in-depth safety information on power tools, the Occupational Safety and Health Administration (OSHA) provides excellent resources on safe tool operation.
Step-by-Step: How to Use a Pin Nailer for Crafts
Ready to get started? Using a pin nailer is simple once you get the hang of it. Follow these steps for a perfect finish on your craft projects.
Step 1: Prepare Your Workspace and Materials
- Clear Your Area: Make sure you have a stable, well-lit surface to work on. Remove any clutter.
- Gather Your Supplies: Have your pin nailer, the correct pin nails, your project pieces, safety glasses, and any other required tools (like clamps) ready.
- Test Your Materials: If you’re working with a new type of wood or assembly, it’s a good idea to test fire the nailer on a scrap piece of the same material. Drive a few nails to check the depth and ensure no splitting.
Step 2: Load the Pin Nails into Your Nailer
This process can vary slightly between models, so always refer to your manual. Here’s a general guide:
- Disconnect Power: First, ensure the nailer is disconnected from its power source (air hose disconnected, battery removed, or unplugged). Safety first!
- Open the Magazine: Most pin nailers have a spring-loaded magazine. You’ll typically pull back a follower or slide a piece of the magazine open.
- Insert the Nails: Place a strip of your chosen pin nails into the magazine. Ensure the nails are stacked correctly and oriented according to your tool’s design. They usually sit flat against the bottom of the magazine.
- Close the Magazine: Gently release the follower or slide the magazine closed. The spring will push the nails forward, ready to be fired.
Step 3: Set the Depth and Air Pressure (If Applicable)
- Depth Adjustment: Find the depth adjustment wheel or lever on your nailer. This is critical. Start with a medium setting. You want the pin to be flush with the surface or very slightly recessed. Too deep and you’ll damage delicate wood; not deep enough and the pin will stick out.
- Air Pressure (Pneumatic Nailers): Connect your air hose. For most craft applications with pin nailers, you’ll use lower air pressures, often between 70-90 PSI. Again, experiment on scrap wood. Too much pressure can overdrive the pin or damage the wood. Too little and the pin might not set fully.
Step 4: Position and Fire the Nailer
This is where the magic happens!
- Position the Nailer: Place the nose of the pin nailer firmly against the surface where you want to drive the nail. Ensure it’s flush and square to the workpiece for the best results.
- Hold Firmly: Use a confident grip. You don’t need to push hard, but the tool should be stable.
- Fire: Squeeze the trigger. The pin nails are driven by a sharp jolt of air.
- Repeat: Move to the next location and repeat the process.
Step 5: Check and Adjust
- After firing a few nails, inspect them closely. Are they flush? Are they too deep? Is the wood splitting?
- Adjust Depth: If the nails are too proud, adjust the depth setting to sink them deeper. If they are too deep, adjust to drive them less deep.
- Adjust Air Pressure (Pneumatic): If depth adjustment isn’t enough, you may need to slightly increase or decrease air pressure.
- Continue adjusting and testing on scrap until you achieve the perfect result.
Common Pin Nailer Issues and How to Solve Them
Even seasoned pros run into occasional snags. Here are some common pin nailer problems fellow crafters face and how to fix them:
1. Nails Not Firing
- Check Power Source: Is the air hose connected (pneumatic)? Is the battery charged and inserted correctly (cordless)? Is it plugged in (corded)?
- Check Trigger Lock: Ensure the trigger lock isn’t engaged.
- Jam: There might be a jam in the firing mechanism. Disconnect power and refer to your manual for clearing instructions.
- Low Air Pressure (Pneumatic): The compressor might not be providing enough PSI.
2. Nails Not Driving Fully (No-Depth)
- Insufficient Depth Adjustment: The depth setting is likely too shallow. Adjust it to sink deeper.
- Low Air Pressure (Pneumatic): The tool isn’t getting enough power to drive the nail. Increase compressor PSI.
- Weak Nails: Though rare, a bad batch of nails could be an issue, but this is unlikely.
3. Nails Driving Too Deep (Overdriving)
- Excessive Depth Adjustment: The depth setting is too aggressive. Adjust to drive less deep.
- Too Much Air Pressure (Pneumatic): The tool is set too high for the material. Reduce PSI.
- Soft Wood: Some very soft woods will accept pins deeper easily. You might need to rely more on the depth adjustment and less on brute force.
4. Wood Splitting
- Wrong Nail Size: You might be using a nail that’s too thick or too long for the material. Switch to a thinner gauge or shorter length.
- Too Much Air Pressure (Pneumatic): Especially on delicate woods, high pressure can cause splitting. Reduce PSI.
- Proximity to Edge: Nailing too close to the edge of a piece of wood is a common cause of splitting. Keep nails at least 1/2 inch from the edge if possible.
- Wood Type: Some woods are naturally more prone to splitting. Test on scrap if unsure.
- Dry Wood: Extremely dry wood can be more brittle.
5. Inconsistent Firing
- Air Leaks (Pneumatic): Check your air hose connections and the seal around the nailer’s nose.
- Tool Maintenance: The tool may need cleaning or lubrication according to the manufacturer’s instructions.
- Low Air Volume/Flow (Pneumatic): Your compressor might not be able to keep up with the demand, especially with rapid firing. Using a smaller compressor or a tool that draws less air might be necessary for extended use.
When to Add Glue with Pin Nails
While pin nails offer a way to mechanically join pieces, for any craft project that needs to last or withstand any stress, you should almost always use wood glue in conjunction with your pin nails.
Think of the pin nails as a temporary clamp or a way to hold pieces perfectly aligned while the stronger, more permanent bond of wood glue does its work. Here’s when and why:
- For Strength: Wood glue creates a bond that is often stronger than the wood itself. Pin nails alone are usually not sufficient for structural integrity.
- To Ensure Flush Joints while Gluing: Apply a thin, even layer of wood glue to one of the mating surfaces. Then, use the pin nailer to hold the pieces precisely in place while the glue sets. This ensures your project stays perfectly aligned.
- For Added Security: Even in decorative crafts, glue provides peace of mind.
Tip: Wipe away any excess glue that squeezes out with a damp cloth before it dries. Dried glue on the surface can prevent stain or paint from adhering properly.
Projects Perfect for Your Pin Nailer
Ready to put your new skills to the test? Here are some fantastic craft and DIY projects where a pin nailer truly shines:
- Dollhouse Construction: Assembling walls, floors, roofs