Imagine walking into your home and seeing beautiful, shining hardwood floors. They can make any space feel warm and inviting. But what happens if there are small holes or gaps? That’s where pre-finished hardwood wood filler comes in.
This handy product helps fix those annoying spots. It fills in the imperfections and blends right in with your flooring. Have you ever wondered how to make your wooden floors look brand new again? With pre-finished hardwood wood filler, this task becomes a breeze.
Did you know that using the right wood filler can actually help extend the life of your floors? It protects them from dirt and moisture. Plus, it makes those flaws less noticeable. So, if you’re ready to learn how this amazing product can transform your space, keep reading!
Table of Contents
Pre-Finished Hardwood Wood Filler: Smooth Your Surface Seamlessly

Understanding Pre-Finished Hardwood Wood Filler
Pre-finished hardwood wood filler helps restore your wood floors. It fills in gaps, cracks, and scratches, making your floors look new again. Did you know using the right wood filler can save you money on repairs? This product blends well with your floor’s color, ensuring it doesn’t stand out. It’s easy to apply and dries quickly, giving you a smooth surface. Whether you’re a DIY enthusiast or need simple fixes, pre-finished hardwood wood filler is a must-have for home care.
What is Pre-finished Hardwood Wood Filler?
Definition and purpose of wood filler. Differences between prefinished and unfinished hardwood.
Wood filler is a special material used to fill holes and cracks in wood. Its main job is to make surfaces smooth and ready for finishing. This helps create a nice, polished look. Prefinished hardwood wood filler is used for floors or furniture that have already been treated. The difference from unfinished hardwood is important:
- Prefinished hardwood is already coated with a finish.
- Unfinished hardwood needs a finish applied after installation.
Using the right wood filler makes a big difference in how your project looks!
What are the benefits of prefinished hardwood wood filler?
Prefinished hardwood wood filler saves time and improves appearance. It blends well and helps create a smooth surface.
Benefits of Using Pre-finished Hardwood Wood Filler
Timesaving application process. Improved finish consistency and appearance.
Using pre-finished hardwood wood filler is like having a secret weapon for your flooring projects! First, it saves you time. Forget waiting ages for filler to dry. You can get the job done quicker and get back to enjoying your beautiful floors. Second, it makes everything look nicer. The finish is consistent and smooth, so your floors will shine like a new penny. Who doesn’t want floors that look amazing? You’ll have guests wondering if you got a professional to do it!
| Benefit | Why It Matters |
|---|---|
| Timesaving | Quick application means more time for fun! |
| Improved Finish | Consistent look that impresses everyone. |
Types of Pre-finished Hardwood Wood Fillers
Waterbased vs. solventbased fillers. Colormatched options and customization.
Choosing the right wood filler can be fun and a bit tricky, like picking your favorite ice cream flavor! First, you have your water-based fillers; they are easy to clean and dry quickly. Then there are solvent-based fillers; these are tougher but can take longer to dry. Now, let’s talk about colors! You can find some fillers that match your wood perfectly, or you can have them customized. Say goodbye to boring repairs and hello to a colorful fix!
| Type | Pros | Cons |
|---|---|---|
| Water-Based | Fast drying, easy to clean | Can shrink more over time |
| Solvent-Based | Very durable, great for heavy repairs | Long drying time, harder to clean |
How to Choose the Right Pre-finished Hardwood Wood Filler
Factors to consider (wood type, damage size, and finish). Recommendations for specific applications.
Choosing the right filler is important for your hardwood projects. Think about these factors:
- Wood Type: Match the filler to your wood, like oak or maple.
- Damage Size: Consider how big the damage is. Small dents need less filler.
- Finish: Pick a color that blends well with your floor.
For repairs, use a filler that closely matches your wood’s color. For larger areas, a stronger filler works best.
What if I’m not sure which filler to use?
If you’re unsure, consult with experts at your local hardware store. They can guide you to find the perfect pre-finished hardwood wood filler for your needs.
Step-by-Step Application Process
Preparing the surface before applying filler. Techniques for effective application and smoothing.
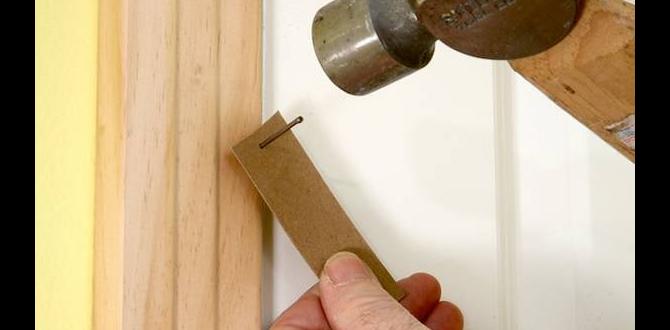
Before applying wood filler, it’s key to prepare the surface. Start by cleaning it well to remove dust and dirt. A clean surface helps the filler stick better. If there are any cracks or holes, make sure they are clear of loose pieces. Next, use a putty knife to apply the filler. Press it into the gaps gently. Smooth it out so it looks nice and even. Use a damp cloth to wipe away any extra. Just like icing on a cake, make it pretty!
| Step | Action |
|---|---|
| 1 | Clean the surface |
| 2 | Clear cracks and holes |
| 3 | Apply wood filler with a putty knife |
| 4 | Smooth with a damp cloth |
So, remember, the smoother, the better! Bumps are great for roller coasters, but not for your wood floor.
Common Mistakes to Avoid
Overfilling and underfilling issues. Poor surface preparation pitfalls.
Avoiding mistakes can save you time and effort! First, don’t overfill or underfill your wood. *Overfilling* makes your project look bumpy, like a roller coaster! While *underfilling* leaves gaps that can collect dust and dirt, making your wood floor sad. Always prepare the surface well; a clean base is key. Think of it like starting a painting on a dirty canvas—yikes! Check out the table below for quick tips.
| Mistake | What Happens |
|---|---|
| Overfilling | Creates bumps and uneven surfaces. |
| Underfilling | Leaves gaps and collects dirt. |
| Poor Surface Prep | Can ruin your final look! |
Maintenance Tips for Pre-finished Hardwood
Best practices for caring for filled areas. Preventative measures to prolong lifespan.
To keep filled areas of your pre-finished hardwood looking great, follow these simple tips. Regular cleaning helps maintain its shine. Avoid using harsh chemicals, which can harm the finish. Always use a soft cloth for dusting.
Consider placing mats at entryways to reduce dirt. Also, trim pets’ nails to avoid scratches. These steps can help your floor stay beautiful longer.
- Clean spills immediately to prevent stains.
- Use felt pads under furniture legs.
- Avoid direct sunlight to prevent fading.
How can I keep my hardwood filler in good shape?
Regularly cleaning and maintaining the area is crucial. This prevents dirt build-up and keeps the filler intact. Use mats and avoid harsh cleaners to make your hardwood last longer.
Frequently Asked Questions
Addressing common concerns and misconceptions. Troubleshooting common issues with wood filler.
Many people have questions about using wood filler. Here are some common concerns and tips to help you. First, remember that wood filler fills gaps well but may not match all wood types perfectly. If it dries too rough, sand it down for smoothness. Lastly, if it shrinks, apply a second layer. Here are more tips:
Common Questions About Wood Filler
Why does my wood filler crack?
It can crack if applied too thickly or if the wood moves too much.
How long does wood filler take to dry?
Most fillers dry within 30 minutes to an hour but check the package for specifics.
Can I paint over wood filler?
Yes! Once dry, it’s perfect for painting.
Conclusion
In conclusion, pre-finished hardwood wood filler is a great choice for fixing small dents and scratches. It matches your floor’s color, making repairs easy. You can apply it quickly and enjoy a seamless look. For best results, follow instructions carefully. To learn more tips on using wood filler, check out our other articles. Let’s keep your hardwood floors looking their best!
FAQs
What Is The Best Way To Apply Pre-Finished Hardwood Wood Filler For A Seamless Finish?
To apply pre-finished hardwood wood filler easily, start by cleaning the area. Use a putty knife to spread the filler into the hole. Press down firmly, so it fills all the gaps. Smooth the surface with the knife. Once it dries, you can sand it lightly and enjoy your nice, neat finish!
How Does Pre-Finished Hardwood Wood Filler Differ From Traditional Wood Fillers?
Pre-finished hardwood wood filler is made to match the color of finished floors. This means it looks great when you use it. On the other hand, traditional wood fillers can be a different color. You might need to paint or stain them to match your wood. So, pre-finished filler saves you time and helps make your repairs look nice right away.
Can Pre-Finished Hardwood Wood Filler Be Stained Or Painted To Match Existing Wood?
Yes, you can stain or paint pre-finished hardwood wood filler to match your wood. Make sure it’s dry before you start. Use a color that looks good with your existing wood. Test it on a small area first to see if you like it. This way, you get a better match!
What Types Of Damage Or Imperfections Can Pre-Finished Hardwood Wood Filler Effectively Repair?
Pre-finished hardwood wood filler can fix small holes and cracks in wood. You can use it for dents from furniture or scratches from pets. It also works well for gaps between floorboards. This filler helps your floor look smooth and pretty again!
Are There Any Specific Brands Of Pre-Finished Hardwood Wood Filler That Are Recommended For Diy Projects?
Yes, there are some good brands of pre-finished hardwood wood filler. You might like Minwax, Elmer’s, or Rust-Oleum. These are easy to find and work well for DIY projects. Be sure to choose a color that matches your wood. Always read the instructions on the package for the best results!