Have you ever wondered how to install wood trim like a pro? It might seem tricky at first. But with the right tools and tips, you can get it done easily. One tool that many people love is the palm nailer.
This handy device makes nailing trim quick and simple. Imagine finishing your project without sore fingers from hammering. Isn’t that great?
In this article, we’ll share some valuable palm nailer wood trim install tips. You’ll learn how to nail with precision and speed. We’ll also cover common mistakes to avoid. So, whether you’re a beginner or an experienced DIYer, there’s something here for everyone.
Let’s dive in and uncover the secrets to a perfect wood trim installation!
Table of Contents
Palm Nailer Wood Trim Install Tips: Essential Guidance

Palm Nailer Wood Trim Install Tips
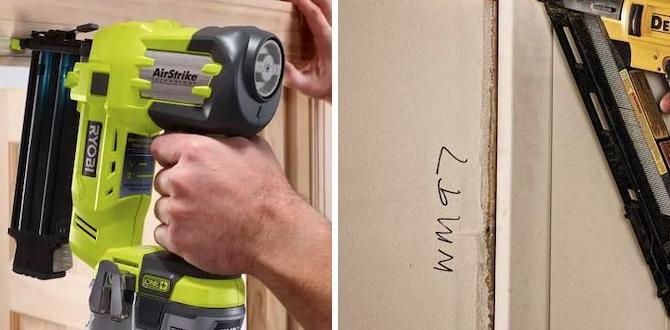
Using a palm nailer can make your wood trim installation much easier. This handy tool drives nails without needing a lot of force. Start by selecting the right nails for your project. It’s important to stabilize your trim while you work, reducing slip-ups. Did you know that a well-placed nail can help prevent wood splitting? Keep your nails straight to ensure a strong hold. With these tips, you’ll have perfect trim in no time!What is a Palm Nailer?
Definition and purpose of a palm nailer. Benefits of using a palm nailer for wood trim.A palm nailer is a small tool that helps you drive nails into wood. It fits in your palm, making it easy to hold and use. With its power, it helps you install wood trim quickly and neatly. Instead of hammering away, you can just aim and nail! The benefits include less strain on your arm, speedier work, and a smaller chance of misshapes. Plus, it can reach those tricky spots where a hammer can’t fit. It’s like having a tiny superhero for your nails!
| Benefits of Palm Nailer |
|---|
| Easy to use – Fits right in your hand! |
| Fast installation – Get the job done in a snap! |
| Less strain – Your arm will thank you! |
Choosing the Right Palm Nailer for Your Project
Key features to consider when selecting a palm nailer. Comparing different brands and models.Picking a palm nailer is like choosing a superhero for your wood trim project. First, look for weight and size; a lightweight option fights fatigue better. Next, consider the power it packs—look for models that shoot nails effortlessly. Check how easy it is to load nails; nobody wants to struggle with a nail jam!
| Brand | Weight | Nail Size | Power Level |
|---|---|---|---|
| Brand A | 3 lbs | 1-3/4″ | High |
| Brand B | 4 lbs | 2″ | Medium |
| Brand C | 2.5 lbs | 1-1/2″ | Low |
Different brands have their quirks, so compare them closely. Brand A might feel like a race car, while Brand B is more of a reliable family minivan. Make sure you choose the right nailer for your project!
Essential Tools and Materials for Wood Trim Installation
Complete list of tools needed for the project. Types of wood trim and nails recommended.To tackle wood trim installation like a pro, gather your essential tools and materials. You’ll need a palm nailer, a measuring tape, a level, and safety glasses. These make sure your project looks sharp and no fingers get squished! As for trim types, consider options like pine or oak. They are sturdy and bring charm. For nails, 18-gauge brads or finish nails are recommended—think of them as the secret agents in your wood adventure!
| Tool/Material | Purpose |
|---|---|
| Palm Nailer | Drives nails quickly and easily. |
| Measuring Tape | Ensures accurate cuts and placements. |
| Level | Checks that everything is straight. |
| Safety Glasses | Protects your eyes from flying debris. |
| Wood Trim Types | Pine, Oak |
| Nail Types | 18-gauge brads, Finish nails |
Preparing for Installation
Steps to measure and cut wood trim accurately. Importance of surface preparation before installation.Before you dive into your wood trim adventure, it’s wise to measure like a pro. Start by using a tape measure to find the exact lengths you need. Cut carefully, keeping your angles as sharp as your wit! Remember: measure twice, cut once—or face the wrath of the “whoops” pile! Surface prep is key too. Sand down any rough edges and clear away dust. A clean surface is the secret sauce for a great finish!
| Steps for Measuring | Surface Preparation Tips |
|---|---|
| 1. Use a tape measure. | 1. Sand rough areas smooth. |
| 2. Mark your cuts clearly. | 2. Clean off dust and debris. |
| 3. Double-check your measurements. | 3. Ensure surfaces are dry. |
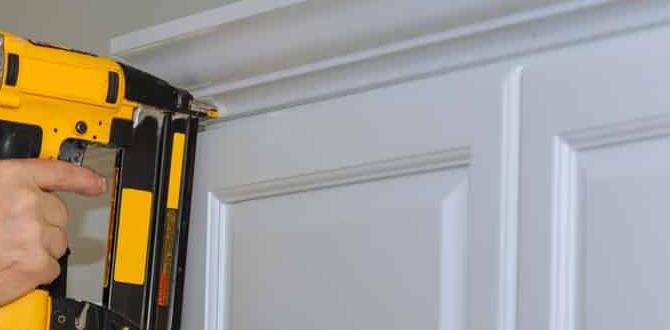
Techniques for Using a Palm Nailer Efficiently
Stepbystep guide on how to use a palm nailer correctly. Tips on maintaining control and precision during installation.Using a palm nailer correctly can make your wood trim installation easier. Follow this step-by-step guide:
- Start with a secure work surface.
- Hold the palm nailer firmly.
- Position the nailer straight against the wood.
- Press the button and let it drive the nail.
To maintain control and precision:
- Keep your hand steady.
- Aim carefully before nailing.
- Adjust your grip as needed.
A little practice with these techniques will help you achieve the best results!
What are some tips for using a palm nailer?
Use a steady hand and focus on your target. Adjust your grip for comfort to ensure accuracy.
Finishing Touches After Installation
Techniques for filling nail holes and finishing edges. Recommended stain or paint options for wood trim.After putting in all that effort, the finish matters. It’s time to make your wood trim look perfect. Here are some tips:
- Fill nail holes with wood putty or caulk. It makes everything smooth.
- Sand the edges gently for a clean look.
- Choose a stain or paint that matches your home. Popular stains are oak and walnut.
Using good products gives the best finish. It can make your work shine!
What is the best way to fill nail holes in wood trim?
The best way to fill nail holes in wood trim is to use wood putty or caulk. They fill the holes well and create a smooth surface for painting or staining.
Tips for Choosing Paint or Stain:
- Test samples on a small area.
- Consider the room’s lighting.
Maintenance of Your Palm Nailer
Tips for cleaning and maintaining your palm nailer. Signs that your palm nailer may need repairs or replacement.Keeping your palm nailer in tip-top shape is easier than it sounds! Regular cleaning is key. Just wipe it down after each use to remove sawdust and grime. A little lube goes a long way, too. If it’s making weird noises or struggling to nail, it might need a tune-up. Don’t let your tool become a drama queen!
| Maintenance Tip | Sign of Trouble |
|---|---|
| Clean after each use | Strange noises or vibrations |
| Lubricate moving parts | Nails don’t go in straight |
| Store in a dry place | Leaks or slippages |
Remember, a happy palm nailer makes a happy wood trim installer! So, stay alert for signs that it needs repairs, and always keep an eye on that trusty tool. It’s like your sidekick on a superhero mission!
Conclusion
In summary, using a palm nailer makes installing wood trim easier and faster. Remember to choose the right nail size and hold the tool steady. Practice on scrap wood if you’re unsure. To improve your skills, explore more tips online or ask a friend for help. You got this—let’s create beautiful spaces together! Happy nailing!FAQs
What Are The Advantages Of Using A Palm Nailer For Installing Wood Trim Compared To Traditional Nailing Methods?Using a palm nailer makes it easier and faster to put in wood trim. It fits right in your hand, so you can control it better. You don’t have to hit nails with a hammer, which can be hard. The palm nailer also helps prevent mistakes, like bending nails. Overall, it makes the job more fun and less tiring!
What Type Of Nails Should Be Used With A Palm Nailer For Optimal Performance When Installing Wood Trim?You should use finish nails with your palm nailer for wood trim. Finish nails are thin and long. They hold the trim well without splitting the wood. Look for nails that are 1.5 to 2.5 inches long for the best fit. Remember to choose the right size for your project!
How Do You Properly Set Up And Use A Palm Nailer To Ensure A Clean And Secure Installation Of Wood Trim?To set up a palm nailer, first, put on safety goggles to protect your eyes. Then, connect the nailer to an air compressor. Check that you have the right nails for your trim. When you start working, hold the palm nailer flat against the wood, and press the trigger gently. This will drive the nails in neatly without splitting the wood. Always double-check your nails to make sure they’re secure.
Are There Any Specific Techniques Or Tips For Achieving Precision And Avoiding Damage To The Wood When Using A Palm Nailer?To use a palm nailer safely, hold it steady with one hand. Use your other hand to support the piece of wood. Make sure the nail is straight before you start. Start with a light tap to avoid damaging the wood. If you keep it steady, you will nail it perfectly!
What Safety Precautions Should Be Taken When Using A Palm Nailer For Wood Trim Installation?When using a palm nailer, you should always wear safety glasses to protect your eyes. Keep your hands clear of the tool’s tip to avoid getting hurt. Make sure the tool is working properly before using it. Also, don’t point the palm nailer at anyone. Finally, use it in a well-lit area to see what you’re doing.
{“@context”:”https://schema.org”,”@type”: “FAQPage”,”mainEntity”:[{“@type”: “Question”,”name”: “What Are The Advantages Of Using A Palm Nailer For Installing Wood Trim Compared To Traditional Nailing Methods? “,”acceptedAnswer”: {“@type”: “Answer”,”text”: “Using a palm nailer makes it easier and faster to put in wood trim. It fits right in your hand, so you can control it better. You don’t have to hit nails with a hammer, which can be hard. The palm nailer also helps prevent mistakes, like bending nails. Overall, it makes the job more fun and less tiring!”}},{“@type”: “Question”,”name”: “What Type Of Nails Should Be Used With A Palm Nailer For Optimal Performance When Installing Wood Trim? “,”acceptedAnswer”: {“@type”: “Answer”,”text”: “You should use finish nails with your palm nailer for wood trim. Finish nails are thin and long. They hold the trim well without splitting the wood. Look for nails that are 1.5 to 2.5 inches long for the best fit. Remember to choose the right size for your project!”}},{“@type”: “Question”,”name”: “How Do You Properly Set Up And Use A Palm Nailer To Ensure A Clean And Secure Installation Of Wood Trim? “,”acceptedAnswer”: {“@type”: “Answer”,”text”: “To set up a palm nailer, first, put on safety goggles to protect your eyes. Then, connect the nailer to an air compressor. Check that you have the right nails for your trim. When you start working, hold the palm nailer flat against the wood, and press the trigger gently. This will drive the nails in neatly without splitting the wood. Always double-check your nails to make sure they’re secure.”}},{“@type”: “Question”,”name”: “Are There Any Specific Techniques Or Tips For Achieving Precision And Avoiding Damage To The Wood When Using A Palm Nailer? “,”acceptedAnswer”: {“@type”: “Answer”,”text”: “To use a palm nailer safely, hold it steady with one hand. Use your other hand to support the piece of wood. Make sure the nail is straight before you start. Start with a light tap to avoid damaging the wood. If you keep it steady, you will nail it perfectly!”}},{“@type”: “Question”,”name”: “What Safety Precautions Should Be Taken When Using A Palm Nailer For Wood Trim Installation? “,”acceptedAnswer”: {“@type”: “Answer”,”text”: “When using a palm nailer, you should always wear safety glasses to protect your eyes. Keep your hands clear of the tool’s tip to avoid getting hurt. Make sure the tool is working properly before using it. Also, don’t point the palm nailer at anyone. Finally, use it in a well-lit area to see what you’re doing.”}}]}