Have you ever walked into a room and felt instantly at home? A natural birch accent wall can do just that. It adds warmth and charm to any space. Imagine the beauty of textured wood working together with your favorite colors. It creates a cozy feeling that’s hard to resist.
Many people think that making a stunning accent wall is tough. But what if I told you it’s simple and fun? With a DIY natural birch accent wall, you can transform your living area without hiring a professional. Picture yourself picking the perfect planks and seeing your dream wall come to life.
This project can be done in a weekend! A surprising fact is that birch wood is not just beautiful but also strong and durable. As you read on, you’ll discover easy steps to create your very own accent wall. Ready to embark on a creative adventure? Let’s dive in!
Table of Contents
Create A Stunning Natural Birch Accent Wall Diy

Natural Birch Accent Wall DIY
Creating a natural birch accent wall can transform any room. It adds warmth and charm, making your space inviting. Gather materials like birch plywood and basic tools to start your project. Did you know birch wood is not only beautiful but also eco-friendly? This DIY project helps you express your style while being kind to the planet. Imagine how great it will feel to show off your handiwork to friends and family! Get ready to create a stunning feature wall!Understanding Birch Wood: Characteristics and Benefits
Explore the properties of birch wood and why it’s a popular choice for accent walls.. Discuss the aesthetic appeal and versatility of natural birch in various interior designs..Birch wood is a favorite for many reasons. Its smooth texture and light color make spaces look brighter. Plus, birch is strong and durable. This wood works well in different styles like modern, rustic, or minimalist. You can paint it or leave it natural for a cozy touch. Many people love birch because of its warm feel. It can bring any room to life with a touch of nature.
What makes birch wood popular for accent walls?
Birch wood’s beauty and strength make it a top choice. Its light color matches many designs, adding brightness to spaces.
Key Benefits of Birch Wood:
- Smooth texture
- Durable and strong
- Warm, inviting look
- Versatile for different styles
Materials Needed for Your DIY Birch Accent Wall
List essential tools and materials required for the project.. Provide recommendations for sourcing highquality birch wood and other supplies..Ready to transform your space? For a natural birch accent wall, you’ll need some key tools and materials!
| Materials | Why You Need Them |
|---|---|
| Birch Wood Boards | These are the stars of your show! Look for quality at local lumber yards or online sites. |
| Wood Glue | This helps hold everything together. Think of it as the wall’s best friend! |
| Saw | You need one to cut the wood. Don’t worry, it’s less scary than it sounds! |
| Sandpaper | For a smooth finish. No one wants splinters in their living room. |
| Paint or Stain | To give your wall a pop. Choose colors that match your vibe! |
Locating good birch wood can be easy. Check local hardware stores or websites for the best deals. Happy crafting!
Preparing Your Space for Installation
Guide on measuring the wall and calculating the amount of birch wood needed.. Tips on clearing the wall area and ensuring a clean workspace..Start by measuring your wall. Use a tape measure to find the height and width. Multiply these numbers to get the total area. Next, calculate how much birch wood you need by checking the size of each panel. Remember to add a bit extra for mistakes.
Before you begin, clear the wall area. Remove any pictures, shelves, or decor. This makes the workspace cleaner and safer. A tidy space helps you work better. Also, lay down a plastic sheet to protect your floor. You’ll enjoy your project more in a neat place!
How do I measure my wall for birch wood?
To measure your wall, use a tape measure. Get the height and width, and multiply these for the total area.
Quick Tips for Preparing Your Space:
- Take down all items from the wall.
- Clean the wall surface.
- Lay down a protective sheet on the floor.
- Have all tools ready and nearby.
Step-by-Step Installation Process
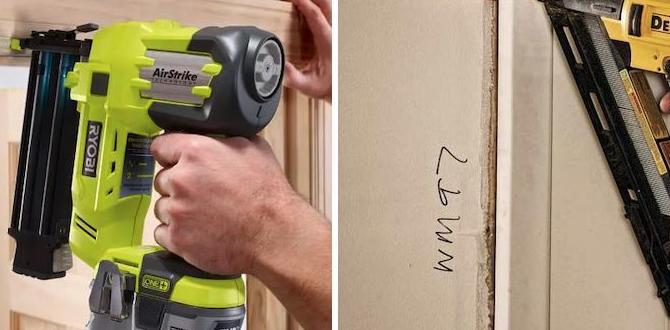
Detailed instructions on how to cut and fit the birch panels.. Techniques for securing the panels to the wall for a professional finish..First, measure your wall and cut the birch panels to size. Use a circular saw for straight cuts and a jigsaw for curves. Make sure to wear safety goggles; you don’t want sawdust in your eye! Now, place the panels on the wall. Start from one corner and work your way out. For a professional finish, secure the panels using finishing nails. Mark where to nail to avoid messy holes. You want your wall to look amazing, not like a toddler’s art project, right?
| Step | Action |
|---|---|
| 1 | Measure and cut birch panels |
| 2 | Place panels on wall, starting from a corner |
| 3 | Secure with finishing nails at marked spots |
Following these simple steps will help you create a lovely natural birch accent wall that makes your friends say, “Wow!” and not “What happened here?”
Finishing Touches for Your Birch Accent Wall
Suggestions on staining or sealing the birch to enhance durability and appearance.. Ideas for incorporating lighting or decor to complement the accent wall..Once your birch accent wall is up, it’s all about the finishing touches! Start by giving the wood a good stain or seal. This will not only make it shine but also keep it safe from little spills and splats. Did you know that protective finishes can make your wall last for years? Now, let’s add some flair! Consider using warm lights to create a cozy atmosphere. Maybe some cute plants or fun art pieces too! The right decor will turn your wall from drab to fab!
| Suggestions | Benefits |
|---|---|
| Stain or Seal | Enhances durability and appearance |
| Warm Lighting | Creates a cozy atmosphere |
| Decor Items | Adds personality and charm |
Maintenance Tips for Your Birch Accent Wall
Best practices for cleaning and maintaining the birch wood over time.. Advice on addressing any issues such as scratches or discoloration..A birch accent wall makes any room pop! Keeping it looking great is easy. First, wipe it with a soft cloth regularly to remove dust. You can mix equal parts vinegar and water for a gentle cleaner if it needs a refresh. For scratches, use a matching wood crayon or marker—covering it up is like giving your wall a little makeover! If discoloration happens, fine sandpaper can help smooth things out. Remember, your wall doesn’t need a spa day, but a little TLC goes a long way!
| Maintenance Task | Frequency |
|---|---|
| Dusting | Weekly |
| Deep Cleaning | Monthly |
| Scratch Repair | As needed |
| Check for Discoloration | Every 3 months |
Alternative Ideas for Using Birch in Home Decor
Inspiration for other DIY projects that utilize birch wood.. Explore how birch can be integrated into different styles and spaces in your home..Birch wood can work wonders in your home! Think beyond walls. You can craft cheery shelves or make quirky furniture pieces that catch the eye. Birch really brings a sense of warmth and natural charm. A birch wood vase can spruce up your table, while a playful birch picture frame adds personality. Imagine adding birch coasters to your coffee table—they’re not only practical, they’re also fun! Here are some projects to inspire you:
| Project | Description |
|---|---|
| Birch Wood Shelves | Sturdy and stylish, these hold your favorite books or knick-knacks. |
| Birch Picture Frames | Show off family memories in a stylish way. |
| Birch Coasters | Protect your surfaces with a touch of nature. |
So get crafty with birch and add that cozy wood feel to any corner of your home!
Conclusion
In conclusion, creating a natural birch accent wall DIY is fun and rewarding. You can easily transform your space with simple materials and tools. Remember to choose the right birch and measure carefully. Don’t rush; take your time for the best results. For more tips and ideas, check out other DIY projects to inspire your creativity! Happy decorating!FAQs
Here Are Five Related Questions On The Topic Of Creating A Natural Birch Accent Wall Diy:Sure! To make a birch accent wall, you’ll need some birch wood. You can buy this wood at a store. First, you measure your wall to know how much wood you’ll need. Then, you can cut the wood pieces to fit. Finally, attach the wood to the wall using glue or nails. It will look beautiful in your room!
Sure! Just let me know what question you have, and I’ll provide a simple answer.
What Materials Do I Need To Create A Natural Birch Accent Wall?To create a natural birch accent wall, you need some wooden birch boards. You’ll also need a saw to cut them to size. Get wood glue or nails to stick them to the wall. Don’t forget a measuring tape and a level to make sure everything is straight. Finally, grab some sandpaper to smooth the edges!
How Do I Prepare The Wall Surface Before Installing Birch Logs Or Planks?First, you need to clean the wall. Use a cloth to wipe off dust and dirt. If the wall is rough, you might want to sand it down. Next, make sure the wall is dry. Finally, check for any holes or cracks and fill them in. Now you’re ready to put up the birch logs or planks!
What Is The Best Method For Securing Birch Wood To The Wall To Ensure Durability?To secure birch wood to the wall, use strong screws. First, drill holes in the wood. Then, line up the wood where you want it on the wall. Next, screw it into the wall firmly. This keeps the wood safe and steady for a long time.
How Can I Achieve A Polished Or Rustic Finish On The Birch Accent Wall?To get a polished finish on your birch wall, you can sand it until it’s smooth. Then, apply a clear coat like varnish. For a rustic look, you can leave the wood rough and use a wood stain. This will add color and make the wall look cozy. Both finishes can be fun to try!
Are There Any Specific Maintenance Tips To Keep My Birch Accent Wall Looking Its Best Over Time?To keep your birch accent wall looking great, dust it regularly with a soft cloth. Avoid using harsh cleaners; warm soapy water works well. You can also check for any scratches and fix them with wood polish. Finally, try to keep it out of direct sunlight to prevent fading.