Summary: For DIY pallet projects, a pneumatic framing nailer or a heavy-duty cordless framing nailer is your genius essential tool. It makes quickly and safely disassembling, assembling, and building with pallets incredibly efficient, saving you time and effort.
Ever stared at a stack of free pallets and dreamed of building amazing things like rustic coffee tables, garden planters, or even outdoor furniture? It sounds fun, right? But then you think about pulling apart those tough, nailed-together planks, or putting them back together firmly… and it feels a little daunting. The thought of pounding nails one by one with a hammer can make even the most enthusiastic beginner feel a bit discouraged. But what if I told you there’s a tool that can turn this whole process from a chore into a breeze? A tool that makes working with pallets fast, easy, and surprisingly satisfying?
Well, buckle up, because today we’re diving into the world of the nailer for pallet projects. It’s a game-changer, and by the time we’re done, you’ll see why it’s an absolute must-have for anyone who loves repurposing these humble wooden treasures.
Table of Contents
Why a Nailer is Your Pallet Project’s Best Friend
Pallets are fantastic sources of free or cheap lumber. They’re sturdy, readily available, and perfect for a wide range of DIY projects. However, they also come with their own set of challenges. The wood is often rough, the boards can be stuck together with really stubborn nails, and building new items requires precise and strong connections. Trying to do all of this by hand with just a hammer and screwdriver can be time-consuming, physically demanding, and sometimes, just plain frustrating. You might end up with wobbly projects or spend way more time than you planned.
This is where a nailer steps in. It’s not just a tool; it’s a project accelerator. For pallet work, it’s about efficiency, speed, and getting a professional-looking finish with a lot less effort. It’s about making your DIY dreams a reality without the backaches and the endless hammering.
Choosing the Right Nailer for Pallet Projects: Decoding the Options
When we talk about a “nailer for pallet projects,” we’re generally looking for a tool that can handle slightly larger nails and drive them with sufficient power to go through dense pallet wood and into other pieces. The most common and effective types for this job are framing nailers. These are designed for heavy-duty construction tasks, which makes them perfect for the robust nature of pallet wood.
Let’s break down the main contenders:
1. Pneumatic Framing Nailers
These are the workhorses of the nailing world. They run on compressed air supplied by an air compressor. They are known for their power, speed, and lighter weight in hand compared to their cordless counterparts, as the motor is external (the compressor). If you plan on doing a lot of pallet work or other construction-like DIY projects, a pneumatic nailer is often the go-to choice.
Pros of Pneumatic Framing Nailers:
- Powerhouse Performance: They deliver serious driving force, easily sinking nails into tough wood.
- Lightweight in Hand: Without a heavy motor onboard, they’re more comfortable for extended use.
- Fast Firing Rate: Many pneumatic nailers can fire nails very rapidly, ideal for quick assembly.
- Durability: Generally very robust and built to last with proper maintenance.
- Cost-Effective: Often, the nailer itself is less expensive than a comparable cordless model, though you need to factor in the cost of an air compressor and hose.
Cons of Pneumatic Framing Nailers:
- Requires Air Compressor: You need an air compressor, which adds to the initial cost, takes up space, and can be noisy.
- Hose Management: The air hose can get in the way and limit your movement.
- Setup Time: You need to connect the hose, turn on the compressor, and let it build pressure.
2. Cordless Framing Nailers
These are battery-powered marvels that offer the ultimate in portability. They use a combination of a battery, a powerful motor, and often a small gas cartridge or a spring-loaded mechanism to drive nails. They are fantastic if you don’t want the hassle of an air compressor or need to take your tool to remote locations.
Pros of Cordless Framing Nailers:
- Ultimate Portability: No cords, no hoses! Work anywhere you want.
- Fast Setup: Just grab it and go.
- Convenient: Great for quick jobs or if you have limited space for equipment.
Cons of Cordless Framing Nailers:
- Heavier in Hand: The battery and motor add significant weight.
- Battery Dependence: You need charged batteries, and running out mid-project can be a bummer.
- Power Can Vary: Some cheaper models might struggle with the densest pallet wood compared to pneumatic.
- Higher Initial Cost: Generally more expensive upfront than pneumatic systems.
- Maintenance: Can require more specialized maintenance depending on the fuel source.
Which One is Best for Pallets?
For most DIYers tackling pallet projects, especially if you’re disassembling and then reassembling, a pneumatic framing nailer is often the most powerful and cost-effective choice in the long run. Its consistent power is excellent for both breaking down pallets and building new items. However, if portability and ease of use are your absolute top priorities, and you’re willing to invest a bit more, a high-quality cordless framing nailer is also a superb option.
Key Features to Look For in a Pallet Nailer
You don’t need the absolute top-of-the-line industrial nailer, but there are a few features that will make your life much easier when working with pallets:
- Nail Capacity: Look for a nailer that can handle nails of at least 2 inches, and preferably up to 3-1/2 inches. This gives you flexibility for different project needs.
- Depth Adjustment: This is crucial! It allows you to control how deep the nail is driven. You’ll want to drive nails just beneath the surface of the wood, not smash them in so hard they blow through or are left sticking out.
- Rafter Hook: Handy for hanging the nailer on your belt or a ladder rung when you’re not using it.
- Sequential Trip vs. Bump Fire:
- Rafter Hook: Handy for hanging the nailer on your belt or a ladder rung when you’re not using it.
- Sequential Trip vs. Bump Fire:
- Sequential Trip: Requires you to press the safety contact tip against the wood then pull the trigger. This is safer and more precise, good for making sure your nails go exactly where you want them.
- Bump Fire: Allows you to hold down the trigger and “bump” the nailer against the wood to fire nails rapidly. This is faster for assembly but requires more practice to control precisely.
- Weight and Ergonomics: Since you’ll be handling it, make sure it feels comfortable in your hand.
- Jam Clearing: A tool that’s easy to clear jams from will save you a lot of frustration.
For specific nail types, framing and construction nailing typically use nails that are collated with either plastic or wire. Plastic-collated nails are often better for outdoor use as they don’t rust, but wire-collated nails can sometimes be easier to find or cheaper. Either will work well for pallets.
The “Nailer vs. Hammer” Showdown for Pallets
Let’s be honest, you can disassemble and assemble pallets with a hammer. Many people do! But let’s compare the experience and efficiency:
| Feature | Hammer | Nailer (Pneumatic/Cordless Framing) |
|---|---|---|
| Disassembly Speed | Slow and laborious. Requires prying and hammering nails out one by one. High risk of wood splitting. | Significantly faster. Often, nails can be driven through or pried out with minimal damage to the wood. Specialized nail pullers (part of some nailer kits or separate tools) make it even easier. |
| Assembly Speed | Very slow. Each nail takes multiple hammer strikes. Consistent driving depth is difficult. | Extremely fast. Nails are driven with a single trigger pull. Consistent depth is achievable with depth adjustment. |
| Effort Required | High physical exertion. Repetitive motion can lead to fatigue and injury. | Significantly less physical exertion. Tool does the driving. Ergonomics are important to manage weight. |
| Nail Strength/Consistency | Can be inconsistent. Nails might not be driven fully, or they might bend. | Consistent, strong drives. Nails are driven to a consistent depth, creating strong joints. |
| Wood Damage Potential | High – hammering can split wood, prying can gouge. | Lower – precise nail placement and achievable depth control minimize splitting. For disassembly, careful nail removal is key. |
| Cost of Tool | Low (hammer is inexpensive). | Moderate to High (nailer + compressor for pneumatic, or higher cost for cordless). |
| Learning Curve | Low. | Moderate (learning safe operation, depth adjustment, clearing jams). |
As you can see, while a hammer is cheap, the nailer offers a massive leap in efficiency, speed, and the quality of your finished project, especially when dealing with the demands of pallet wood.
DIY Pallet Disassembly with Your Nailer
One of the first tasks you’ll likely face with pallets is taking them apart to get usable lumber. This is where your nailer can shine, though it requires a slightly different approach than assembly. You’re not necessarily driving nails in this phase, but using the nailer’s power and precision for removal or to facilitate easier dismantling.
Here’s a general approach:
Tools You’ll Need for Disassembly:
- Your chosen framing nailer (pneumatic or cordless)
- Pry bar (a good stout one!)
- Hammer (for persuasion, or to unbend nails)
- Safety glasses (ESSENTIAL!)
- Work gloves
- Reciprocating saw with a metal-cutting blade (optional, for stubborn nails)
- Nail puller attachment (some nailers have them)
Steps for Pallet Disassembly:
- Inspect the Pallet: Look for any loose or damaged boards. Note how the boards are joined. Some pallets are assembled with screws, others with nails. Most nails are straight, but some are ring-shanked (ridged) for extra grip, making them tougher to remove.
- Start with the Deck Boards: These are usually attached to stringers (the thicker support beams). Place a pry bar between the deck board and the stringer.
- Using the Nailer for Assistance (Optional but Recommended): This is where it gets clever. Some people use a nailer configured for disassembly. You can sometimes drive a nail next to a stubborn nail head to help loosen it. Or, if a nail is really sunk and you want to avoid excessive prying, you can sometimes drive another nail through the board to pop the other one up slightly, or even sink it through if it’s on the underside. Be cautious with this method. A more common approach is to use the nailer to re-seat nails that are popping up from the bracing, making them easier to get a grip on with a pry bar.
- Pry Gently but Firmly: Apply steady pressure with your pry bar to create a gap. You might need to move the pry bar along the board or use a hammer to tap the prying end down.
- Address Stubborn Nails: If a nail simply won’t budge, you have a few options:
- Hammer and Pry Bar: Drive the hammer head under the nail head along with the pry bar.
- Nail Set: Use a nail set to drive the nail head below the surface of the wood, then try prying from the other side.
- Reciprocating Saw: For really stubborn, rusted-in nails, a reciprocating saw with a metal-cutting blade can be slipped between the boards to cut the nail. This is a last resort as it can damage the wood around the nail.
- Hammer and Nailer (Carefully): Some experienced users will carefully use their framing nailer to drive nails through the board and out the other side, effectively “pushing” the original nail out. This takes practice and is best for nails on the underside of the stringer.
- Remove Stringer Boards: Once all deck boards are off, you’ll be left with the thicker stringer boards, which are usually much more heavily nailed. Repeat the prying process here.
- Clean Up: Pull out any remaining nail fragments or use your nailer to drive them flush if they’re too difficult to remove, so they don’t cause injury.
Watch this helpful video tutorial on dismantling pallets for visual guidance. Remember to prioritize safety and work slowly, especially when you’re new to it.
DIY Pallet Assembly with Your Nailer
Now for the fun part – building! This is where your nailer truly shines. It allows you to create strong, durable constructions quickly and easily. Using a nailer for assembly will feel more intuitive than disassembly.
Setting Up for Assembly:
- Air Compressor (for Pneumatic): Ensure your compressor has enough air pressure (usually set between 90-120 psi, check your nailer’s manual).
- Nailer Settings: Adjust the depth setting so nails sink flush or slightly below the wood surface. Test on a scrap piece first.
- Nail Selection: Use appropriate framing nails (e.g., 2-1/2″ to 3-1/2″ for most pallet projects).
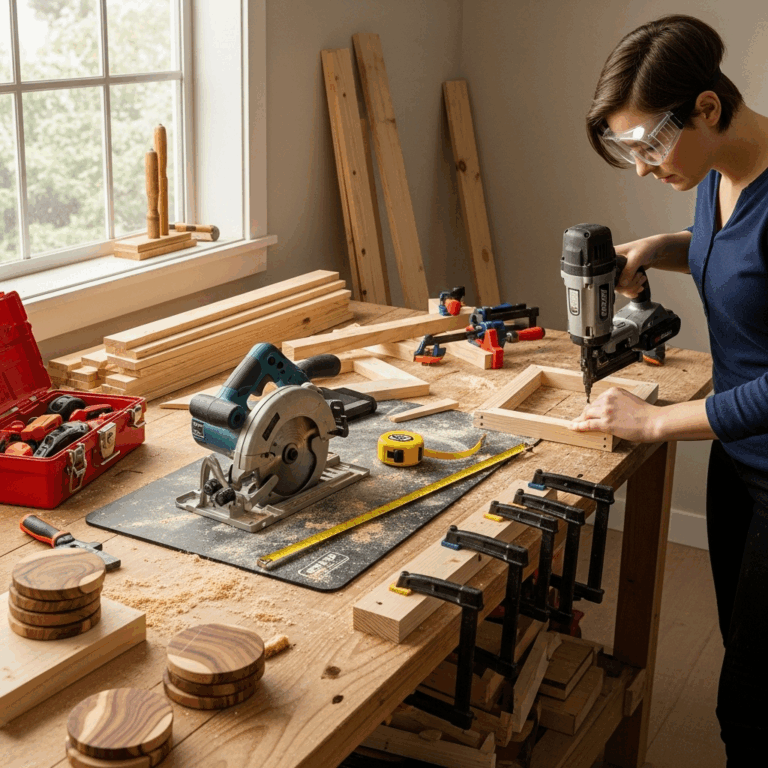
- Safety First: Always wear safety glasses! Ensure no one is behind you when you fire the nailer.
Steps for Pallet Assembly:
- Plan Your Project: Have a clear design in mind. Measure and cut your pallet wood pieces to size using a saw.
- Position Your Pieces: Lay out the pieces you want to join. For example, attaching a brace to a larger panel.
- Nail Placement: For maximum strength, you generally want nails to go through one piece of wood and into the grain of the other piece, not just into the end of it. If joining two boards edge-to-edge, try to place a third piece behind them to nail into.
- Use the Sequential Trip (Recommended for Beginners):
- Place the nose of the nailer firmly against the wood where you want to drive a nail.
- Depress the safety contact tip (the little lever on the nose) against the wood.
- Pull the trigger.
This ensures you drive a nail only when you intend to.
- Bump Fire for Speed (With Practice): If you’ve got the hang of sequential firing and want speed, use bump fire. Hold the trigger down, and rapidly press the nose of the nailer against the wood at each desired nail location. This is great for quick tacking, but requires more control to avoid unintentional nail placement.
- Drive Multiple Nails: For strong joints, especially on larger pieces, drive multiple nails spaced appropriately. For example, for a simple brace, you might drive two nails on each connection point.
- Check Your Work: Ensure all nails are driven to the desired depth and that your project feels sturdy.
You can find fantastic inspiration and step-by-step guides for pallet projects online. Many woodworking blogs and YouTube channels offer detailed plans that will guide you from raw pallet wood to finished furniture. For more on the physics of woodworking joints, consider exploring resources from organizations like the Woodworkers’ Journal which often discuss the best ways to join lumber.