Have you ever wondered how professionals get their jobs done so fast? The answer often lies in the tools they use. One of those powerful tools is the nail gun. Today, we’ll explore the Paslode nail gun user manual. This guide is essential for anyone wanting to master this handy device.
Getting started with a nail gun might seem tricky. But don’t worry! The Paslode nail gun user manual is here to help. Did you know that using a nail gun can save you a lot of time? Instead of hammering nails one by one, you can finish your project in just a fraction of the time.
Imagine you are building a treehouse or fixing a deck. What if you could drive nails quickly and easily? With the Paslode nail gun, you can do just that. This manual will walk you through everything you need to know, from safety tips to maintenance tricks. Are you ready to learn how to make your work faster and more fun?
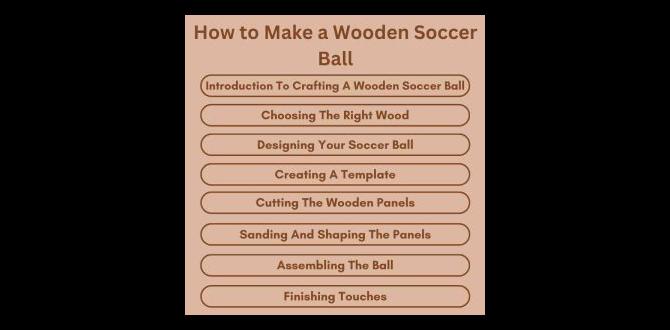
Table of Contents
Nail Gun User Manual Paslode: A Complete Guide For Users
Paslode’s nail gun user manual is a treasure trove of useful information. It guides you through setup, safety, and maintenance. Have you ever wondered how to maximize your tool’s lifespan? The manual explains important care tips. You’ll also find instructions for troubleshooting common issues. Did you know that improper use can lead to accidents? Learning to operate it safely can prevent mishaps. This manual is your key to becoming a confident and skilled user.
Safety Precautions for Nail Gun Use
Essential safety gear and equipment. Common hazards and how to avoid them.
Using a nail gun can be fun, but it comes with risks! Before you start, wear essential safety gear like goggles and gloves. They protect your eyes and hands from flying sparks—and yes, you definitely don’t want a splinter the size of a small town!
Be on the lookout for common hazards, such as misfires and stray nails. Don’t point the gun at anyone, even if you’re just practicing your aim for the next dart tournament. Keep your workspace clear to avoid tripping over tools.
| Safety Gear | Hazard | Prevention |
|---|---|---|
| Goggles | Misfires | Aim safely |
| Gloves | Stray nails | Clear workspace |
| Ear Protection | Noise | Use regularly |
Remember, safety first! A few laughs and precautions can ensure your project ends up fun, not fatal.
Components of the Paslode Nail Gun
Detailed breakdown of parts and functions. Importance of each component in operation.
The paslode nail gun has several important parts that work together. Each piece plays a role in making the tool efficient and safe. Here’s a quick look at its main components:
- Trigger: This part starts the firing action.
- Nail Chamber: It holds and feeds nails during use.
- Safety Mechanism: This prevents accidental firing.
- Motor: It powers the nail gun to drive nails into wood.
- Housing: The outer shell keeps all parts secure.
Understanding the function of each component helps users operate the nail gun safely and effectively. Proper care for these parts ensures longer tool life.
What are the key components of a paslode nail gun?
The main parts include the trigger, nail chamber, safety mechanism, motor, and housing. Each part is crucial for safety and performance.
Setup and Preparation
Instructions for assembling the nail gun. Loading nails and fuel cartridge correctly.
First, let’s get that nail gun ready! Start by grabbing your Paslode nail gun, and follow these steps. Each nail gun is like a puzzle; you’ll need the right pieces. To assemble, check the manual for the correct parts. It’s like building with Legos, but with less snack breaks! Next, loading nails requires a little finesse. Open the magazine and slide the nails in. Don’t squish them like an overripe banana! After that, you’ll need a fuel cartridge. Insert it carefully. If you hear a ‘pop!’ don’t panic—it’s just the fuel getting cozy! Here’s a quick table for clarity:
| Step | Action |
|---|---|
| 1 | Assemble nail gun parts |
| 2 | Load nails into magazine |
| 3 | Insert fuel cartridge |
Follow these steps, and you’ll be ready to nail it—literally! Always check your manual if things get wobbly.
Operating Your Paslode Nail Gun
Stepbystep operation guide. Tips for effective and efficient nailing.
Start your Paslode nail gun adventure with a good read of the user manual. First, load your nails like you’re stacking pancakes—neat and tidy! Next, check your safety gear. No one looks cool with a finger missing. Then position your gun, aim, and *blast*! Remember, the nail goes in, not your fingers! For the best results, keep the gun steady and don’t rush. You’ll be nailing like a pro in no time!
| Tip | Details |
|---|---|
| Check Your Nails | Make sure you have the right nails for the job! |
| Maintain Distance | Keep the gun about 90 degrees to the surface! |
| Stay Safe | Always wear goggles; you want to see your masterpiece, not the inside of an eye doctor’s office! |
Maintenance and Care
Regular cleaning and upkeep procedures. Troubleshooting common issues and repairs.
Taking care of your nail gun is important for safe and efficient use. Regularly clean it to keep it in top shape. Use a cloth to wipe off dirt and debris after every project. If you hear strange noises or it stops working, don’t panic! Check the manual for troubleshooting tips. Asking, “Why isn’t my gun shooting?” is a common question. It might just need a little love – or some new nails.
| Common Issue | Quick Fix |
|---|---|
| Jamming | Clear the jam and check for nail alignment. |
| Poor Performance | Clean and lubricate the moving parts. |
| Battery Not Charging | Check the charger and replace the battery if needed. |
With a little care, your nail gun can last a long time. Remember, it’s just a tool – not a magic wand. So, keep it happy, and it will keep you happy!
Choosing the Right Nails and Fuel
Different types of nails suitable for Paslode. Understanding fuel options and their impact on performance.
Choosing the right nails and fuel is key for your Paslode nail gun. You can use different types of nails based on your project. Here are some suitable nails:
- Common nails
- Finish nails
- Brad nails
Next, understand your fuel options. The right fuel can boost performance. Paslode offers:
- Gas cartridges
- Batteries
Each option affects how efficiently your nail gun works. Choose wisely for best results!
What types of nails do I need for a Paslode nail gun?
You need finish nails, brad nails, or common nails depending on your task.
How does fuel affect nail gun performance?
Fuel types can change speed and power. The right fuel ensures smooth operation.
Additional Resources and Support
Where to find further information and manuals. Contacting support for issues and repairs.
Need more tips on using your nail gun? Explore the Paslode website for extra manuals and helpful guides. They’ve got all the info you could dream of and then some! If something goes wrong, don’t panic. Contact their support team for repairs or questions. They’re like superheroes but with tools! Check the table below for quick contact details:
| Resource | Link/Contact |
|---|---|
| Paslode Manuals | Paslode Manuals |
| Customer Support | 1-800-222-6990 |
| Email Support | [email protected] |
Conclusion
In summary, the Paslode nail gun user manual is essential for safe and effective use. It helps you understand your tool and its features. Follow the safety tips and guidelines to avoid accidents. We encourage you to read the manual carefully and practice using your nail gun. This will boost your confidence and skill as a user.
FAQs
What Safety Precautions Should Be Taken Before Using A Paslode Nail Gun?
Before using a Paslode nail gun, you should wear safety goggles to protect your eyes. Make sure you read the instructions. Check the nail gun for any jams or damage. Keep your hands and body away from the front. Always point the nail gun away from yourself and others.
How Do You Properly Load Nails Into A Paslode Nail Gun?
To load nails into a Paslode nail gun, first, make sure the gun is off and not loaded. Open the magazine by pressing the release button. Next, take the nail strip and place it into the magazine, making sure the nails face down. Close the magazine until it clicks into place. Now, your nail gun is ready to use!
What Types Of Fasteners Are Compatible With Paslode Nail Guns?
Paslode nail guns use special nails called “nails” or “fasteners.” These nails come in different sizes and types, like framing nails for big jobs and finishing nails for small details. You load the nails into the gun, and it shoots them into wood. Make sure to always use the right type of nails for your specific Paslode gun!
How Can I Troubleshoot Common Issues With My Paslode Nail Gun, Such As Jamming Or Misfires?
If your Paslode nail gun jams, first check if the nails are loaded correctly. Open the magazine and make sure the nails aren’t bent or stuck. If it misfires, you might need to clean the gun or add more battery power. Check the air pressure too, since low pressure can cause problems. Always wear safety glasses while working!
What Maintenance Steps Are Recommended To Ensure The Longevity And Proper Functioning Of A Paslode Nail Gun?
To keep your Paslode nail gun working well, first, clean it after each use. You should check and change the fuel cell regularly, as it helps power the tool. Make sure to oil the tool a little bit to keep it running smoothly. Always store it in a dry place to prevent rust. Lastly, check for any loose parts before using it again.