Yes, a nail gun is essential and makes fence building effortlessly easy, saving you significant time and back strain compared to hammering by hand. It ensures strong, consistent connections, perfect for DIYers who want professional results with less fatigue.
Building a fence can seem like a big project, right? You picture yourself wrestling with wooden posts and boards, hammer in hand, for what feels like forever. It’s easy to get discouraged before you even start. But what if I told you there’s a tool that can transform this task from a chore into a swift, satisfying process? That’s where a nail gun for fence building shines. It’s not just a shortcut; it’s a smarter way to build, guaranteeing sturdy results without all the sweat and sore thumbs. Get ready to discover how a nail gun can make your fence project surprisingly simple and quick.
Table of Contents
Why a Nail Gun is Your Fence Building Ally
Let’s be honest, swinging a hammer all day to attach fence pickets or rails is exhausting. Your arms ache, your rhythm gets off, and sometimes, you miss the nail or hit your thumb. This is tough work! A nail gun dramatically changes this experience. It drives fasteners quickly and powerfully, making the repetitive task of attaching boards feel almost effortless. For anyone looking to build a beautiful, durable fence without breaking their back, a nail gun is a game-changer. It’s an investment in your time, your energy, and the quality of your finished fence.
Choosing the Right Nailer for Your Fence
Not all nail guns are created equal, especially when it comes to fence building. You need a tool that can handle the job reliably and efficiently. The most common and suitable types for fence construction are framing nailers and coil roofing nailers.
Framing Nailers
These are powerhouses designed for heavy-duty construction. They fire larger nails, typically between 2 to 3-½ inches long, making them ideal for securely attaching fence rails to posts and for more structural elements of your fence. Framing nailers come in both pneumatic (air-powered) and cordless (battery-powered) varieties.
Pros of Framing Nailers for Fences:
- Power: Drives longer nails deep into wood for maximum holding power.
- Speed: Fires nails rapidly, significantly speeding up installation.
- Durability: Built to withstand tough construction environments.
- Versatility: Can handle various lumber sizes and types common in fencing.
Cons of Framing Nailers for Fences:
- Size and Weight: Can be bulkier and heavier, requiring more strength to maneuver.
- Cost: Generally more expensive than other nailer types.
- Air Compressor Needed (for pneumatic): Requires an air compressor and hose, limiting portability if you don’t have one.
Coil Roofing Nailers
While designed for roofing, these nailers are surprisingly effective for fence pickets and other lighter-duty tasks. They use nails collated in a coil, fed into the gun at an angle. Their compact size and ease of use make them a popular choice for attaching thinner boards.
Pros of Coil Roofing Nailers for Fences:
- Lightweight & Compact: Easier to handle and maneuver, especially when working overhead or at awkward angles.
- Speed: Continuous feeding mechanism allows for very fast nailing.
- Nail Capacity: Coils hold many nails, meaning fewer reloads.
- Cost-Effective: Often less expensive than framing nailers.
Cons of Coil Roofing Nailers for Fences:
- Nail Length: Typically fire shorter nails (around 1 to 1-¾ inches), which might not be sufficient for structural connections. Best for pickets.
- Less Power: May struggle to penetrate dense hardwood or multiple layers of wood.
- Nail Angle: The angled magazine can sometimes make it tricky to get into tight corners.
Pneumatic vs. Cordless Nailers
When you’re choosing between pneumatic (air-powered) and cordless (battery-powered) nailers, consider your workspace and priorities.
- Pneumatic Nailers:
- Pros: Generally lighter than their cordless counterparts, more powerful, and often less expensive upfront. They also don’t run out of battery power.
- Cons: Require an air compressor and hose, which can be cumbersome and limit your range of motion. The compressor itself can be loud.
- Cordless Nailers:
- Pros: Ultimate freedom of movement – no hoses or compressors needed! Modern battery technology offers great power and run time. Great for remote fence locations.
- Cons: Can be heavier due to the battery, more expensive upfront, and you need to ensure batteries are charged.
What Kind of Nails to Use
The type and size of nails are crucial for a strong fence. Always match your nails to your nail gun and the specific task.
| Nailer Type | Typical Nail Size | Recommended Use for Fencing | Galvanization/Coating |
|---|---|---|---|
| Framing Nailer | 2″ to 3-½” (10 to 8-gauge) | Attaching fence rails to posts, structural framing. | Hot-dip galvanized (HDG) or similar exterior-grade coating. |
| Coil Roofing Nailer | 1″ to 1-¾” (14 to 11-gauge) | Attaching fence pickets, trellises, lighter decorative elements. | Hot-dip galvanized (HDG) or stainless steel. |
For fence building, exterior-grade nails are absolutely essential. Look for nails that are either hot-dip galvanized (HDG) or made of stainless steel. This coating protects the nails from rust and corrosion, which is vital for longevity, especially in outdoor environments that are exposed to moisture and the elements. Using the wrong type of nail will lead to rust stains on your fence boards and eventual structural failure.
Step-by-Step: Using a Nail Gun for Fence Building
Using a nail gun might seem intimidating at first, but with a little practice and attention to safety, you’ll be building your fence like a pro in no time. Here’s how to do it:
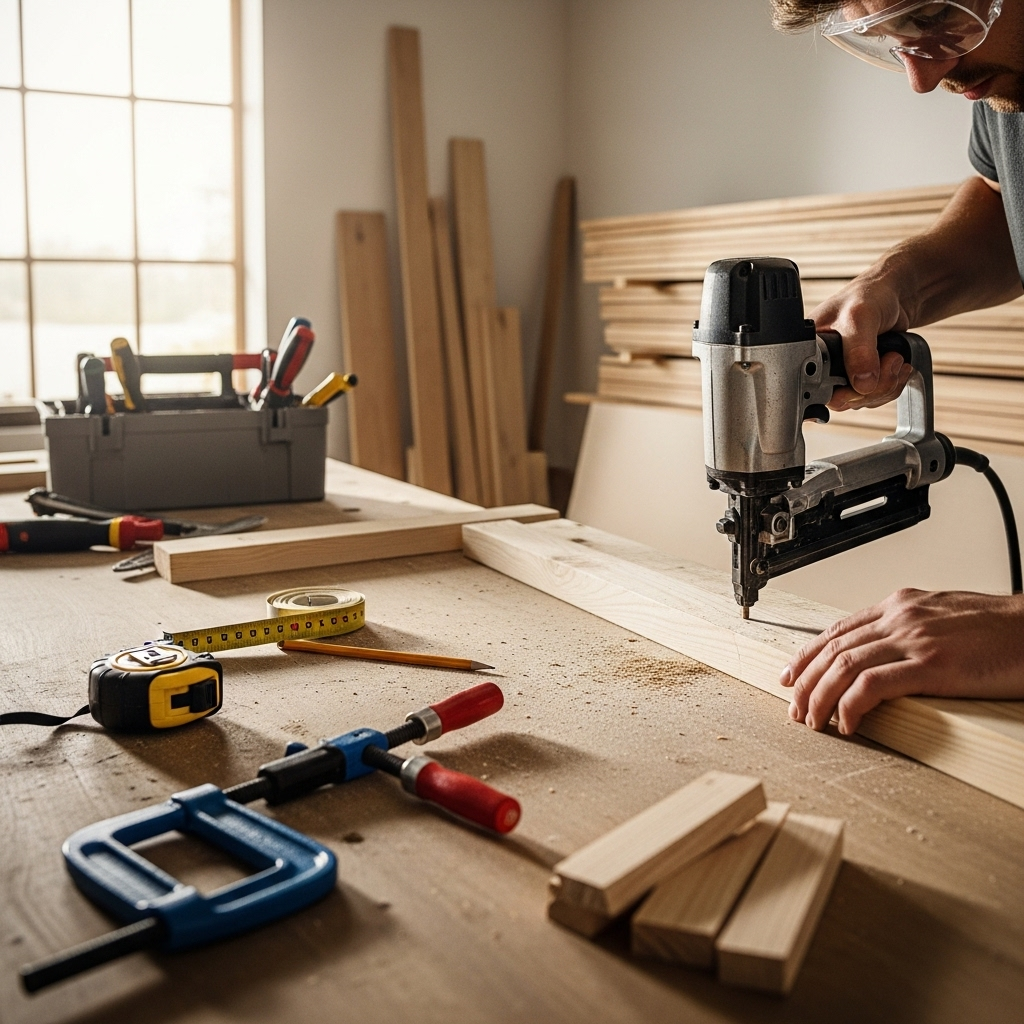
Step 1: Preparation and Safety First
Before you even pick up your nail gun, safety is paramount. Always wear safety glasses or goggles to protect your eyes from flying debris or ricocheting nails. Hearing protection is also recommended, especially with pneumatic nailers. Ensure your work area is clear of obstacles and that you have a stable footing. If using a pneumatic nailer, connect it to your air compressor and set the air pressure according to the nail gun’s manual—this is typically between 70-100 PSI. For cordless nailers, ensure the battery is fully charged.
Step 2: Understanding Your Nailer
Familiarize yourself with your specific nail gun. Read the owner’s manual! Understand how to load the nails, how to adjust the depth of drive (how far the nail sinks into the wood), and how to troubleshoot common issues. Most fence-building tasks will involve setting the depth so the nail head is just slightly below or flush with the wood surface. Too deep, and you might damage the wood; too shallow, and the nail won’t be secure.
Step 3: Loading the Nails
Loading varies by nailer type but generally involves opening the magazine, inserting the strip or coil of nails correctly, and closing the magazine until it latches. Make sure the nails are seated properly. For coil nailers, ensure the nails are oriented correctly in the feeder mechanism.
Step 4: Attaching Fence Pickets or Boards
This is where the magic happens. Position the fence picket or board against the fence rail or post where you want to attach it. Place the nose of the nail gun firmly against the wood at the point where the nail should enter. Crucially, most modern nail guns have a safety contact tip (a metal piece at the nose). This tip must be pressed against the wood for the nailer to fire. This is a vital safety feature to prevent accidental firing. Once the nailer is positioned and the contact tip is engaged, pull the trigger. The nail will be driven instantly.
For attaching pickets, you’ll typically use two nails per picket into each horizontal rail. Space them evenly. For attaching rails to posts, you might use three or four nails at each connection point, depending on the size of the lumber.
Step 5: Consistent Placement
The key to a professional-looking fence is consistency. Try to place your nail gun in the same spot each time for similar boards and aim to drive nails in similar locations. Practice on scrap wood to get a feel for the tool and achieve a uniform look. Many nailers have a “sequential trip” or “contact trip” firing mode. For fence building, the “contact trip” (bump fire) mode is often preferred for speed, though “sequential trip” offers more control for precise placement.
Step 6: Powering Your Nailer (Air or Battery)
- Pneumatic: Keep the air hose from becoming a trip hazard and ensure the compressor maintains consistent pressure.
- Cordless: Monitor your battery level. Have a spare charged battery ready if available to avoid interruptions.
Step 7: Troubleshooting and Common Issues
Occasionally, you might encounter a nail jam or a nail that doesn’t drive fully. Consult your nailer’s manual for how to safely clear jams – this usually involves disconnecting the air supply (or removing the battery) and using a tool to pull out the stuck nail. If nails aren’t driving deeply enough, check your air pressure (for pneumatic) or battery charge (for cordless). If they are driving too deep, adjust the depth of drive setting.
Fence Building Projects Perfect for Nail Guns
A nail gun isn’t just for fences; it can speed up many related outdoor projects.
- Picket Fences: Ideal for quickly attaching numerous pickets to rails. This is where a coil roofing nailer or a lighter framing nailer excels.
- Privacy Fences: The power of a framing nailer is invaluable for securing the solid boards and heavier rails required for privacy fences.
- Wood Garden Gates: Building a sturdy gate requires strong connections, making a framing nailer a great choice.
- Trellises and Arbors: Lighter projects like these are easy work for many nail guns, especially coil or finish nailers if you have one.
- Deck Railings with Pickets: If your deck railings include vertical pickets, a nail gun speeds up that repetitive fastening process.
Important Considerations for Outdoor Projects
Besides choosing the right nailer and nails, here are a few extra tips to ensure your fence building project is a success.
Weather Conditions
Avoid building in extremely wet or humid conditions if possible. While your nail gun can work in most weather, prolonged exposure to moisture can affect the wood’s stability and your comfort. Make sure your tools are protected from rain.
Wood Type
Some hardwoods are much denser than pine or cedar. A more powerful framing nailer might be necessary for consistently driving nails into harder woods. You might also need to adjust your air pressure or depth settings.
Nail Gun Maintenance
Keep your nail gun clean and well-maintained. Lubricate pneumatic nailers regularly according to the manufacturer’s instructions. Store your tools properly to prevent damage. Investing in good quality tools means they’ll serve you well for many projects to come.
Learning More About Tool Use
For detailed information on safe operation and maintenance for specific tools, always refer to the manufacturer’s guidelines. Organizations like the Occupational Safety and Health Administration (OSHA) also provide valuable safety resources for the safe use of portable, powered tools like nail guns.
Pros and Cons: Nail Gun vs. Hammer for Fencing
To really see the advantage, let’s compare the two methods side-by-side:
| Feature | Nail Gun | Hammer |
|---|---|---|
| Speed | Extremely fast; multiple nails per minute achievable. | Slow; requires significant time for each nail. |
| Effort/Fatigue | Minimal physical effort per nail; greatly reduces fatigue. | High physical demand; leads to significant arm and shoulder fatigue. |
| Consistency | Drives nails to a consistent depth and angle (with practice). | Depth and angle can vary greatly; requires skill for uniformity. |
| Holding Power | Generally drives nails deeper for superior holding power. | Can sometimes bend nails or not drive them fully, reducing holding power. |
| Accuracy | Precise placement possible with practice; safety tip helps. | Requires good hand-eye coordination; higher risk of hitting adjacent wood. |
| Cost (Tool) | Higher upfront investment (tool, compressor/batteries). | Low upfront investment (hammer is inexpensive). |
| Noise Level | Can be very loud (especially compressors). | Relatively quiet. |
| Risk of Injury | Risk of accidental firing, jams, ricochets. | High risk of hitting fingers, repetitive strain injuries. |
| Learning Curve | Moderate; requires understanding tool operation & safety. | Low; basic hammering is intuitive, but perfection takes practice. |
Frequently Asked Questions About Nail Guns for Fencing
—
Q1: Is a nail gun really necessary for building a fence, or can I just use a hammer?
While you can build a fence with a hammer, a nail gun makes the process significantly faster, easier, and less physically demanding. For any substantial fence project, a nail gun is a highly recommended tool that will save you a lot of time and energy.
Q2: What type of nail gun is best for fence pickets?
A coil roofing nailer is often ideal for fence pickets because it’s lightweight, easy to maneuver, and drives nails quickly. However, if your pickets are made of very hard wood or if you need slightly longer nails for better grip, a lighter framing nailer can also work well.
Q3: Do I need an air compressor for a fence nailer?
Not necessarily. Pneumatic nailers require an air compressor and hose. However, there are also many excellent cordless (battery-powered) nailers available that don’t require external air, offering greater portability.
Q4: What nail size should I use for attaching fence rails to posts?
For attaching fence rails to sturdy posts, you’ll typically want longer nails for maximum holding power. A framing nailer firing nails between 2.5 and 3 inches long is usually recommended for these structural connections.
Q5: How do I prevent nails from sinking too deep into the wood?
Most nail guns have an adjustable depth-of-drive setting. You can usually turn a dial or collar on the tool to control how far the nail penetrates the wood. It’s best to test fire on scrap pieces of the same lumber you’re using and adjust the setting until the nail head is flush or just slightly below the surface