Make a beautiful wooden tissue box cover effortlessly with this simple DIY guide. Learn the easy steps, essential tools, and tips to create a custom, stylish home for your tissue boxes that complements your decor, perfect for beginner woodworkers ready to tackle a satisfying project.
Tired of those drab cardboard tissue boxes cluttering your beautiful home? You know, the ones that just don’t match your style? Well, I’ve got just the project for you! Making a wooden tissue box cover is a fantastic way to add a touch of handmade charm and a custom look to any room. It’s surprisingly straightforward, even if you’re new to woodworking, and the result is a piece that looks way more expensive than it is to make. Forget those flimsy plastic holders; we’re creating something solid, stylish, and built to last. Ready to transform a basic necessity into a decorative accent? Let’s dive into how you can make your very own wooden tissue box cover, step-by-step.
Table of Contents
Why Make Your Own Wooden Tissue Box Cover?
There are a bunch of great reasons to craft your own wooden tissue box cover. First off, it’s a fantastic beginner woodworking project. The cuts are usually straight, the fastenings are simple, and you get a tangible, useful item at the end. Plus, you get to choose the wood, the finish, and even the exact dimensions to perfectly match your decor. Think about it: a rustic farmhouse look with reclaimed wood, a sleek modern vibe with a dark stain, or even something colorful for a kid’s room.
Beyond aesthetics, a wooden cover adds a sense of warmth and natural beauty that plastic or flimsy fabric just can’t replicate. It’s a small project, meaning it’s relatively quick and doesn’t require a massive investment in tools. You’ll gain confidence with each cut and joint, building valuable DIY skills along the way. And let’s not forget the satisfaction of saying, “I made that!”
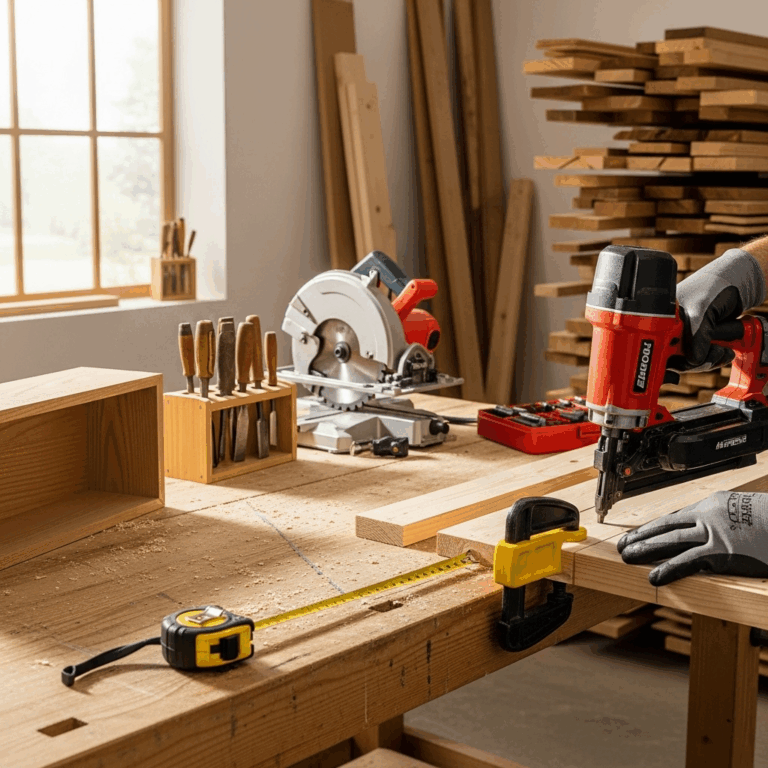
Essential Tools and Materials for Your Project
Before we start cutting and assembling, let’s gather everything we need. Don’t worry if you don’t have a professional workshop; many of these items are basic tools you might already own or can easily borrow.
Tools You’ll Need:
Measuring Tape: For accurate measurements, every time.
Pencil: To mark your cut lines.
Safety Glasses: Absolutely essential for protecting your eyes. Always wear them when cutting or sanding!
Hearing Protection: If you’re using power tools, this is a must.
Dust Mask: To avoid inhaling sawdust.
Saw: This could be a handsaw, a miter saw (highly recommended for precise angles and straight cuts), or a circular saw.
Clamps: To hold pieces securely while you glue or fasten them.
Sandpaper: A variety of grits (e.g., 120, 180, 220) for smoothing.
Sander (Optional): An orbital sander can speed up the sanding process significantly.
Drill/Driver: For pre-drilling holes and driving screws.
Countersink Bit: To allow screw heads to sit flush or below the wood surface.
Wood Glue: A good quality wood glue is crucial for strong joints.
Finishing Supplies: Paint, stain, polyurethane, or wax, depending on your desired look.
Brushes or Rags: For applying your chosen finish.
Materials You’ll Need:
Wood: Common choices include pine, poplar, oak, or plywood. For beginners, pine is affordable and easy to work with. You’ll need enough for the sides, top, and bottom of your cover.
Wood Screws: Choose screws that are appropriate for the thickness of your wood.
A Standard Tissue Box: This is your template! Measure your box carefully to ensure the cover will fit.
Planning Your Wooden Tissue Box Cover
This is where we get our ideas down on paper and make sure everything will fit together perfectly. A standard boutique tissue box is usually around 9.5 inches long, 5 inches wide, and 2 inches tall. However, tissue boxes can vary, so measuring your specific box is key!
Here’s a simple design we’ll follow: a rectangular box with an opening on top for the tissues to pull through. We’ll aim for a slight overhang on the sides and ends to give it a finished look and make it easy to slide the tissue box in and out.
Step 1: Measure Your Tissue Box
Grab that tissue box and your measuring tape. Measure its length, width, and height, including any rounded corners. Jot these down.
Length (L):
Width (W):
Height (H):
For our example, let’s assume your box is:
L = 9.5 inches
W = 5 inches
H = 2 inches
Step 2: Design Your Wood Dimensions
Now, let’s determine the size of the wooden panels. We want our wooden cover to be slightly larger than the tissue box so it slides in easily. A good rule of thumb is an extra 0.5 inches to 1 inch in length and width. For assembly, we’ll make the side panels longer than the front/back panels to create simple butt joints.
Let’s add 0.75 inches to the length and width for a comfortable fit.
Internal Length: L = 9.5 inches
Internal Width: W = 5 inches
To make assembly easier, we’ll build a four-sided box for the main structure.
Front/Back Panel Width: Internal Width (W) = 5 inches
Side Panel Width: Internal Length (L) + Thickness of Front Panel + Thickness of Back Panel. Let’s assume our wood is 0.5 inches thick. So, 9.5 + 0.5 + 0.5 = 10.5 inches.
Height of All Panels: Original Height (H) + desired overhang (let’s say 0.5 inches for a total of 2.5 inches).
The top panel will be slightly larger than the external dimensions of the box.
Top Panel Length: Internal Length (L) + 2 desired overhang (let’s say 0.75 inches on each side) = 9.5 + 0.75 + 0.75 = 11 inches.
Top Panel Width: Internal Width (W) + 2 desired overhang (let’s say 0.75 inches on each side) = 5 + 1.5 = 6.5 inches.
The bottom panel will be slightly smaller to fit inside the assembled side panels. This makes for a cleaner look and easier assembly.
Bottom Panel Length: Internal Length (L) = 9.5 inches.
Bottom Panel Width: Internal Width (W) = 5 inches.
This planning stage is crucial for a good fit. Double-checking your measurements here saves a lot of headaches later!
Cutting Your Wood Pieces
With your measurements finalized, it’s time to cut. Safety first! Always wear your safety glasses and hearing protection when using saws.
Let’s outline the pieces for our example using 0.5-inch thick wood:
2 x Side Panels: 10.5 inches (length) x 2.5 inches (height)
2 x Front/Back Panels: 5 inches (length) x 2.5 inches (height)
1 x Top Panel: 11 inches (length) x 6.5 inches (width)
1 x Bottom Panel: 9.5 inches (length) x 5 inches (width)
Here’s a breakdown of how to make the cuts:
1. Mark Your Wood: Using your measuring tape and pencil, carefully mark the dimensions for each piece onto your wood. For perfectly straight cuts, it’s a good idea to draw a line across the width of the board.
2. Make the Cuts:
If using a handsaw, take your time and saw precisely along your marked lines. A miter box can help you achieve straight cuts with a handsaw.
If using a miter saw or circular saw, ensure your wood is securely supported. Set your saw to a 90-degree angle for these straight cuts. Make sure your saw is set to the correct depth to cut all the way through the 0.5-inch material. For more on saw safety, the U.S. Consumer Product Safety Commission offers great resources.
3. Cut the Top Panel Opening: On the piece designated for the top panel (11″ x 6.5″), you need to cut out the opening for the tissues.
Measure in from each edge to mark the opening. This should be slightly smaller than the actual tissue opening on your box. Let’s aim for about 1 inch in from all the edges of the top panel.
Mark a rectangle in the center of your top panel. For our example, this would be approximately 9 inches long (11″ – 1″ – 1″) and 4 inches wide (6.5″ – 1″ – 1″).
To cut this opening, you have a few options:
Drill and Jigsaw/Scroll Saw: Drill starter holes inside the marked rectangle large enough to insert your jigsaw or scroll saw blade. Carefully cut along the lines.
Router (with a template bit): If you have a router, this is a very clean way to achieve this. You can use a template or freehand it.
Table Saw (with dado blade): This is more advanced but can create a very clean opening.
Remember to always cut on the waste side of your line so your piece is the correct size.
Assembling Your Wooden Tissue Box Cover
Now for the fun part – putting it all together! We’ll use wood glue and screws for strong, durable joints.
Step 1: Prepare for Assembly
Dry Fit: Before applying any glue, assemble the four side panels (two sides, two front/backs) and the bottom panel to ensure everything fits snugly and your corners are square. Make any minor adjustments needed.
Pre-Drill Holes: To prevent the wood from splitting, especially with smaller pieces or near the edges, it’s important to pre-drill pilot holes for your screws. Use a drill bit that is slightly smaller than the diameter of your screws.
Countersink: Use a countersink bit on your pilot holes where the screws will go. This allows the screw heads to sit flush with the wood surface or slightly below it for a cleaner finish.
Step 2: Assemble the Four Sides
1. Apply a thin, even bead of wood glue along the edge of one of the front/back panels where it will meet a side panel.
2. Align the two panels at a 90-degree angle, ensuring the edges are flush.
3. Clamp the pieces together securely.
4. Drill two pilot holes through the side panel into the edge of the front/back panel.
5. Drive in your wood screws.
6. Repeat this process for all four side panels, creating a rectangular frame.
Step 3: Attach the Bottom Panel
1. With the four sides assembled in a frame, flip it over so the open bottom is facing up.
2. Apply wood glue along the bottom edges of the assembled frame.
3. Carefully place the bottom panel into position. It should fit snugly inside the frame.
4. From the outside bottom edges of the frame, pre-drill holes up into the bottom panel and secure with screws. You’ll want at least two screws per side.
Step 4: Attach the Top Panel
1. Flip the assembled box so the open top is facing up.
2. Apply a thin bead of wood glue around the top edges of the four assembled side panels.
3. Carefully position the top panel (with the tissue opening) onto the glued edges. Ensure it is centered and the overhang is even on all sides.
4. Since many tissue boxes are meant to be opened from the top, you might choose not to permanently attach the top. This allows you to replace the tissue box easily. You can secure it with a few small, removable screws from the inside, or even just let the weight of the wood hold it in place if it’s a snug fit. If you plan to glue it permanently, pre-drill from the top panel down into the side panels and secure with screws from the top.
A note on joinery: For a slightly more advanced but stronger joint, you could explore rabbit joints or miter joints, but for a beginner project, simple butt joints with glue and screws are perfectly effective and elegant.
Sanding and Finishing for a Professional Look
This is where your project really starts to shine! Sanding removes any imperfections, rough edges, and pencil marks, preparing the wood for a beautiful finish.
Step 1: Sanding
1. Start with Rougher Grit: Begin with sandpaper in the 120-grit range to knock down any high spots, smooth out glue squeeze-out, and remove any saw marks. Sand in the direction of the wood grain.
2. Progress to Finer Grits: Move to 180-grit sandpaper to further smooth the surface. Then, finish with 220-grit sandpaper for a silky-smooth feel.
3. Round Edges (Optional): If you want a softer look, you can lightly sand the edges to break any sharp corners.
4. Clean the Dust: After sanding, thoroughly wipe down the entire wooden cover with a tack cloth or a slightly damp rag to remove all sawdust. Any residual dust will show up under your finish.
Step 2: Applying Your Finish
The finish is what protects your wood and gives it its final look. You have tons of options!
Stain: Stains add color to the wood while allowing the grain to show through.
Apply stain evenly with a brush or rag, following the wood grain.
Wipe off any excess stain after the recommended time (usually 5-15 minutes, check the product instructions).
Let it dry completely.
Paint: Paint completely covers the wood grain and offers endless color possibilities.
Apply a coat of primer first for better adhesion and coverage, especially if painting a dark color or using a lighter paint.
Apply your chosen paint color in thin, even coats.
Allow each coat to dry thoroughly.
Natural Finish (Polyurethane, Lacquer, Wax): These finishes protect the wood while maintaining its natural color, or can be used over stain.
Apply thinly and evenly with a brush or rag.
Most finishes require multiple coats (2-3 is common). Lightly sand with very fine grit (220-320) between coats for a super smooth finish. Remove dust thoroughly after each sanding.
Applying the Finish:
1. Choose a well-ventilated area.
2. Protect your work surface with drop cloths.
3. Follow the manufacturer’s instructions for your chosen finish precisely.
4. Apply your finish in thin, even coats. It’s much better to apply multiple thin coats than one thick, streaky one!
5. Allow adequate drying time between coats as specified on the product.
For a truly professional look, consider a pre-stain wood conditioner if you’re working with pine, as it helps prevent blotchiness.
Customization Ideas to Make It Your Own
Once you’ve mastered the basic design, don’t be afraid to get creative!
Wood Types: Experiment with different woods! Walnut offers a rich dark color, maple is light and smooth, and oak has a distinctive grain. Reclaimed wood can add a fantastic rustic or industrial feel.
Decorative Elements:
Inlay: Try adding a simple inlay with a contrasting wood or even a metal accent.
Carving: If you have carving tools, a simple decorative motif can be added to the top or sides.
Applied Trim: Small decorative molding or bead trim can add detail.
Cut-outs/Piercing: Use a scroll saw to create intricate patterns on the sides or the top opening.
Finish Options: Blend stains for unique colors, use chalk paint for a matte, shabby chic look, or even decoupage the box with fabric or paper for a personalized touch.
Size Variations: Make covers for different sized tissue boxes, like the larger cubic ones. Just adjust your measurements accordingly!
Hinged Lid: For a more advanced option, you could design the top to be hinged, making it even easier to swap out tissue boxes.
Wood Burning: Add a personalized design or lettering using wood-burning tools.
Making a wooden tissue box cover is a perfect canvas for your creativity!
Troubleshooting Common DIY Woodworking Issues
Even with the best intentions, sometimes things don’t go exactly as planned. Here are a few common issues and how to fix them:
Glue Squeeze-Out Not Cleaned Up
Problem: You didn’t wipe away excess glue before it dried, and now it’s hardened and difficult to remove.
Solution: Let the glue dry completely. You can often scrape it off with a sharp chisel or putty knife. For stubborn spots, very light sanding might be needed, but be careful not to sand too deep if you plan to stain afterwards, as dried glue spots can resist stain. You can also use a dedicated glue-cleanup product.
Wood Splitting When Screwing
Problem: The wood cracked when you drove in a screw.
Solution: This usually happens when the pilot hole is too small, too close to the edge, or if you forget to pre-drill altogether. For minor splits, you can sometimes force some