Have you ever looked at a home project and thought, “I can do that”? Many people begin their DIY adventures with small tasks. Creating a sturdy deck or building a shed can be a great start. To make this easier, using a joist hanger nail gun is key.
At Home Depot, you can find everything you need for your next project. The right tools can transform your work. But what is a joist hanger nail gun? Why should you care?
Imagine building a treehouse for your kids. You want it safe and strong. A joist hanger nail gun can help you attach beams and support structures fast. This tool will save you time and effort, making your project smoother.
Did you know that using a nail gun can cut down your building time by half? It’s true! People who try it often wonder how they ever worked without one. So, let’s explore how to set up your joist hanger nail gun correctly and get started on that dream project!
Table of Contents
Joist Hanger Nail Gun Setup At Home Depot: A Complete Guide Joist Hangers Are Essential Components In Construction And Woodworking, Providing Structural Support For Beams And Joists. When It Comes To Installing Joist Hangers, Having The Right Tools And Setup Is Crucial, And Using A Nail Gun Can Significantly Speed Up The Process. In This Article, We Will Guide You Through The Steps For An Effective Joist Hanger Nail Gun Setup, Focusing On Tools Available At Home Depot And Tips To Ensure A Reliable Installation. Understanding Joist Hangers Before Diving Into The Setup, It’S Important To Understand What Joist Hangers Are. These Metal Brackets Are Designed To Support The Ends Of Joists, Ensuring They Are Securely Attached To Beams Or Walls. There Are Various Sizes And Types Of Joist Hangers Available, So Selecting The Right One For Your Project Is Essential. Choosing The Right Nail Gun At Home Depot, You Can Find A Variety Of Nail Guns Suitable For Joist Hanger Installation. Here Are Some Options: 1. **Pneumatic Nail Guns**: These Require An Air Compressor And Are Ideal For Heavy-Duty Tasks, Providing Quick And Efficient Fastening. 2. **Cordless Nail Guns**: Perfect For Portability, Cordless Models Are Easy To Use And Can Drive Nails Into Joist Hangers With Ease. 3. **Framing Nailers**: If You’Re Working On A Larger Project That Requires Longer Nails, Framing Nailers Can Handle Thicker Material Effectively. Setting Up Your Nail Gun Getting Your Nail Gun Ready To Install Joist Hangers Is Straightforward. Here’S How: 1. **Read The Manual**: Start By Referring To The User Manual Of Your Nail Gun For Specific Instructions. 2. **Select The Appropriate Nails**: Choose Nails That Are Compatible With Your Nail Gun And Suitable For Joist Hangering—Typically 1-1/2” To 3” Nails Are Used. 3. **Adjust The Depth**: Set The Nail Depth According To The Material Thickness To Ensure The Nails Don’T Penetrate Too Deeply Or Not Enough. 4. **Safety First**: Always Use Protective Eyewear And Hearing Protection When Operating A Nail Gun. Installation Process 1. **Position The Joist Hanger**: Set The Joist Hanger In Place On The Ledger Board Or Beam. 2. **Tack With A Hammer**: Before Using The Nail Gun, It’S Helpful To Use A Hammer To Tack One Or Two Nails To Keep The Hanger In Place. 3. **Use The Nail Gun**: Aim The Nail Gun At The Pre-Drilled Holes On The Joist Hanger And Fire Away. Repeat For All Holes In The Hanger And Ensure They Are Securely Fastened. 4. **Check For Level**: Make Sure That The Joist Is Level And Adjust If Necessary Before Nailing It Permanently In Place. Final Thoughts With The Right Joist Hanger Nail Gun Setup From Home Depot, Installing Joist Hangers Can Become A Quick And Efficient Task. Remember To Choose The Correct Nail Gun And Nails, And Follow Safety Protocols Throughout Your Project. Whether You’Re A Seasoned Pro Or A Diy Enthusiast, Mastering This Setup Will Lead You To Better Results And A Safer Build. Happy Building!

Joist Hanger Nail Gun Setup at Home Depot
Setting up a joist hanger nail gun at Home Depot can make your project easier. This tool helps secure joists quickly. You’ll find various options to choose from. It’s essential to select the right nails for your gun. Did you know that using the correct setup saves time and improves quality? Learning to use this tool can boost your confidence in home improvement projects. Getting it right means strong, safe builds for your home!Understanding Joist Hangers
Definition and purpose of joist hangers. Different types of joist hangers available at Home Depot.Joist hangers are like cozy little beds for your joists. They hold wooden beams in place, making sure everything is sturdy and safe. Think of them as the best buddy for your home’s structural support. At Home Depot, you can find a variety of joist hangers, each designed for different needs. It’s like a candy shop, but for builders! Here’s a quick look:
| Type | Description |
|---|---|
| Standard Hanger | Perfect for basic joist support. |
| Heavy-Duty Hanger | For extra strength and stability. |
| Galvanized Hanger | Rustproof for outdoor use. |
Choose wisely, and you’ll have a rock-solid structure that won’t wobble at the first sign of a strong breeze! Who knew building could be this fun?
Choosing the Right Nail Gun for Joist Hangers
Types of nail guns suitable for joist hanger installation. Comparison of pneumatic vs. cordless nail guns.When installing joist hangers, picking the right nail gun is key. There are mainly two types you could use: pneumatic and cordless. Pneumatic nail guns need air compressors. They shoot nails quickly and are powerful. Cordless nail guns use batteries, making them easy to carry. They don’t need air hoses, giving you more freedom to move. Here’s a quick comparison:
- Pneumatic Nail Guns: Fast and powerful with air, but need a compressor.
- Cordless Nail Guns: Mobile and convenient, but the battery may run out.
Choose based on your project needs. Want speed? Try pneumatic. Prefer convenience? Go cordless.
Which nail gun is best for joist hangers?
Pneumatic nails guns are usually best for heavy-duty jobs like joist hangers because they work faster.
Essential Materials and Tools Required
List of materials needed for joist hanger installation. Additional tools recommended for a smooth setup.For a smooth joist hanger installation, gather the right materials and tools. You’ll need joist hangers, special nails, and your trusty nail gun. A measuring tape and a level are also handy to ensure everything is straight. And don’t forget safety gear! Here’s a simple table to help:
| Materials | Tools |
|---|---|
| Joist hangers | Nail gun |
| Special nails | Measuring tape |
| Wood glue | Level |
With these tools, you’ll be set to hang joists like a pro. Remember, measure twice, nail once! And if you accidentally miss the joist, well, that’s a new style of modern art!
Step-by-Step Guide to Setting Up Your Nail Gun
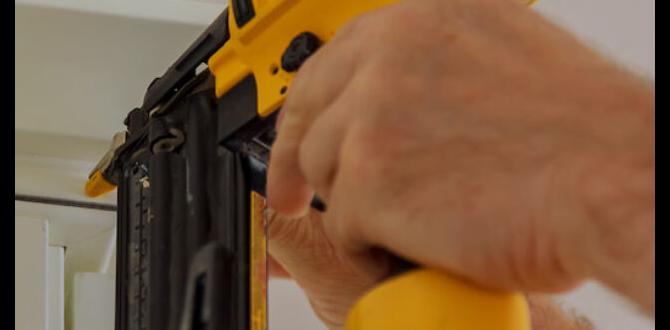
Preparing your nail gun for use. Loading nails correctly into the nail gun.Before using your nail gun, ensure it is ready. First, check the safety features. Make sure the safety switch is on. This keeps accidents from happening. Next, prepare your nails. Loading them correctly is very important. Here’s how:
- Open the nail gun magazine.
- Insert the nails with the pointed ends facing down.
- Close the magazine securely.
- Check again if it’s safe to use.
Now, your nail gun is all set for your project!
How do I ensure the nail gun is safe to use?
To keep the nail gun safe, always check the safety features first. Make sure the safety switch is on and never point it at people or pets.
Techniques for Installing Joist Hangers
Proper positioning and alignment of joist hangers. Tips for securing joist hangers effectively with nail gun.Installing joist hangers correctly is important for a strong frame. First, ensure proper positioning. Place them so they are level and aligned with your beams. Use a square to check everything. Next, for securing them, a nail gun is very helpful. Here are some tips:
- Choose the right nails for your gun.
- Fire nails in the correct spots to firmly attach the hanger.
- Check your work with each step to avoid mistakes.
Following these steps makes your project safer and easier!
How do you use a joist hanger nail gun?
To use a joist hanger nail gun, align the hanger where you need it. Hold it steady. Then, trigger the gun to shoot nails into the pre-drilled holes. This holds the hanger securely in place!
Safety Tips for Using Nail Guns
Personal protective equipment (PPE) to wear. Common hazards and how to avoid them.Using a nail gun can be fun, but safety is key! Always wear your personal protective equipment, or PPE. This includes goggles to protect your eyes and ear protection – because those sounds can be louder than a rock concert! Avoid common hazards like misfires by keeping fingers away from the trigger until ready to shoot. Don’t be a hero; be smart and follow safety tips!
| PPE Item | Purpose |
|---|---|
| Safety goggles | Protects eyes from flying debris |
| Ear protection | Reduces noise and protects hearing |
| Steel-toed boots | Protects feet from falling objects |
Keep your workspace tidy. A clean area helps you avoid tripping and falling. Remember, safety isn’t just a suggestion; it’s part of being a nail gun superhero!
Maintenance of Nail Guns
Regular maintenance tips for prolonging nail gun life. Troubleshooting common nail gun issues.Taking care of your nail gun isn’t hard, but it pays off big time. Regular maintenance helps keep your tools happy and working well. Clean out dust and debris regularly, and remember to oil the moving parts. Lubricated nails have more fun! If your nail gun jams, don’t panic—check for any stuck nails or debris. A little troubleshooting can save a lot of head-scratching time.
| Maintenance Tips | Common Issues |
|---|---|
| Clean regularly | Jamming |
| Oil the parts | Weak firing |
| Store properly | Leakage |
Frequently Asked Questions (FAQs)
Common questions related to joist hanger installation. Clarifications on nail gun usage and safety.When people think about installing joist hangers, they often have some common questions. Here are a few helpful answers:
How do I use a nail gun safely?
Always wear safety glasses to protect your eyes. Keep your hands away from the trigger until you’re ready to shoot.
Why choose joist hanger nails?
Joist hanger nails are designed for strength and stability. They help secure the joist tightly.
What is the best angle for nails?
Use a 45-degree angle for the best support. This angle gives strong connections.
Do I need a specific nail gun?
A nail gun for joist hangers works best. Make sure it has the right power and nail size.
By knowing these tips, you can make your project easier and safer!
Where to Find Help and Resources at Home Depot
Availability of workshops or assistance at Home Depot. Online resources and guides provided by Home Depot.Home Depot is a treasure chest for DIY enthusiasts! They offer workshops where you can learn hands-on skills with experts and show off your new talents. Can’t make it to a class? No worries! Check out their website for online guides that walk you through projects step by step. Need a little extra help? Just ask an associate—it’s like having a helpful friend with a toolbelt!
| Resource | Description |
|---|---|
| Workshops | Free classes on various home improvement topics. |
| Online Guides | Step-by-step instructions for your projects. |
Conclusion
In summary, using a joist hanger nail gun is easy and efficient. You’ll find everything you need at Home Depot. Set it up right for perfect results. Always follow safety guidelines while working. Don’t hesitate to ask an employee for help if you’re unsure. Now, grab your supplies and start your project! Happy building!FAQs
Certainly! Here Are Five Related Questions On The Topic Of “Joist Hanger Nail Gun Setup At Home Depot”:To set up a joist hanger nail gun at Home Depot, start by picking the right nail gun. You want one that fits joist hangers. Next, check if you have the right nails. They should match your gun. Finally, make sure to follow the instructions in the manual to keep everything safe and working well.
Sure! Please give me the question you’d like me to answer, and I’ll do my best to help!
What Type Of Nail Gun Is Recommended For Installing Joist Hangers, And Does Home Depot Carry Specific Models?To install joist hangers, a special nail gun called a framing nailer is recommended. It uses long nails to hold the hangers tightly. You can find different models at Home Depot. They usually have both electric and gas-powered options. Ask a worker there to help you choose the best one!
Are There Specific Nails Or Fasteners That Should Be Used With Joist Hangers For Optimal Structural Integrity?Yes, you should use special nails or fasteners for joist hangers. These are usually called “hurricane ties” or “joist hanger nails.” They are strong and help keep everything in place. Check the instructions on the joist hanger package for the right type to use. Using the correct nails keeps your structure safe and sturdy.
How Do I Properly Set Up A Nail Gun For Joist Hanger Installation, And Are There Safety Precautions To Keep In Mind?To set up a nail gun for installing joist hangers, first check the nail gun’s manual. Load the nails carefully into the gun. Adjust the depth for how far you want the nails to go in. Always wear safety glasses to protect your eyes. Keep your fingers away from the front when you fire the gun.
Does Home Depot Offer Rental Options For Nail Guns Suitable For Joist Hanger Applications, And What Are The Rental Terms?Yes, Home Depot lets you rent nail guns for joist hangers. You can rent them for a few hours or days. Just go to the tool rental area in the store. You will need to show an ID and give a credit card for the rental.
What Additional Tools Or Materials Do I Need For A Successful Joist Hanger Installation, Aside From The Nail Gun?To install a joist hanger, you also need a measuring tape to get the right sizes. You will need a level to make sure everything is straight. A hammer can help if you need to tap things into place. Don’t forget safety gear, like gloves and goggles, to protect yourself while working.