Are you ready to tackle your next home project? If so, you might need an interior trim nailer. This tool makes installing baseboards, crown molding, and other decorative features a breeze. Imagine transforming your plain walls into beautiful, inviting spaces.
What if we told you that using the right trim nailer can save you time and effort? Choosing the best one can make a big difference. It can turn a tiring task into a fun DIY adventure!
In this interior trim nailer guide, we’ll unlock the secrets to making smart choices. You’ll learn what features to look for, tips for perfect use, and common mistakes to avoid. Whether you’re a beginner or a seasoned pro, this guide has something for everyone.
Are you excited to learn more? Let’s dive in and discover how an interior trim nailer can simplify your projects today!
Table of Contents
Comprehensive Interior Trim Nailer Guide: Efficient Tips & Techniques

Interior Trim Nailer Guide
Choosing the right interior trim nailer can make your projects easier and faster. This guide explains the different types of nailers, such as pneumatic and battery-operated. You learn how to select the right nails and settings for your work. Did you know that using a nailer can save you hours compared to hammering? By the end, you’ll feel confident picking a nailer that matches your needs, helping you achieve a professional finish with ease.What is an Interior Trim Nailer?
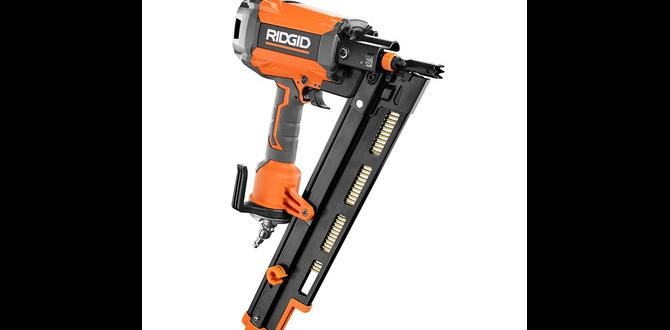
Definition and purpose of an interior trim nailer. Differences between trim nailers and other types of nail guns.An interior trim nailer is a handy tool designed for quick and easy fastening of trim and molding. It shoots small nails into wood without leaving big holes, making your work look neat. Unlike regular nail guns, trim nailers provide precision for delicate tasks. They are lighter and easier to control, so you won’t feel like you’re wrestling a bear!
| Type of Nailer | Best Use |
|---|---|
| Interior Trim Nailer | Trim and molding |
| Framing Nailer | Heavy lumber |
| Finish Nailer | Fine finishing work |
So, next time you think about trimming your home, remember the right tool can make all the difference. A trim nailer can make your job easier and save you from sticky situations!
Key Features to Look for in an Interior Trim Nailer
Gauge options and their impact on trim projects. Weight and ergonomics for user comfort.Choosing the right trim nailer feels like picking a favorite donut—so many options! First, look at gauge options. The size affects how deep you can nail, which matters for smooth trim jobs. Lighter gauges are less visible but might need more power. Next, think about weight and ergonomics. Is it comfy? If it’s heavy, you might need a gym membership after a few hours! A good trim nailer should feel like a feather in your hand.
| Feature | Importance |
|---|---|
| Gauge Size | Affects nail depth and visibility |
| Weight | Comfort during long projects |
| Ergonomics | Reduces strain on hands and arms |
How to Choose the Right Interior Trim Nailer for Your Project
Factors influencing the choice: material type, project scale, and frequency of use. Brand comparisons and recommended models.Selecting the best interior trim nailer can feel like a daunting task. However, it boils down to a few key factors. First, consider the material type. Some nailers work better with softer woods, while others tackle tougher materials easily. Next, think about your project scale. A small, quick job might only need a lightweight model, but bigger projects often call for a heavy-duty one. Lastly, consider how often you’ll use it. If you’re a weekend warrior, maybe skip the fancy options. When looking for brands, DeWalt and Bostitch come highly recommended. They nail it every time! Check out this handy comparison table:
| Brand | Popularity | Price Range |
|---|---|---|
| DeWalt | High | $$$ |
| Bostitch | High | $$ |
| Hitachi | Medium | $$$ |
| Ryobi | Medium | $ |
Keep these points in mind and you’ll be on your way to nailing your interior trim project like a pro!
Setting Up Your Interior Trim Nailer
Stepbystep guide to unboxing and assembly. Safety precautions and maintenance tips.First, take a deep breath—you’re about to unbox your new trim nailer! Begin by carefully opening the box. Keep those tiny parts from flying away! Assemble the nailer by following the easy steps in the manual. Attach the safety guards and check if everything is tight. Remember to wear safety glasses; no one wants a nail surprise in their eye, right? Lastly, keep your nailer clean. A quick wipe after each use goes a long way in keeping it happy!
| Tip | Details |
|---|---|
| Safety First | Always wear goggles and ear protection. |
| Maintenance | Clean after use and check for jams. |
Common Techniques for Using an Interior Trim Nailer
Best practices for nailing techniques in different trim applications. Tips for achieving a professional finish.Using an interior trim nailer can make your projects easier and faster. Start with the right angle. Hold the nailer at about 45 degrees for best results. Strike the nail in straight. This helps avoid crooked designs and makes your finish look neat. To achieve a polished look, always countersink your nails slightly. Add a filler afterward, and no one will see those little holes! Remember, practice makes perfect—so don’t fret if your first try isn’t a masterpiece.
| Tip | Technique |
|---|---|
| Angle | Hold at 45 degrees |
| Nailing | Strike straight for a neat finish |
| Finishing | Countersink nails and use filler |
Maintenance and Troubleshooting Tips
Routine maintenance practices for longevity. Common issues and how to fix them.To keep your interior trim nailer working well for a long time, regular check-ups are key. Clean it often to remove dust and jammed nails. A happy nailer is a clean nailer! If you notice misfiring, it might be time to check the air pressure. A simple fix can make your day!
| Common Issues | Fixes |
|---|---|
| Misfiring | Check air pressure and clean the nozzle. |
| Jams | Remove nails and clean the track. |
| Low Power | Inspect the air compressor and fittings. |
Every nail gun has its quirks. If things don’t seem right, consult the manual. It’s like having a secret weapon! Remember, a little maintenance goes a long way. Keep your tool happy, and it will keep you happy, too!
Frequently Asked Questions about Interior Trim Nailers
Answers to common queries about usage and features. Resources for additional information and support.Wondering about interior trim nailers? They can seem tricky! First up, do you need a compressor? Some nailers need one, while others are battery-powered. It’s like choosing between a loud coffee maker and a peaceful tea kettle. Next, what nail length should you use? A good rule is 1.25 to 2.5 inches for most projects. For extra help, check online forums or videos where fellow DIYers share their tips.
| Question | Answer |
|---|---|
| Do I need a compressor? | Depends on the type! |
| What nail length to use? | 1.25 to 2.5 inches is ideal. |
| Where to find more help? | Check online videos and forums! |
Conclusion
In summary, an interior trim nailer is a great tool for your home projects. It makes attaching trim easy and fast. We learned about different types and how to choose the right one for you. Now, it’s time to explore your options and consider picking one up. Check out more guides to boost your DIY skills!FAQs
Sure! Here Are Five Related Questions On The Topic Of Interior Trim Nailers:Sure! Here are five questions we can think about for interior trim nailers: 1. What is an interior trim nailer? An interior trim nailer is a tool that helps you attach trim pieces, like moldings, to walls. 2. How does an interior trim nailer work? It uses special nails and air pressure or batteries to push nails into wood quickly. 3. Why do we use a nailer instead of a hammer? Nailers are faster and make less noise than using a hammer. 4. Can kids use a nailer? No, it’s not safe for kids. Only adults should use it. 5. What safety gear should we wear? We should wear goggles to protect our eyes and ear protection to keep our ears safe.
Sure! Please provide the question you’d like me to answer.
What Are The Key Features To Look For When Selecting An Interior Trim Nailer?When choosing an interior trim nailer, look for a few important things. First, check the size of the nails it uses. You want a nailer that fits the nails you need for your projects. Next, see if it has a depth adjustment. This helps you control how far the nails go into the wood. Lastly, make sure it’s easy to handle and feels comfortable in your hand. That way, using it will be fun and simple!
How Do You Determine The Right Nail Size For Different Types Of Interior Trim Projects?To choose the right nail size for your trim, start by looking at the thickness of the wood. If the wood is thin, like a small trim, use shorter nails. If the wood is thick, like a big board, use longer nails. A good rule is to use a nail that goes into the wood at least twice as deep as the trim is thick. This helps keep everything strong and in place.
What Safety Precautions Should Be Taken When Using An Interior Trim Nailer?When using an interior trim nailer, always wear safety goggles to protect your eyes. Keep your fingers away from the front of the nailer. Always point the tool away from yourself and others. Make sure to use the right nails and follow the instructions. Finally, never try to clear jams while the tool is still plugged in or loaded.
How Do Pneumatic And Battery-Powered Interior Trim Nailers Compare In Terms Of Performance And Convenience?Pneumatic nailers use air to work and need a special air compressor. They are usually stronger and can fire nails quickly. Battery-powered nailers are easier to carry because they don’t need extra tools. They are quieter and ready to use anytime. Both are good, but one is better for strength, and the other is better for convenience.
What Maintenance Tips Should Be Followed To Ensure The Longevity And Optimal Performance Of An Interior Trim Nailer?To keep your interior trim nailer working well, you should clean it often. Make sure to remove dust and debris from the tool. You should also check and replace any worn-out parts, like the o-rings. Lastly, always store it in a dry place to prevent rust. Taking these steps will help your nailer last longer!