Have you ever noticed the small gap between the floor and the wall? That’s what quarter round fixes. This tiny trim makes your room look neat. But how do you keep it in place? Enter the finishing nails. These nails are small yet strong. Just like a superhero’s sidekick, they hold everything in place.
Imagine a puzzle with one piece missing. Without it, the picture isn’t complete. Quarter rounds work the same way at home. They hide little flaws and make floors look finished. And those finishing nails? They’re the secret. They work silently, but their job is important.
Here’s a fun fact: every time you walk across your room, you can thank those nails. They keep your quarter round snug and perfect. Have you ever wondered how builders make rooms look so neat? Now you know one of their little secrets. Ready to learn more?
Table of Contents
Choosing The Right Finishing Nails For Quarter Round

Finishing Nails for Quarter Round
Installing quarter round adds charm to your home, but what keeps it in place? Enter finishing nails! These tiny heroes quietly secure the trim. Look for nails that match the size of your quarter round to avoid mishaps. Ever used a hammer only to realize your nails were too long or short? Choosing the right size nail can turn a tricky job into a breeze. With the right nails, your quarter round shines, enhancing any room.
Understanding Quarter Round and Its Purpose
Definition and aesthetics of quarter round. Functional benefits in interior design.
A quarter round is a curved trim piece. It looks like a small slice of a circle. Aesthetically, it softens the edges where the floor and wall meet, making the room look neat. It adds a polished touch to homes. Functionally, it hides gaps between flooring and walls and can protect edges from damage.
What are the benefits of using quarter round in a room?
Quarter rounds offer a neat finish. They hide gaps and protect edges. They can also add a touch of elegance to a room, enhancing its overall appearance.
- Hides gaps between flooring and walls
- Protects wall and floor edges
- Adds decorative flair to rooms
The Importance of Choosing the Right Finishing Nails
Factors to consider when selecting finishing nails. Impact on durability and appearance.
Picking the right finishing nails matters a lot. They affect how things look and last. Do they stay strong or look neat? You must think about their size and finish.
- **Size:** Tiny nails are best for small areas. Big ones suit larger spaces.
- **Finish:** Choose nails that don’t rust easily. This keeps things looking good.
- **Material:** Strong nails last longer. Stainless steel is great.
Initial nail choices affect the end results. A simple choice can change a project’s look and life.
Why use finishing nails for quarter round?
They make the quarter round stay in place. Without them, the trim might not fit well. Nails help the trim look nice and neat. When set up right, the trim helps make rooms look finished.
Types of Finishing Nails for Quarter Round Installation
Common materials and sizes for finishing nails. Pros and cons of different types (e.g., steel, galvanized, etc.).
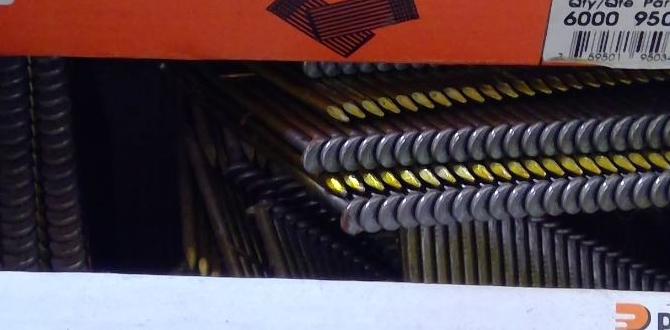
Choosing the right finishing nails for quarter round can be simple with the right guidance. Common sizes range from 1 to 2 inches. Nail materials, like steel and galvanized, have their own benefits. Steel nails are strong but may rust. Galvanized nails resist rust but might be tougher to work with. Different nails suit different needs, so it’s best to choose wisely. Understanding these types helps ensure a smooth installation, and keeps the trim in place.
What are the advantages and disadvantages of steel nails?
Steel nails offer durability and strength. They hold wood well. However, they can rust in wet conditions. Choose them where moisture isn’t a problem. They ensure a firm hold but need care in humid areas.
How do galvanized nails compare?
Galvanized nails resist rust, making them ideal for damp areas. They endure weather well but are sometimes pricier. They can be tough to drive into hard surfaces. Use these when moisture is a major concern.
Common materials of finishing nails:
- Steel: Strong, may rust.
- Galvanized: Resists rust, harder to drive.
Tools and Materials Needed for Installation
Essential tools for accurate installation. Additional materials to ensure a professional finish.
Picture yourself as a crafting ninja, ready with your mighty tools. For precise installation, you’ll need a hammer, a saw, and a tape measure. Think of them as your trusty sidekicks! To get a professional finish, add some wood glue and finishing nails to your inventory. And remember, even Batman has his toolbelt, so don’t forget your safety goggles and gloves. They might not be flashy, but they’ll save the day!
| Tools | Purpose |
|---|---|
| Hammer | Drive finishing nails |
| Saw | Cut quarter rounds |
| Tape Measure | Measure lengths |
Step-by-Step Guide to Installing Quarter Round with Finishing Nails
Preparation and preinstallation steps. Techniques for precise nailing and alignment.
Before starting, ensure you have all supplies ready. You will need a hammer, finishing nails, and quarter round. Cut the quarter round to match your room’s dimensions. To avoid splits, pre-drill the nail holes. Keep an even distance between nails.
- Lay the quarter round on the floor.
- Align carefully against the wall.
- Tap the finishing nails into place.
- Securely fasten but avoid over-hammering.
Why use finishing nails for quarter round?
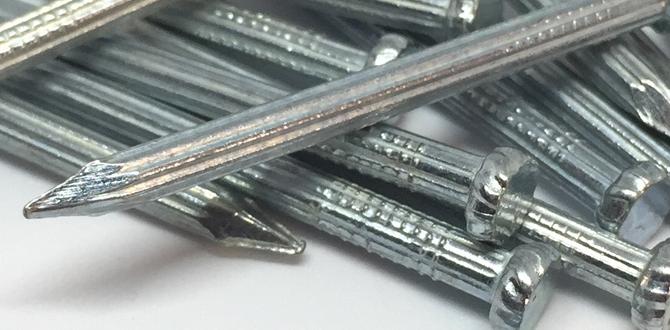
Finishing nails are small with narrow heads. They are less visible, giving a clean look. This makes them perfect for quarter rounds.
Following these steps makes your project easy and tidy. Remember to handle tools safely. Even kids can help! Did you know? One inch equals about 25 millimeters. This can help you measure more accurately!
Troubleshooting Common Installation Issues
Identifying and addressing nail popping or misalignment. Solutions for dealing with split or damaged molding.
Do you see nails poking out or lined up wrong? Try tapping them back in or moving them to a better spot. If the molding is cracked or broken, it is best to use wood glue or replace the piece. These small steps can help everything look neat and tidy. Remember, keeping things tight and even makes a big difference in how it looks.
How do you stop nail popping in molding?
Tap gently. Use a hammer to carefully push the nail back. If needed, add a dab of glue for extra hold.
Why does molding crack?
Wood changes. Temperature and moisture make wood expand and contract. This movement can cause cracks.
- Use good-quality wood.
- Keep indoor air stable.
- Check and fix cracks swiftly.
With a few easy fixes, your molding will look great again. Remember to be careful with each step and everything will fit perfectly!
Maintenance and Care Tips for Quarter Round Molding
Regular cleaning and upkeep for longevity. Tips for repairing minor damages and touchups. ### Maintenance and Care Tips for Quarter Round Molding
Keep your quarter round molding looking great! Regular clean-ups help. Use a soft cloth to wipe dust. For little dents or scratches, try some wood filler. Paint over for a quick fix. Here are some simple tips:
- Regular dusting keeps it shiny.
- Check often for tiny damages.
- Repair using a dab of wood filler.
- Touch up with matching paint.
How do you clean quarter round molding?
Use a damp cloth to wipe them. Avoid harsh chemicals. It makes it shiny and new!
Regular care keeps your home neat. Many say, “A clean home is a happy home.” Fun fact: Over 70% of people do weekly cleaning to maintain their homes, according to a survey. Follow these steps and your molding will last for years.
Enhancing Aesthetic Appeal with Finishing Touches
Paint and stain options for a cohesive look. Decorative elements to complement the molding.
Transforming your space with finishing touches can be as fun as picking your favorite candy. When it comes to paint and stain options, choose shades that match. Imagine your room like a canvas where colors play happily together. Coordinating hues make things look neat and cozy. Want to add some flair? Use decorative pieces that blend with the molding. A quirky vase or a funky picture frame might just bring that extra sparkle.
Here’s a simple way to make everything look perfect:
| Feature | Tip |
|---|---|
| Paint Colors | Select matching shades for harmony. |
| Decorative Items | Choose pieces that complement the molding. |
Remember, even the littlest things can make a huge difference, like the cherry on top of your favorite ice cream!
Frequently Asked Questions About Quarter Round and Finishing Nails
Common concerns and expert answers. Myths and facts about installing quarter round.
Ever wondered why the quarter-round never looks quite right in your home projects? Fear not! You’re not the only one with questions about finishing nails and quarter rounds. A common concern: Why use finishing nails on quarter rounds? They’re thin and discreet, ensuring a smooth look. While some people think adhesives are enough, experts say, “Nails add extra security.” For myths, let’s bust this one: “Quarter rounds are only decorative!” In truth, they’re also handy in hiding gaps. Here’s a quick look at some FAQs:
| Question | Answer |
|---|---|
| Do I need to use nails? | Yes! For stability and a snug fit. |
| Can I paint quarter rounds? | Absolutely! Paint them for a perfect match. |
With these myths debunked, and expert tips, you’re all set to tackle that pesky quarter round like a pro. Remember, perfection in DIY is all about those tiny details! As they say, “A little nail goes a long way for a neat finish!”
Exploring Innovative Alternatives to Traditional Quarter Round
New trends and materials in moldings. Comparison with traditional quarter round benefits.
Who says quarter rounds must be dull and predictable? Today, moldings embrace new trends and materials that add flair to homes. Bamboo, for instance, is eco-friendly and chic. Polystyrene offers a lightweight option with various colors. These innovative moldings outshine the old wooden rounds. They’re easier to install, reduce waste, and boast exciting finishes.
| Material | Benefits |
|---|---|
| Bamboo | Sustainable and stylish |
| Polystyrene | Lightweight with color variety |
Homeowners can enjoy these perks without breaking the bank. Exploring modern alternatives means blending innovation with style, and who wouldn’t love that?
Conclusion
Finishing nails are perfect for attaching quarter rounds. They’re small, smooth, and leave a neat finish. Always choose the right size for strength and neatness. Practice using a hammer or nail gun for better results. Next, explore more about trim installation or home improvement tips to enhance your skills. Happy building!
FAQs
What Size Of Finishing Nails Should Be Used For Installing Quarter Round Molding, And Why?
You should use 1.5-inch finishing nails for quarter round molding. They are just the right size to hold the molding in place without going too deep. This keeps the molding secure and makes it look nice. It also prevents any damage to your wall or floor.
How Do You Effectively Hide Finishing Nail Heads When Attaching Quarter Round To Baseboards?
To hide the nail heads, we first push nails into the quarter round. Then, we use wood putty to fill the tiny holes. It works like peanut butter and covers up the nail heads. Last, we paint over it, so everything looks nice and smooth!
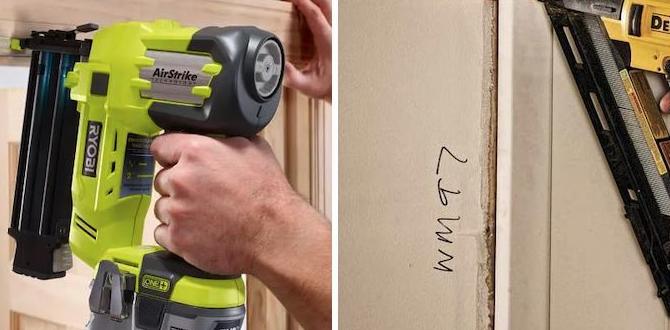
Should You Use A Nail Gun Or A Hammer To Install Quarter Round With Finishing Nails, And What Are The Pros And Cons Of Each Method?
You can use either a nail gun or a hammer to install quarter round. A nail gun is fast and easy but can be expensive and loud. A hammer is cheaper and quieter but takes more time and effort. If you are strong and patient, the hammer is a good choice. If you have a lot of work and want it done quickly, use the nail gun.
What Is The Best Material For Finishing Nails When Working With Quarter Round, Especially If The Molding Will Be Painted Or Stained?
The best material for finishing nails when working with quarter round is usually steel. Steel nails are strong and hold the molding well. If you’ll paint or stain the molding, make sure to hide the nails with paint or wood filler. This makes the finished work look nice and clean.
How Can You Prevent Splitting The Quarter Round Molding When Driving In Finishing Nails?
To avoid splitting the quarter round molding when using finishing nails, first make sure to use thin nails. Use a small drill to make guide holes, so the nails go in easily. You can also gently tap the nails in with a light hammer. Go slow and be careful to protect the wood.