When your nailer misfires, don’t panic! This guide will show you easy, safe steps to diagnose and fix the problem, whether it’s a jam, power issue, or depth setting. Get your projects back on track quickly and confidently.
Hey there, DIYers! Jack Shaffer, your go-to guy for all things nailer, here. It’s a frustrating moment, isn’t it? You’re mid-project, feeling the flow, and BAM! Your nailer just clicks, or worse, it spits out part of a nail or doesn’t drive it in at all. This is what we call a nailer misfire, and it’s more common than you might think, especially when you’re just getting started. But don’t let it derail your DIY dreams! This guide is here to walk you through exactly what to do when your nailer misfires. We’ll break down the common causes and give you simple, safe solutions so you can get back to building what you love.
Table of Contents
Understanding Nailer Misfires: Why It Happens
A nailer misfire can happen for a few key reasons. Think of it like this: a nailer is a precise tool, and sometimes, tiny things can get out of sync. The most common culprits are usually simple to fix. We’ll cover everything from a jammed nail to issues with the air pressure or depth settings. Knowing what’s going on under the hood (or rather, the nose of the nailer) will save you time and frustration. Let’s dive into the nitty-gritty so you can become a nailer troubleshooting pro!
Here are the most frequent reasons your nailer might decide to take a break:
- Nail Jams: The most common issue. A nail might not line up correctly, get bent, or get stuck.
- Lack of Power: This could be an issue with the air compressor (for pneumatic nailers) or the battery/power source (for cordless nailers).
- Incorrect Depth Setting: If the depth is set too shallow, the nail might not fully penetrate the material.
- Safety Tip Issues: The safety contact tip needs to be properly engaged for the nailer to fire.
- Internal Component Wear: Over time, parts can wear out, though this is less common for beginners.
Step-by-Step Guide: What to Do When Your Nailer Misfires
When that dreaded misfire happens, the first rule is: don’t panic! Stay calm and follow these steps. Safety is always the top priority, so let’s start there.
Step 1: Safety First – Disconnect Power
This is the absolute most crucial step. Before you touch anything on the nailer, you need to make sure it can’t accidentally fire.
- For Pneumatic Nailers: Disconnect the air hose from the nailer. This stops any air pressure from getting to the tool.
- For Cordless (Battery) Nailers: Remove the battery pack completely.
- For Corded Electric Nailers: Unplug the power cord from the wall outlet.
This simple action prevents any further nail firing while you inspect the tool, saving you from potential injury. It’s a fundamental safety practice that every DIYer should adopt.
Step 2: Inspect for Jammed Nails
This is usually the main suspect. A jammed nail can jam up the firing mechanism, preventing subsequent nails from being driven correctly. Don’t force it! Gentle inspection and manipulation are key.
Checking the Magazine
Most nailers have a magazine (where the nails are stored). Gently open or slide any access panels to see if there’s a nail visibly stuck or misaligned.
- Look for nails that are bent, broken, or sticking out at an odd angle.
- Sometimes, a nail might just be jammed against the feed mechanism.
Clearing a Jam
If you see a jammed nail, you’ll need to remove it. The method varies slightly by nailer type, but the general idea is to gently ease the obstruction out.
- Try to gently wiggle the offending nail back and forth to loosen it from any tension.
- Use a pair of pliers if necessary, but be careful not to damage the nailer’s internal components. Grip only the nail itself.
- Some nailers have a nose latch or release mechanism that can be opened to give you better access to the firing channel. Consult your nailer’s manual if you’re unsure how to do this.
- Never use excessive force. If a nail is really stuck, there might be a more complex issue.
Step 3: Check Your Air Supply (Pneumatic Nailers)
If your pneumatic nailer isn’t firing with enough force or is misfiring, the issue might be with the air compressor. Air pressure is the engine of your pneumatic nailer. Too little, and it won’t have the power to drive the nail home.
Ideal PSI Range
Most framing nailers operate efficiently between 80 and 120 PSI (pounds per square inch), while brad nailers and finish nailers typically require less, often between 70 and 100 PSI. Always check your nailer’s manual for its specific recommended air pressure range. As a general reference, a standard compressor regulator gauge will help you monitor this.
- Check Compressor Tank Pressure: Ensure your compressor has sufficient air in its tank before you start firing.
- Set the Regulator Correctly: Connect the air hose to your nailer and compressor. Set the regulator on the compressor to the recommended PSI for your nailer.
- Test the Pressure: With the air connected but the nailer not against a surface, try firing it. You should feel a strong burst of air. If it’s weak, increase the PSI slightly, up to the maximum recommended for your tool.
A great resource for understanding air compressors and their role in pneumatic tools is available from the U.S. Department of Energy’s Advanced Manufacturing Office, which details energy efficiency and best practices for compressed air systems.
Step 4: Examine Your Nails and Fasteners
Not all nails are created equal, and using the wrong type or size can cause misfires or jams. It’s also important that the nails are loaded correctly.
- Correct Size and Type: Ensure you are using the type and size of nails recommended by your nailer’s manufacturer. For example, a framing nailer uses large nails, while a finish nailer uses much smaller ones. Using the wrong collation angle (the angle at which the nails are glued together) can also cause issues.
- Nail Quality: Cheap or poorly manufactured nails can be brittle and bend or break easily, leading to jams. Stick to reputable brands.
- Proper Loading: Double-check that the nails are loaded correctly into the magazine. They should sit flat against the feed rail and be pushed forward smoothly. Some magazines have a spring-loaded pusher that needs to be pulled back to load the nails. Make sure this is fully engaged.
Step 5: Adjust Depth of Drive Settings
The depth of drive setting controls how far into the material the nail penetrates. If this is set incorrectly, you might get a misfire where the nail doesn’t go in fully, or it might even glance off the surface.
- Too Shallow: If the nail isn’t driving in enough, it might seem like a misfire because it’s not functional. Increase the depth setting.
- Too Deep: Setting the depth too deep can cause the nail to sink too far into the material, potentially damaging it or driving into something harder underneath.
- How to Adjust: Most nailers have a dial or lever, usually near the nose of the tool, to adjust the depth.
For wood projects, you want the nail head to be flush with or slightly countersunk into the surface. For softer materials, you might need to adjust this downwards. For harder woods or surfaces, you might need a deeper setting. Experiment on a scrap piece of your material to find the sweet spot.
Step 6: Check the Safety Contact Tip (Safety Actuator)
Nailers are designed with a safety feature – the contact tip (or safety actuator). This piece must be pressed firmly against the surface you are nailing into for the nailer to fire. If this tip is damaged, blocked, or not engaged properly, the nailer won’t fire, which can be mistaken for a misfire.
- Ensure Engagement: Press the nose of the nailer firmly against the workpiece. You should feel a slight click or resistance as the safety tip is compressed.
- Inspect for Damage: Check if the safety tip is bent, broken, or obstructed by debris. If it’s damaged, it may need replacement.
- Check for Free Movement: The safety tip should move freely in and out. If it’s stuck, try to clean around it.
Some users, especially those working on intricate projects or at awkward angles, may try to disable this safety feature. This is strongly discouraged. It greatly increases the risk of accidental discharge and serious injury. Always use your nailer with the safety mechanism intact and functional. For more on tool safety, the Occupational Safety and Health Administration (OSHA) provides comprehensive guidelines for power tool safety.
Step 7: Clean and Lubricate Your Nailer
Like any tool, regular maintenance can prevent problems. A clean and properly lubricated nailer will perform better and last longer.
- After Each Use (or Periodically): Wipe down the exterior of your nailer with a clean, dry cloth.
- Clean the Magazine: Remove any dust, wood shavings, or debris from the nail magazine.
- Lubricate (Pneumatic Nailers): For pneumatic nailers, add a few drops of specialized pneumatic tool oil into the air inlet port regularly. This lubricates internal O-rings and pistons. Never use WD-40 or similar solvents; they can dry out rubber seals.
- Check Seals and O-rings: If you notice air leaks from your pneumatic nailer, the seals or O-rings might be worn or damaged and may need replacing.
Consult your nailer’s manual for specific maintenance instructions. Most manufacturers provide a schedule and details on where to add oil and which parts, if any, are user-serviceable.
Step 8: Consider Battery Health (Cordless Nailers)
For cordless nailers, a weak battery is a common cause of reduced power and what can feel like misfires.
- Charge Fully: Ensure your battery is fully charged before use. A partially charged battery might not deliver enough power.
- Battery Condition: If the battery is old or has been used extensively, its capacity might have diminished. You might notice it drains faster or doesn’t provide the same power as it used to.
- Check Connections: Make sure the battery is properly seated in the nailer and that the contacts are clean.
If you suspect a battery issue, try using a fully charged spare battery if you have one. If the problem persists, the battery might need replacing.
Troubleshooting Common Misfire Scenarios
Let’s look at some specific scenarios and how to tackle them. Knowing these can save a lot of guesswork.
Scenario 1: The Nailer Clicks, But No Nail Fires
This is often a power or safety issue, or a sign of a deeper jam.
- Check Power Source: For pneumatic, is the air hose connected and the compressor running? Set PSI correctly. For cordless, is the battery charged and seated properly? For corded, is it plugged in and the outlet working?
- Engage Safety Tip: Is the safety contact tip pressed firmly against the workpiece? Try pressing it down harder.
- Check for Internal Jam: With power disconnected, carefully inspect for any bent or misaligned nails that might be blocking the firing pin.
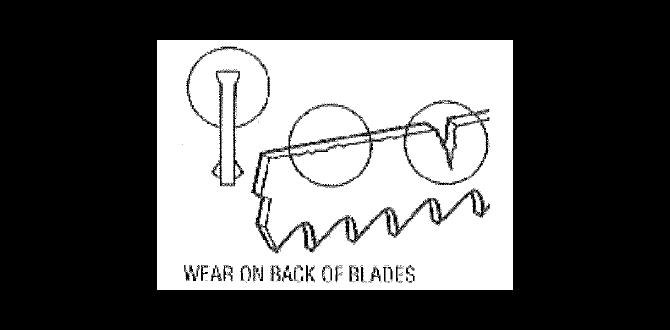
- Worn Driver Blade/Firing Pin: In some cases, the driver blade (the part that strikes the nail head) or firing pin can become worn or damaged.
Scenario 2: Nails Not Driving Deep Enough
This is usually related to air pressure or depth settings.
- Increase Air Pressure: If using a pneumatic nailer, gradually increase the PSI (within the tool’s limits) until nails drive properly.
- Adjust Depth of Drive: Ensure the depth setting isn’t too shallow.
- Weak Motor/Battery: For cordless tools, a weak battery can cause this.
- Material Hardness: You might be trying to drive nails into very hard material. Consider a tool with more power or pre-drilling if necessary.
Scenario 3: Nailer Fires, But Nails Are Bent or Partially Driven
This points strongly towards a jam or incorrect fastener type.
- Clear Any Jams: This is almost always the culprit. Follow the jam-clearing steps meticulously.
- Wrong Nail Type/Size: Ensure you’re using the exact nail specified for your tool.
- Incorrect Collation Angle: The nails must be the correct angle for your nailer’s magazine.
- Worn Driver Blade: A damaged or worn driver blade might not strike the nail head squarely, causing it to bend.
Scenario 4: Air Leaks from the Nailer
This is specific to pneumatic nailers and indicates a seal issue.
- Check Air Hose Connection: Ensure the hose is securely attached to the nailer.
- Inspect O-rings and Seals: Leaks often come from worn or damaged O-rings in the cylinder head or around the piston. These might need to be replaced.
- Check the Trigger Valve: Sometimes, debris can affect the trigger valve.
For air leaks, it might be time to consult your manual or a repair professional if you’re not comfortable with internal repairs.
When to Call a Professional or Consider Replacement
While most nailer misfires are user-fixable with a little patience and know-how, there are times when professional help or even tool replacement is the best course of action.
Signs You Might Need Professional Help:
- Persistent Misfires After Troubleshooting: If you’ve gone through all the steps and the nailer continues to misfire, there could be an internal component failure.
- Damaged Internal Parts: If you suspect a broken spring, worn driver blade, or damaged cylinder.
- Complex Air Leaks: Leaks that you can’t locate or fix, especially from the main housing.
- Safety Mechanism Malfunction: If the safety contact tip is no longer functioning correctly or is damaged beyond repair.
When to Consider Replacing Your Nailer:
- Age and Wear: If your nailer is very old and has seen extensive use, parts may be worn out beyond economical repair.
- Cost of Repair: Sometimes, the cost of parts and labor for a professional repair can approach the cost of a new nailer, especially for less expensive models.
- Outdated Technology: If you’re consistently struggling with a tool that doesn’t meet your project needs, upgrading to a newer, more suitable model might be a good investment.
- Safety Concerns: If the tool has safety issues that cannot be reliably fixed.
Remember, your tools are investments. Sometimes, a small repair keeps them working for years. Other times, recognizing when a tool has reached the end of its useful life is also a smart part of building and DIY.
Preventative Maintenance: Keeping Your Nailer in Top Shape
The best way to deal with nailer misfires is to prevent them from happening in the first place! A little bit of preventative maintenance goes a long way.
| Maintenance Task | Frequency | Notes |
|---|---|---|
| Clean Exterior & Magazine | After each use / Weekly | Wipe down with a dry cloth. Remove debris from magazine tracks. |
| Lubricate (Pneumatic) | Daily / Every Gallon of Air Used | Add 2-3 drops of pneumatic tool oil to the air inlet. |
| Inspect Driver Blade & Tip | Monthly / As Needed | Look for wear or damage that could cause jamming or poor performance. |