Have you ever looked at a plain napkin holder and thought it could use a little flair? Imagine creating something special for your dining table. DIY birch napkin holders can add a touch of nature and beauty to your home.
Making these holders can be a fun project. It is easy and doesn’t require many tools. You can feel proud knowing that you made it yourself. Plus, birch wood is not only pretty but also strong and light.
Did you know that birch trees grow in many parts of the world? They are often seen in parks and forests. This wood is perfect for crafting and will brighten up your table in a unique way.
Let’s explore how you can turn some simple materials into beautiful DIY birch napkin holders. Your friends and family will be impressed when they see your work. Are you ready to get started on this exciting project?
Table of Contents
Creative Diy Birch Napkin Holders For Your Table Setting
Creating DIY birch napkin holders is a fun and easy project. Imagine setting a beautiful table with rustic charm! You only need a few materials, like birch twigs and glue. These holders add a natural touch to any meal. Plus, crafting them can be a delightful bonding activity with family. Did you know that using natural materials can enhance your dining experience? Grab your tools and get started on this creative adventure today!
Materials You’ll Need
List of essential tools and materials for making birch napkin holders. Suggestions for sourcing sustainable birch wood.
Gathering supplies for your birch napkin holders can be half the fun! Here’s what you need: first, grab some beautiful birch wood – it’s like nature’s craft paper! Next, have a saw, sandpaper, and wood glue handy. You might also want a measuring tape and a pencil for precise cuts. For those environmentally friendly folk, check out local lumber yards or even online marketplaces for sustainable birch sources. Remember, trees are our friends – unless they’re trying to steal your lunch!
| Materials | Purpose |
|---|---|
| Birch wood | Main material |
| Saw | Cuts wood |
| Sandpaper | Smooth edges |
| Wood glue | Holds pieces together |
| Measuring tape | For measuring |
| Pencil | Marking cuts |
Step-by-Step Instructions
Detailed process for cutting and shaping birch wood. Techniques for assembling the napkin holders.
First, grab your birch wood and a sharp saw. Measure pieces around 4 inches long. Cut them carefully; no one wants crooked napkin holders! After cutting, smooth the edges using sandpaper. Stay safe and don’t sand your fingers! Next, assemble the pieces. Use wood glue to hold them together. For extra strength, add tiny nails if you like. Let it dry and voilà! You now have stylish napkin holders that will impress your guests!
| Step | Action |
|---|---|
| 1 | Cut birch into 4-inch pieces. |
| 2 | Smooth edges with sandpaper. |
| 3 | Assemble using wood glue. |
| 4 | Let it dry before use. |
Design Variations
Ideas for different styles and shapes of napkin holders. Tips for personalizing your holders with paint or engravings.
Creating DIY birch napkin holders can be fun and creative! You can try different styles and shapes. Here are some ideas:
- Try making them in a heart shape for a romantic dinner.
- Use a simple rectangle for a classic look.
- How about a cute animal shape for a kids’ party?
To make your holders special, personalize them! You can:
- Paint them in your favorite colors.
- Use stencils for fun designs.
- Engrave names for special events.
This way, each napkin holder can tell a story!
How can I personalize my napkin holders?
You can personalize your napkin holders by adding colors, designs, or names with paint or engravings. This makes them unique and special for any occasion.
Finishing Touches
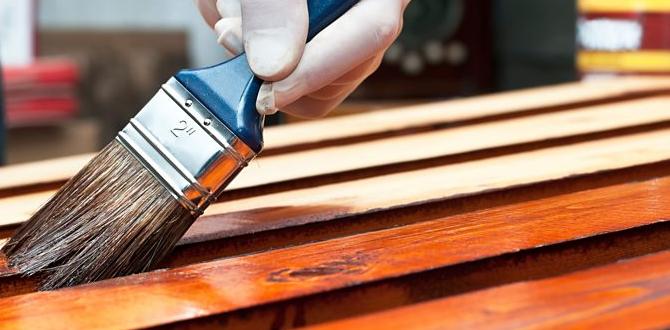
Recommendations for finishing and sealing the wood. Best practices for ensuring durability and aesthetics.
To make your birch napkin holders shine, don’t skip the finishing touches! Start by sealing the wood with a good finish like polyurethane or beeswax. This protects the wood and keeps it looking fresh. Did you know that a good finish can extend the life of your project by years? Apply at least two coats for extra strength and shine. A little sanding between coats can make a big difference. Also, remember to keep them out of the dishwasher—napkin holders don’t like spa days!
| Finish Type | Durability | Aesthetic |
|---|---|---|
| Polyurethane | High | Glossy |
| Beeswax | Medium | Satin |
| Mineral Oil | Low | Natural |
Follow these best practices to make your DIY project durable and pretty! Happy crafting!
Styling Your Table Setting
Ideas for incorporating birch napkin holders into different table themes. Suggestions for complementary tableware and decor.
Transform your dining experience by adding some fun with birch napkin holders! These holders can fit into many table themes. For a rustic look, pair them with earthy plates and linen tablecloths. Want a modern vibe? Use sleek dishes and metallic accents. Here’s a quick table to help you:
| Table Theme | Complementary Items |
|---|---|
| Rustic | Earthy plates, burlap runner |
| Modern | Sleek dishes, shiny cutlery |
| Beachy | Light colors, seashell decor |
Add some fresh flowers for a pop of color! Your guests will love the charm of your table. Remember, it’s all about having fun and getting creative. So, let those napkins shine like they’re at a napkin fashion show!
Benefits of DIY Napkin Holders
Discuss the costeffectiveness and creative freedom of DIY projects. Highlight the environmental benefits of using natural materials.
Making your own napkin holders brings fun and smart saving! You can use inexpensive materials like birch, which saves money. Plus, creating them yourself lets you design what you want. How cool is that? Also, making things from natural materials helps the Earth. It reduces waste and keeps our planet green.
- Cost-effective: Save money by using materials you have.
- Creative freedom: Make unique designs that fit your style.
- Environmentally friendly: Use natural materials to cut down on waste.
Why is DIY important for napkin holders?
DIY projects save money, unleash creativity, and benefit the environment.
Common Mistakes to Avoid
List of frequent errors beginners make in the DIY process. Solutions and troubleshooting tips for a successful project.
Many beginners make mistakes when creating their own napkin holders. One common error is using the wrong type of glue, which can ruin your project. Instead, opt for wood glue, it’s stronger and dries clear. Another blunder is not sanding the wood correctly, leaving it rough. Always sand until it feels smooth!
| Common Mistake | Solution |
|---|---|
| Wrong Glue | Use wood glue for stronger hold. |
| Rough Edges | Sand until smooth. |
| Not Measuring | Always measure twice, cut once. |
Finally, don’t rush! Take your time to ensure everything fits well. Remember, it’s not a race; napkin holders won’t run away! With these tips, you’ll impress your friends and family with your DIY skills.
Additional Craft Ideas
Suggestions for other DIY projects using birch wood. Ways to expand your crafting skills through similar woodwork projects.
If you enjoyed making birch napkin holders, you’re in for a treat! Birch wood is perfect for many other fun projects. Consider crafting coasters, picture frames, or even small shelves. Each project helps you practice your skills and learn new ones. Want something funny? Why not create a “snack shelf”? It will hold snacks, while keeping your fingers clean. Here’s a quick table for more project ideas:
| Project | Skill Level |
|---|---|
| Coasters | Beginner |
| Picture Frames | Intermediate |
| Small Shelves | Advanced |
| Snack Shelf | Beginner |
These projects help you think outside the box. Each successful creation brings a smile and maybe a little snack too!
Conclusion
In conclusion, DIY birch napkin holders are fun and easy to make. You can personalize them to match your style. Gather your materials, follow simple steps, and enjoy crafting. Not only do they look great, but they also impress your guests. So, grab some birch wood and start creating! For more ideas, check out other DIY projects online.
FAQs
What Materials Do I Need To Create Diy Birch Napkin Holders?
To make DIY birch napkin holders, you need a few simple things. First, get some small pieces of birch wood. You’ll also need a saw to cut the wood and sandpaper to smooth the edges. Grab some wood glue to stick the pieces together. Finally, use a paintbrush and some wood finish if you want to make them shiny!
Are There Specific Tools Required For Crafting Birch Napkin Holders, And What Are Some Alternatives?
To make birch napkin holders, you need some simple tools like a saw, sandpaper, and glue. These tools help you cut the wood and smooth the edges. If you don’t have these tools, you can use craft wood or even strong cardboard instead. You can also decorate your napkin holders with paint or stickers!
How Can I Decorate Or Personalize My Birch Napkin Holders For Different Occasions?
You can decorate your birch napkin holders using paint or markers. Try adding colors that match your party theme. Stick on stickers or use stencils to make fun designs. You can also tie a colorful ribbon around each holder for a special touch. Changing the decorations can make them perfect for any event!
What Techniques Can I Use To Ensure That The Birch Wood Is Properly Treated And Finished For Durability?
To make birch wood strong and last longer, start by sanding it smooth. Then, clean off any dust. Next, you can use a wood primer to protect it. After that, apply a finish like varnish or sealant. This helps keep the wood safe from water and scratches. Always let each layer dry completely before adding more.
Can I Incorporate Other Natural Elements Or Designs Into My Birch Napkin Holders For A More Unique Look?
Yes, you can add other natural things to your birch napkin holders! Think about using small twigs, leaves, or flowers for decoration. You could even paint or draw designs on them. Get creative and have fun making your napkin holders special!