Don’t let a jammed nailer stop your project! This guide makes clearing jammed nails effortless, with simple steps and expert tips to get you back to building fast and safely.
We’ve all been there. You’re deep into a woodworking project, feeling that satisfying rhythm as your finish nailer sinks fastener after fastener. Then, suddenly, thwack-sproing – silence. A jammed nail. It’s frustrating, it can be a little intimidating, and it’s a super common issue for anyone using a nail gun. But don’t worry! Clearing a jam is usually a straightforward process, and with this easy-to-follow guide, you’ll be unjamming your nailer like a pro in no time. We’ll cover everything you need to know, from safety precautions to the specific steps for getting those stubborn nails out.
When your nailer jams, it’s easy to feel a bit flustered. But understanding a few basic principles and having a clear process will make all the difference. This guide is designed for beginners, so we’ll break down each step into simple, actionable advice. We’ll also talk about why jams happen and how to prevent them in the future. Ready to conquer that jam and get back to building? Let’s dive in!
—
Table of Contents
Why Do Nail Guns Jam?
Nail jams are nobody’s favorite part of using a nail gun. They can happen for a variety of reasons, and understanding these can help you prevent them. It’s usually not a complicated problem, but it’s good to know what’s going on under the hood.
Here are the most common culprits:
- Improper Nail Loading: If nails aren’t seated correctly in the magazine or if you mix different sizes or types, it can lead to jamming. The nail needs to slide smoothly into the firing channel.
- Wrong Nail Size or Type: Using nails that are too long, too short, or have a different collation angle than what your nailer is designed for is a surefire way to cause a jam. Always check your nailer’s manual!
- Low Air Pressure (for Pneumatic Nailers): If your air compressor isn’t delivering enough pressure, the piston might not drive the nail all the way, or it might snag.
- Worn-Out Parts: Over time, internal components like the driver blade, springs, or seals can wear down. This can lead to misfires and jams.
- Dirt and Debris: Small bits of wood, dust, or old lubricant can accumulate inside the nailer, interfering with the smooth operation of the firing mechanism.
- Hitting Hard Knots or Metal: While less common with finish nailers, trying to drive a nail through extremely dense wood knot or, worse, a hidden metal object can cause a jam.
- Actuation Lever Issues: The safety contact tip (the part that touches the wood to fire) needs to be depressed for the nailer to fire a nail. If this is damaged or obstructed, it can cause problems.
For excellent resources on tool maintenance and safety, the U.S. Consumer Product Safety Commission (CPSC) offers valuable information. You can find details on power tool safety, including nail guns, on their website, which is a great place to start for general safety practices.
—
Safety First: Your Top Priority
Before you even think about touching that jammed nail, safety MUST be your number one concern. Nail guns operate under pressure and have sharp, fast-moving parts. A moment of carelessness can lead to a serious injury, especially to your hands or eyes.
This is non-negotiable. Always treat your nailer as if it’s loaded and ready to fire, even when you think it’s not.
Essential Safety Steps Before Clearing a Jam:
- Disconnect the Power Source: This is the absolute first step!
- For Pneumatic Nailers: Disconnect the air hose from the nailer.
- For Cordless (Battery) Nailers: Remove the battery pack.
- For Corded Electric Nailers: Unplug the power cord.
- Remove All Nails from the Magazine: Open the nail magazine and carefully remove any remaining nails. This ensures no nails can be accidentally fired during the clearing process.
- Point the Nailer Away from Yourself and Others: Always direct the nose of the nailer away from any person or living creature.
- Wear Safety Glasses: This is critical! Wear safety glasses or goggles at all times. Small parts or nails can be ejected unexpectedly.
- Keep Fingers Away from the Trigger and Nose: Be mindful of where your fingers and hands are placed.
Think of these steps as your nailer’s “off switch” and “safety check” before any maintenance. It might seem obvious, but rushing this is how accidents happen. Take your time and follow these steps every single time.
—
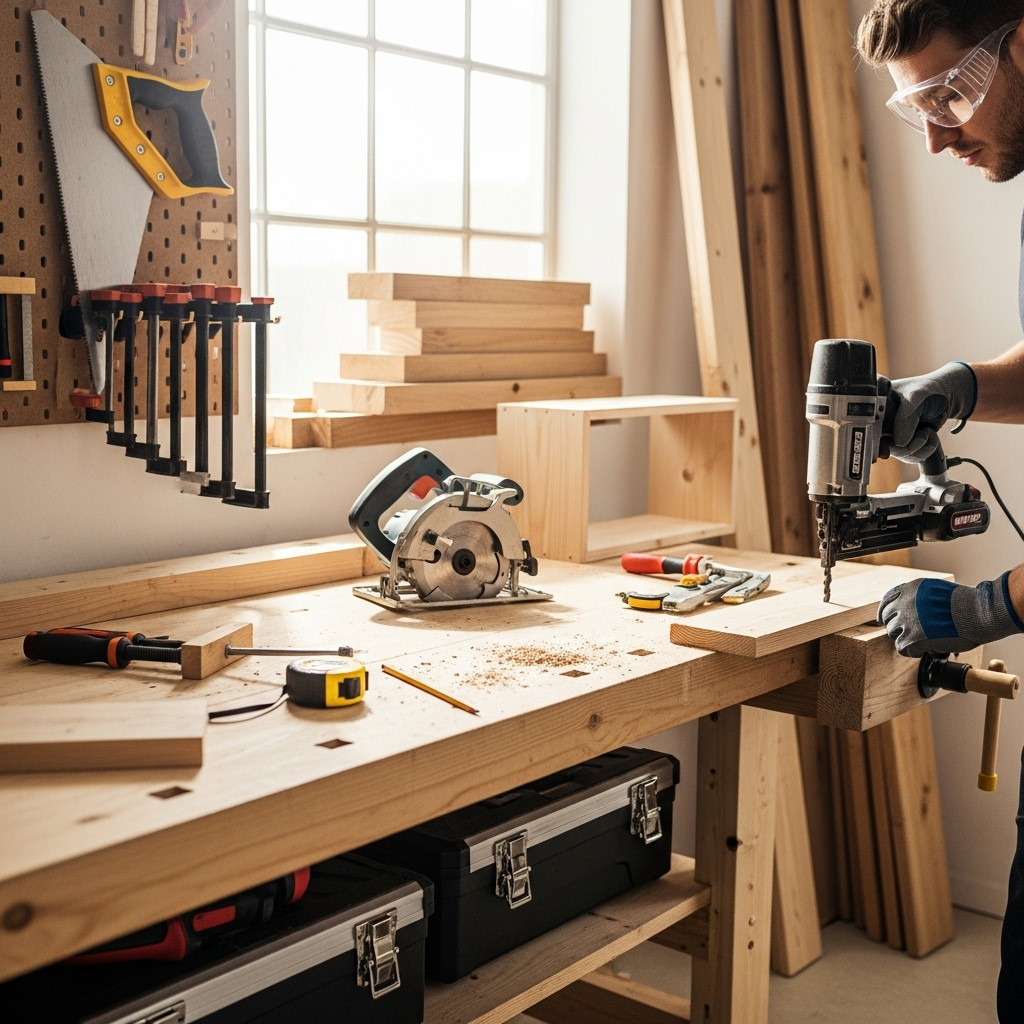
Tools You Might Need
Most of the time, you won’t need a whole toolbox to clear a jammed nail. Your nailer is usually designed to be accessible. However, having a few basic tools can make the job easier and cleaner.
Gather These Items:
- Safety Glasses: As mentioned, this is a must-have.
- Work Gloves: To protect your hands from sharp nail edges or the nailer itself.
- Pliers or Needle-Nose Pliers: These are super handy for gripping and gently wiggling stubborn nails.
- Small Flathead Screwdriver or Awl: Sometimes, a gentle poke or pry from a screwdriver can dislodge a misaligned nail. Be careful not to scratch internal parts.
- Soft Cloth or Rag: For wiping away any dust or debris.
- Your Nailer’s Manual: If you have it, it’s a great resource for specific diagrams and instructions for your model. Some nailers have unique access panels.
Don’t overthink it. You probably have most of these around your workspace already. The goal isn’t to force anything, but to have the right gentle tools if needed.
—
How to Clear Jammed Nails: A Step-by-Step Guide
Alright, let’s get down to business. This process is designed to be as painless as possible. We’ll guide you through each step to safely and effectively remove that troublesome jammed nail.
Step 1: Safety First (Double Check!)
You’ve heard it before, and we’ll say it again: safety is paramount. Before you do anything else, ensure the power source is completely disconnected. For pneumatic nailers, that means the air hose is off. For battery models, the battery is out. For corded, the plug is unplugged. Confirm the magazine is empty. Point the nailer away from everyone. Put on your safety glasses and gloves.
Step 2: Inspect the Nose of the Nailer
Look closely at the nose of your nailer, where the nails typically fire from. This is the most common spot for a jam to occur. You should be able to see if a nail is bent, misaligned, or sticking out.
Sometimes, a nail might simply be half out. If you can see the head of the nail sticking out, you might be able to gently pull it out.
Step 3: Attempt Gentle Removal
If you can see the nail head:
- Try to get a good grip on the nail head with your pliers or needle-nose pliers.
- Gently wiggle the nail back and forth while pulling outwards.
- Avoid yanking or forcing it. The goal is to coax it out, not to break it off further if it’s already stuck.
If the nail is just slightly sticking out, this might be all you need. Sometimes, a little persuasion is all it takes.
Step 4: Access the Firing Channel (If Necessary)
Many finish nailers have a way to open up the nose area to access the firing channel more directly. This is usually done by releasing a latch or a small lever on the side of the nosepiece.
- Consult Your Manual: This is where your nailer’s manual is your best friend. It will show you exactly how to open the nose or firing mechanism for your specific model.
- Open the Access Door: Typically, you’ll slide a cover or flip open a small door at the front of the nailer.
- Be Gentle: Don’t force any latches or covers. If it feels stuck, check your manual again.
Once opened, the firing channel should be visible. This is where the nail travels before being driven.
Step 5: Carefully Remove the Jammed Nail
With the firing channel accessible, you can now see the offending nail more clearly.
- Identify the Problem: Is the nail bent? Is it stuck sideways? Is another nail caught on it?
- Use Pliers: If you can get a grip on the nail with your pliers, try to pull it straight out.
- Use a Screwdriver (Carefully): If the nail is wedged tightly, you might be able to use a small flathead screwdriver to gently pry it loose. Use the screwdriver tip to push the nail back towards the magazine opening or to lever it sideways away from the driver blade. Be extremely careful not to damage the driver blade or the inside walls of the firing channel. These are precision parts.
- Push it Through: In some cases, if the nail is bent but still mostly intact, you might be able to gently push it back into the magazine or through the channel, as long as it isn’t jammed against the driver blade.
Take your time here. Patience is key. Rushing can cause more damage, leading to more complex repairs.
Step 6: Inspect and Clean
Once the jammed nail is out, take a moment to inspect the firing channel and the driver blade.
- Check for Damage: Look for any bent or broken parts, especially the driver blade. If you see significant damage, it might be time to consult the manufacturer or a repair shop.
- Remove Debris: Use a soft cloth or rag to wipe away any sawdust, wood shavings, or metal fragments that might have accumulated. A clean tool works better and is less prone to future jams.
A quick clean can go a long way in ensuring smooth operation. Think of it as giving your nailer a little spa treatment.
Step 7: Close the Access and Reassemble
Carefully close any access doors or covers you opened on the nose of the nailer. Make sure they click securely into place. If your nailer has multiple parts that were temporarily removed, reassemble them according to your manual.
Step 8: Test Fire
Before loading nails again, it’s a good idea to test the nailer.
- Reconnect the power source (air hose, battery, or plug).
- Hold the nailer against a piece of scrap wood.
- Ensure the safety contact tip/actuation lever is pressed firmly against the wood.
- Pull the trigger.
You should hear the nailer cycle normally. If it seems to fire properly and without any strange noises, you’re likely good to go.
Step 9: Reload and Resume Your Project
Now you can reload your nail magazine with the correct type and size of nails. Take a moment to ensure they are seated properly. Then, with renewed confidence, get back to your project!
—
Common Finish Nailer Jam Scenarios and Solutions
Finish nailers are versatile, but sometimes specific scenarios can lead to jams. Here’s a quick rundown of common issues and how to tackle them.
Scenario 1: A Nail is Snagged and Bent
This is the most frequent type of jam. The nail isn’t driven fully and gets caught as the driver blade retracts, bending the nail.
- Solution: Follow Steps 2-5 above. Gentle wiggling with pliers is usually effective. If the nail is bent sharply, you might need to use a small screwdriver to lever it out of the firing channel. The key is to pull it out straight if possible, or at least clear of the driver blade.
Scenario 2: A Nail is Buried and Won’t Come Out
Sometimes, a nail might be driven into the wood but at an angle, or it might have broken off just below the surface, making it hard to grab.
- Solution: If the nail is still protruding slightly, grip it with pliers and try to pull upwards. If it’s completely flush or below the surface, you might need to very carefully use a small pry bar or the tip of a screwdriver to lift the head or edge of the nail just enough to get a grip with pliers. Always be mindful of damaging the workpiece.
Scenario 3: Multiple Nails Jammed
Rarely, you might find two or more nails are jammed together in the firing channel or magazine feed.
- Solution: Disconnect power, empty the magazine. Carefully inspect the nose and firing channel. You may need to use pliers to gently separate and remove each nail one by one. Sometimes, one nail will be bent, trapping another. Focus on removing the bent one first.
Scenario 4: Jam Inside the Magazine Feed
Less common, but nails can jam as they feed from the magazine into the firing mechanism.
- Solution: Open the magazine. Remove all nails. Inspect the feed path for any bent nails or debris. Sometimes, gently pushing a nail or two forward manually can help clear a minor obstruction. If the magazine mechanism itself seems damaged, refer to your manual or contact the manufacturer.
Understanding these common jams can help you troubleshoot more effectively. Remember, most jams are minor and solvable with a bit of patience.
—
Preventing Nail Gun Jams: Tips for a Smoother Experience
The best way to deal with a jammed nail gun is to avoid jams in the first place! Here are some proactive steps you can take:
Proactive Maintenance and Best Practices:
- Use the Correct Nails: This is critical. Always use the type, size, and collation angle specified by your nailer manufacturer. Using the wrong nails is a leading cause of jams and can damage the tool.
- Proper Loading Technique: Ensure nails are loaded flat and flush against the magazine’s backstop. Don’t force the magazine shut if it feels like it’s binding.
- Maintain Air Pressure (Pneumatic): For pneumatic nailers, ensure your compressor is set to the recommended PSI range for your nailer. Too low pressure can cause weak drives and jams; too high can damage the tool. Check out resources from compressor manufacturers for optimal pressure settings.
- Keep it Clean: Periodically wipe down the nose of your nailer and clean out any dust or debris. Compressed air can be useful for blowing out the magazine area. A light application of lubricant (if specified by the manufacturer) can also help.
- Regular Inspections: Do a quick visual inspection of the driver blade and nose area regularly. If you notice significant wear or damage, it might be time for maintenance or replacement of parts.
- Don’t Force It: If a nail doesn’t drive properly, stop and investigate. Don’t just keep firing. Something is likely wrong.
- Avoid Firing into Extremely Hard or Dense Materials (with standard finish nailers): While finish nailers are designed for hardwoods, consistently trying to drive nails into knots, extremely dense areas, or materials not intended for nail guns can stress the tool and lead to jams.
- Store Properly: Keep your nailer clean and dry when not in use.
A little bit of preventative care goes a long way in keeping your tools running smoothly and preventing frustrating project interruptions. For more in-depth maintenance guides, consider looking at resources from reputable tool brands or woodworking associations.
—
Troubleshooting Table: When Jams Persist
If you’ve followed the steps and are still experiencing jams, or if you notice other issues, this table might help diagnose the problem.
| Problem Description | Possible Cause(s) | Suggested Solution(s) |
|---|---|---|
| Nails not firing at all | No air pressure (pneumatic) | Check air compressor, hose connection, and nailer regulator. |
| Battery drained or faulty (cordless) | Recharge or replace the battery. | |
| Safety contact tip not depressed | Press the nose firmly against the workpiece. Check if the tip is free to move. | |
| Nails driven incompletely or not at all | Low air pressure (pneumatic) | Increase air pressure to the recommended PSI. |
| Worn driver blade or internal |