Quick Summary:
Looking for the cheapest pneumatic nailer that still gets the job done? Focus on reputable brands’ entry-level models, consider refurbished tools from trusted dealers, and understand that basic features often mean lower cost without sacrificing essential performance for DIY projects.
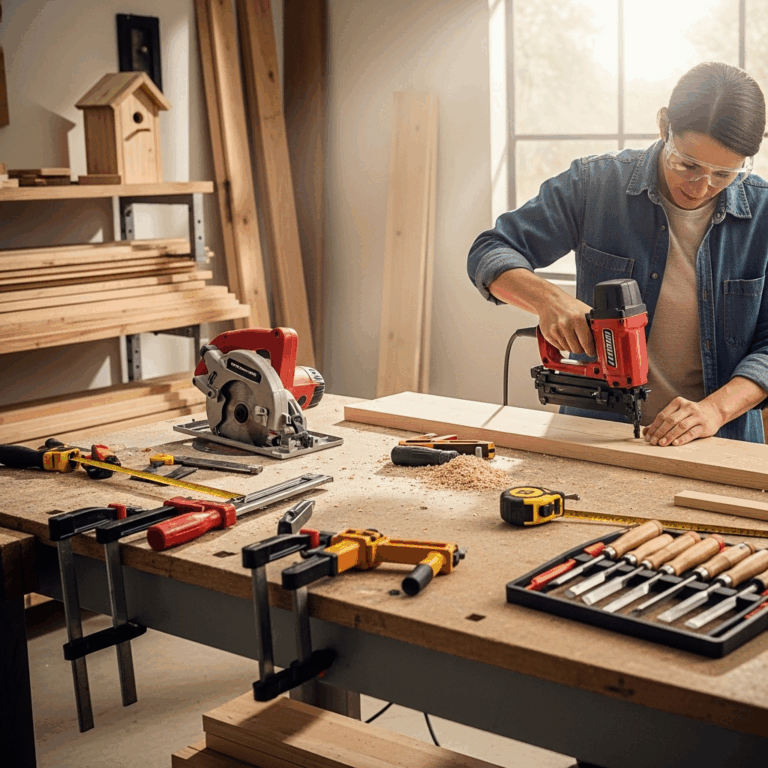
Hey there, fellow DIYers and woodworking enthusiasts! Jack Shaffer here, your go-to guy for all things nailers. Ever looked at a pneumatic nailer and thought, “Wow, that looks awesome, but my wallet is screaming?” You’re not alone! Getting the right tool for your projects shouldn’t break the bank. Many beginners feel overwhelmed by the options, worrying that they need the most expensive tool to get quality results. Well, I’m here to put your mind at ease. We’re going to dive deep into finding a powerful, reliable pneumatic nailer that’s incredibly affordable. Forget the fancy bells and whistles you don’t need; we’re focusing on pure performance and value. Get ready to nail your next project without emptying your savings!
Table of Contents
Finding the Cheapest Pneumatic Nailer: More Than Just Price Tag
It’s easy to scan online stores and just sort by “lowest price.” But when it comes to tools, especially power tools like pneumatic nailers, the absolute cheapest option isn’t always the best. We want a tool that’s affordable, yes, but also reliable, safe, and capable of performing the tasks you need it for. Think of it like buying a car – the cheapest one on the lot might get you from A to B, but will it be comfortable, dependable, and safe? We’re aiming for that sweet spot: a nailer that offers serious value for your hard-earned money.
A good pneumatic nailer can revolutionize your woodworking. It drives nails faster, cleaner, and with more power than hammering by hand. This means less fatigue, straighter nails, and projects that look professionally done. But the cost can be a significant barrier, especially for those just starting out or working on occasional home improvement tasks. So, how do we find a tool that’s light on the wallet but heavy on performance?
We’ll explore different types of nailers, discuss what features are essential versus optional, and look at brands known for their value. We’ll also touch upon where to find the best deals, including the smart option of looking at refurbished tools. By the end of this guide, you’ll have a clear roadmap to selecting a fantastic, affordable pneumatic nailer that will serve you well.
Understanding Pneumatic Nailer Types: Which One Do You Need (and Can Afford)?
Pneumatic nailers use compressed air to drive nails. They require an air compressor, which is an additional cost, but the nailer itself is often cheaper and lighter than its cordless or electric counterparts. The type of nailer you need depends entirely on your projects. For the budget-conscious DIYer, focusing on the most versatile and commonly used types makes the most sense.
Framing Nailers
These are the heavy-duty workhorses. They drive large nails (typically 2 to 3.5 inches) used for building frames of houses, decks, and other structural projects. If you’re doing major renovations or building a shed, this is your tool. However, framing nailers are usually more expensive and overkill for smaller DIY tasks. For finding the cheapest pneumatic nailer, a framing nailer might not be your first pick unless framing is your primary need.
Finish Nailers
Finish nailers are incredibly versatile and a popular choice for beginners. They drive smaller nails (usually 1 to 2.5 inches) that have minimal impact on the wood surface. These are perfect for attaching trim, baseboards, crown molding, window casings, door frames, and even furniture construction. They are less likely to split wood, making them forgiving for beginners. A good entry-level finish nailer is often the sweet spot for affordability and utility.
Finish nailers come in different gauges, which refers to the thickness of the nail:
- 18-gauge (brad nailer): Drives very thin nails. Great for delicate trim work, attaching small moldings, and projects where you want minimal nail holes.
- 16-gauge (finish nailer): A bit thicker than 18-gauge. Good for larger trim pieces, baseboards, and situations where a bit more holding power is needed.
- 15-gauge (internailer): Even thicker. Leaves a slightly larger hole that’s easier to fill. Good for door jambs, heavier trim, and some furniture applications.
For a beginner looking for the cheapest pneumatic nailer that offers broad usability, an 18-gauge or 16-gauge finish nailer is usually the way to go.
Brad Nailers (Generally 18-Gauge)
Often used interchangeably with “18-gauge finish nailer,” brad nailers are fantastic for detailed work. They use slim, headless or very small-headed nails making them ideal for craft projects, intricate moldings, and situations where you want the nail to disappear. If your projects involve a lot of small, delicate pieces, a brad nailer is invaluable. Many affordable combo kits include both a framing and a brad nailer, but if you have to pick just one, a finish or brad nailer often provides more immediate value for home DIYers.
Staplers
While not technically “nailers,” pneumatic staplers are also common and affordable. They drive staples and are excellent for upholstery, attaching upholstery fabric, fencing, or sheathing. If your projects lean towards fabric work or lighter construction, a stapler might be a more appropriate and budget-friendly choice.
What Makes a Pneumatic Nailer Affordable: Essential vs. Nice-to-Have Features
To find the cheapest pneumatic nailer that’s still worthwhile, we need to understand where manufacturers cut costs and what features are truly non-negotiable for good performance.
Essential Features for Value
- Durability: Even affordable tools should last. Look for robust housing (often magnesium or durable plastic) and well-built internal components.
- Ease of Use: A tool you can’t figure out isn’t useful. Look for simple instructions, easy nail loading, and straightforward depth adjustment.
- Reliability: It needs to drive nails consistently. Check reviews for common complaints about jamming or misfires.
- Safety Features: A contact trip safety (where the nailer only fires when pressed against the wood) is crucial and standard on most modern nailers.
- Basic Adjustability: The ability to adjust the depth of the nail (how far it’s driven into the wood) is important for different wood types and desired finishes.
“Nice-to-Have” (But Often Cut for Cost) Features
- Tool-Free Jam Release: While convenient for clearing jams quickly, many affordable models expect you to use a small tool (often included) or pliers to clear jams. This is manageable for occasional use.
- Tool Hangers: A built-in hook for hanging the nailer on your belt or a ladder. Useful, but you can add a Carabiner if needed.
- Swiveling Air Couplers: Allows the air hose to rotate freely, preventing tangles. A good hose management system with a separate swivel adapter can achieve this.
- Integrated LED Lights: Handy for dark areas, but not essential if you have good garage lighting.
- Belt Clips: Similar to tool hangers, these are convenient but not critical.
- Multiple No-Mar Tips: Extra rubber tips to protect delicate surfaces. Usually, one sufficient tip is provided.
Focusing on tools that excel in the “essential” categories and are basic in the “nice-to-have” ones is the key to finding a truly affordable yet competent pneumatic nailer.
Top Brands Known for Affordable & Reliable Pneumatic Nailers
While you might find ultra-cheap, no-name brands, they often lack durability and can be frustrating to use. Sticking with well-established brands that offer entry-level or “value” lines is a much safer bet. These brands have a reputation to uphold, meaning even their most affordable options are typically designed with functionality and reliability in mind.
Popular Brands with Budget-Friendly Options:
- Ryobi: Often found at big-box home improvement stores, Ryobi offers a wide range of power tools, including affordable pneumatic nailers. They are known for good value, especially for the DIYer tackling home projects.
- Hitachi/Metabo HPT: Hitachi (now Metabo HPT) has a long-standing reputation for quality pneumatic tools. They often have excellent entry-level models that are robust and reasonably priced.
- Arrow Fastener: While perhaps more known for their manual staplers, Arrow also offers affordable pneumatic nailers and staplers that are popular for home use and crafts.
- Freeman: This brand is specifically targeted at the DIY and prosumer market, often offering good performance for the price. They frequently have combo kits that provide excellent value.
- Porter-Cable: Historically a professional brand, Porter-Cable now offers a range of consumer-oriented tools, including very popular and affordable pneumatic nailers that are great for beginners.
When buying, always check reviews specifically for the model you’re considering. Even within a good brand, some models might be better than others. Look for consistent positive feedback on reliability and ease of use.
Where to Find the Cheapest Pneumatic Nailer Deals
Finding the best price requires a bit of smart shopping. Don’t just buy the first one you see. Here are some strategies:
1. Big Box Home Improvement Stores
Stores like Home Depot, Lowe’s, and even Menards often have sales on tool brands they carry. Keep an eye on their weekly ads and holiday sales (like Memorial Day, Labor Day, Black Friday). They usually stock popular entry-level models from brands like Ryobi, Porter-Cable, and Freeman.
2. Online Retailers
Amazon, Home Depot’s website, Lowe’s website, and specialized tool sites like ToolBarn or Acme Tools are great places to compare prices. You can often find online-exclusive deals or a wider selection of budget models.
3. Refurbished and Reconditioned Tools
This is where you can often snag the biggest savings while still getting a reliable tool. Many reputable manufacturers and retailers sell “factory reconditioned” or “refurbished” tools. These have been returned, inspected, repaired (if necessary), and certified to work like new, usually with a warranty (though it might be shorter than for a new tool).
Where to find refurbished:
- Manufacturer Websites: Some brands sell refurbished tools directly.
- Online Retailers: Amazon Warehouse, or specific sections on retailer websites.
- Specialty Refurbished Tool Dealers: Sites that specialize in tools, sometimes offering a better selection or warranty.
Always check the seller’s reputation and the warranty information carefully if buying refurbished.
4. Combo Kits
Sometimes, buying a nailer as part of a kit with an air compressor can be more cost-effective than buying them separately. This is especially true if you don’t already own an air compressor. Look for kits that include an 18-gauge or 16-gauge finish nailer, as these are the most versatile for DIYers. You can often find good deals on starter kits which include the compressor, a basic hose, and one or two nailers.
Minimum Air Compressor Requirements
Remember, no pneumatic nailer works without an air compressor. The compressor is often a bigger investment than the nailer itself, but a basic, small compressor can power many affordable nailers effectively. Here’s what to look for:
What to Consider:
- PSI (Pounds per Square Inch): Most finish and brad nailers operate efficiently between 70-120 PSI. Your compressor needs to be able to deliver this range.
- CFM (Cubic Feet per Minute) at 90 PSI: This measures how much air the compressor can deliver. For a single finish or brad nailer, a compressor with a CFM rating of around 1 to 2 CFM at 90 PSI is usually sufficient. Framing nailers will require more.
- Tank Size: A larger tank stores more air, meaning the compressor motor runs less frequently. For light DIY, a 1-6 gallon tank is often adequate. For more continuous use or framing, 10-20 gallons is better.
When budgeting for the cheapest pneumatic nailer, don’t forget to budget for a suitable air compressor if you don’t already have one. You can often find entry-level compressors for around $100-$200. Look for “pancake” compressors – they are compact and great for portable use and powering single nailers.
For more detailed information on air compressors, OSHA provides excellent resources on workplace safety, which includes understanding air power capacities and safe usage:
Setting Up Your Affordable Pneumatic Nailer: A Step-by-Step Guide
Once you’ve picked out your budget-friendly pneumatic nailer and a compatible air compressor, setting them up is generally straightforward. Here’s how:
What You’ll Need:
- Your new pneumatic nailer
- Your air compressor
- A suitable air hose (usually 1/4-inch NPT, length depends on your workspace)
- Nails of the correct size and gauge for your nailer
- Safety glasses (non-negotiable!)
- Ear protection (highly recommended)
Step-by-Step Setup:
- Read the Manuals: Seriously, this is step one! Every tool is slightly different. Understand your specific nailer and compressor.
- Connect the Air Hose:
- Attach one end of your air hose to the air outlet on your compressor. Ensure it’s securely tightened.
- Attach the other end of the air hose to the air inlet on your pneumatic nailer. Most nailers use a standard 1/4-inch NPT fitting. Make sure this connection is also snug to prevent air leaks.
- Load the Nails:
- Open the nail magazine. This usually involves pulling back a spring-loaded follower or releasing a latch.
- Insert the correct type and size of nails into the magazine. Make sure they are seated properly and facing the right direction (the magazine will show you how).
- Close the magazine securely, ensuring the follower engages the last nail. Test the feed mechanism gently to make sure it’s smooth.
- Connect to Air and Pressurize:
- Ensure the air compressor is plugged into a power source and turned OFF.
- Turn ON the air compressor. It will begin to fill its tank.
- Set the regulator on the compressor to the recommended PSI for your nailer (check the nailer’s manual, typically 70-120 PSI for finish/brad nailers).
- Once the compressor reaches its cut-off pressure, it will stop. Your nailer is now ready to receive air pressure when connected.
- Perform a Test Fire (Safety First!):
- PUT ON YOUR SAFETY GLASSES AND EAR PROTECTION.
- Hold the nailer in one hand. With the other hand, hold a scrap piece of wood.
- Press the nose of the nailer firmly against the wood.
- For sequential/single-fire triggers, you’ll need to pull the trigger. For contact/bump triggers, the trigger is held down and firing happens as you bump the nose against the wood.
- Fire a single nail into the scrap wood. Check the depth and listen for any unusual sounds.
- If the nail is sunk too deep or not deep enough, adjust the depth setting on your nailer or the air pressure on your compressor regulator.
- Adjust Depth Setting:
- If nails are going too deep (e.g., breaking the surface or driving below flush), slightly reduce the air pressure or increase the depth adjustment setting (consult your manual).
- If nails are not going deep enough (e.g., proud of the surface), slightly increase the air pressure or decrease the depth adjustment setting.
- Make small adjustments and test fire again until you achieve the desired result. Consistency is key!
Maintaining Your Budget Pneumatic Nailer for Longevity
Even the cheapest pneumatic nailer can last for years with a little basic maintenance. Neglecting it will lead to jams, poor performance, and premature wear. Here’s how to keep your affordable tool in top shape:
Regular Maintenance Tasks:
- Lubrication: Most pneumatic tools require a drop or two of specialized pneumatic tool oil daily or every few uses. Add the oil to the air inlet fitting. Many affordable compressors come with an oiler on the regulator, or you can use inline oilers.
- Air Filter: Regularly check and clean or replace the air filter on your