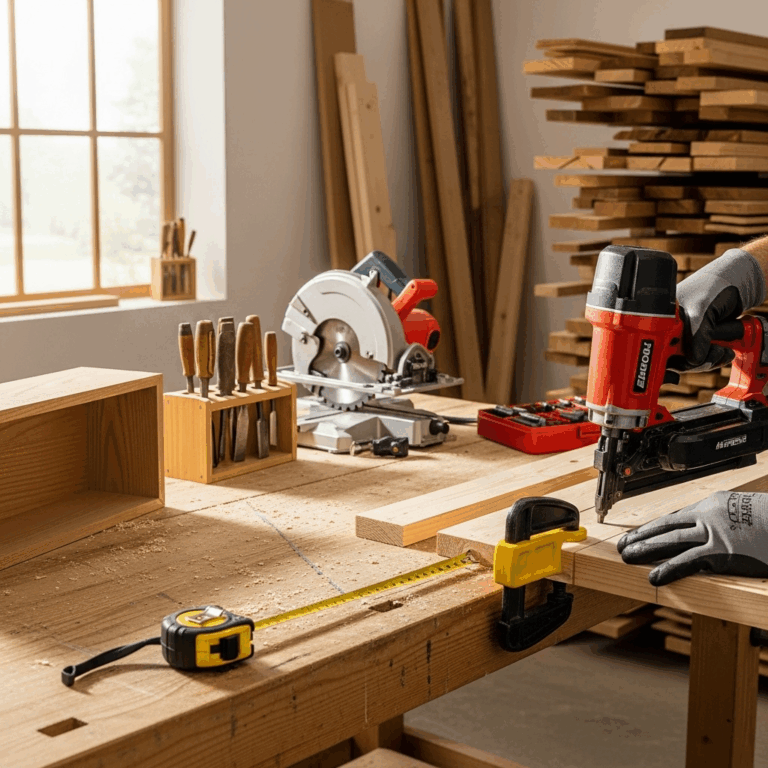
For DIYers powering through projects, a battery powered pin nailer is an essential tool that offers cordless freedom and precise fastening for delicate trim, molding, and craft work.
Ever looked at a beautiful piece of trim or intricate molding and thought, “How did they get those nails in so perfectly without any fuss?” It’s a common question for anyone diving into DIY woodworking or home improvement. Tackling small projects, like attaching delicate trim or crafting furniture details, can feel daunting when you’re wrestling with bulky pneumatic tools and tangled air hoses. The good news is, there’s a simpler, more convenient way! A battery powered pin nailer might just be the secret weapon your toolbox has been missing. It’s designed for ease of use, precision, and ultimate portability, making those detailed jobs feel more manageable and even enjoyable. Let’s explore how this little powerhouse can make a big difference in your next project.
In this guide, we’ll walk through everything you need to know to pick the right battery powered pin nailer for your needs, understand its benefits, and start using it with confidence. We’ll cover how it works, what makes it so handy, and some tips to get the most out of this versatile tool.
Table of Contents
What is a Battery Powered Pin Nailer?
A battery powered pin nailer, often called a cordless pin nailer, is a portable fastening tool that uses a rechargeable battery to drive tiny, headless nails (called pins) into wood and other materials. Unlike its pneumatic cousins that require an air compressor and hose, this tool is entirely self-contained. This means you can take it anywhere – from your workbench to the top of a ladder, or even outdoors – without being tethered by cords or hoses.
Pin nailers are specifically designed for the most delicate woodworking tasks. The pins they drive are extremely thin and small, usually ranging from 1/2 inch to 1-1/2 inches in length. Because they are so fine, the holes they leave are almost invisible, making them perfect for tasks where appearance is key and you don’t want to see nail heads. Think of attaching thin decorative molding, securing small cabinet parts, or even working on craft projects like picture frames.
The “battery-powered” aspect is its main advantage. It eliminates the need for an air compressor, which can be loud, heavy, and cumbersome. The battery provides the power to drive the nail, often through a clever mechanism that combines a motor and a spring or a small air cylinder. This makes them incredibly user-friendly, especially for beginners or those who value convenience and portability.
Why Choose a Battery Powered Pin Nailer? The Essential Power of Cordless Freedom
The “essential power” of a battery powered pin nailer comes down to a few key benefits that make it a standout tool for specific jobs:
-
{!– Markdown Example
- Unmatched Portability: No compressors, no hoses. This means you can move around freely, work at heights, or tackle jobs in tight spaces without restriction.
- Clean Finishes: The tiny, headless pins leave minimal to no visible marks, perfect for delicate trim, crown molding, and detailed work where nail head visibility is undesirable.
- Ease of Use: Most models are lightweight and ergonomically designed, making them comfortable to handle, even for extended periods. Plus, they’re very straightforward to operate.
- Versatility: While best for thin materials, they can be surprisingly effective for various small-scale assembly and finishing tasks.
- Quick Setup: Grab it, load it, and you’re ready to go. No waiting for compressors to build pressure.
Unmatched Portability: No compressors, no hoses. This means you can move around freely, work at heights, or tackle jobs in tight spaces without restriction.
Clean Finishes: The tiny, headless pins leave minimal to no visible marks, perfect for delicate trim, crown molding, and detailed work where nail head visibility is undesirable.
Ease of Use: Most models are lightweight and ergonomically designed, making them comfortable to handle, even for extended periods. Plus, they’re very straightforward to operate.
Versatility: While best for thin materials, they can be surprisingly effective for various small-scale assembly and finishing tasks.
Quick Setup: Grab it, load it, and you’re ready to go. No waiting for compressors to build pressure.
–}
When is a Battery Powered Pin Nailer the Right Tool?
A battery powered pin nailer shines in situations where precision and a clean finish are paramount, and where the fasteners don’t need to bear significant structural load. Here are some prime examples:
- Attaching Trim and Molding: This is their bread and butter. Installing delicate baseboards, chair rails, crown molding, or window and door casings where you want a seamless look without filling lots of nail holes.
- Craft Projects: Building picture frames, intricate boxes, small shelves, or any craft where small, hidden fasteners are needed.
- Cabinetry and Furniture Details: Adding decorative trim, small moldings, or securing thin back panels on cabinets and furniture.
- Detail Work on Woodworking Projects: Adding small decorative elements or joining thin pieces where strength isn’t the primary concern.
- Repair Work: Quickly tacking small pieces of wood or trim back into place without leaving obtrusive fasteners.
What a Battery Powered Pin Nailer is NOT For:
It’s also important to understand its limitations. A battery powered pin nailer is not designed for:
- Structural Nailing: Do not use it for framing walls, building decks, or any task that requires significant holding power. The pins are too small and don’t have enough grip for this.
- Driving Large Nails: It cannot drive common nails, finish nails, or brad nails. Its sole purpose is to drive tiny pins.
- Thick Material Fastening: While it can sometimes go through thicker pieces, its effectiveness decreases, and it might struggle to drive pins fully without bending, especially in hardwoods.
Types of Battery Powered Pin Nailers
While the core function is the same, battery powered pin nailers can differ slightly in their power source and operation. The most common types you’ll encounter are:
1. Battery-Powered (Direct Drive):
This is the most prevalent type. It uses a powerful electric motor and a mechanical system (often involving a spring-loaded striker or a small air cylinder charged by the motor) powered solely by a rechargeable battery pack. These are self-contained and offer the ultimate in cordless convenience.
{/ External Link Example /}
For a deeper dive into the mechanics, you can explore how various power tool mechanisms function at sites like HowStuffWorks, though their focus might be broader than just pin nailers.
2. Hybrid (Battery Assisted):
Some tools might have a battery to power the motor that charges a small internal air cylinder. The actual firing of the nail uses compressed air from this cylinder. While they use a battery, they can sometimes offer slightly different performance characteristics and might even share some parts with pneumatic tools. However, the fully battery-powered direct-drive models are rapidly becoming the standard for their simplicity and efficiency.
Key Features to Look For in a Battery Powered Pin Nailer
When you’re ready to buy, consider these features to ensure you get a tool that fits your projects and preferences:
- Battery System:
- Voltage: Higher voltage (e.g., 18V, 20V) generally means more power, but also potentially more weight and cost.
- Battery Life: Check how many nails you can drive on a single charge. This is crucial for longer jobs.
- Compatibility: Does it use batteries you already own for other tools from the same brand? This can save money.
- Nail Size and Type:
- Pin Gauge: The most common are 23-gauge (virtually invisible pins) and 20-gauge (slightly more robust but still very small). Ensure the nailer accepts the gauge you need.
- Nail Length: Check the range of nail lengths the tool can drive (e.g., 5/8″ to 1-1/2″).
- Depth Adjustment:
- Firing Mode:
- Sequential vs. Contact Fire: Sequential firing (you press the nose against the wood, then pull the trigger) is safer and more precise. Contact fire (pull trigger, then bump the nose) is faster but riskier if not used carefully. Many offer both modes.
- Jam Clearing:
- Ergonomics and Weight:
- LED Light:
- Belt Hook:
This is vital! It allows you to control how deep the pin is driven into the material. You’ll want a tool with an easy-to-use, tool-free depth adjustment (often a dial or lever) so you can fine-tune it for different wood types and thicknesses.
Look for models with tool-free jam clearing. When a nail jams, you want to be able to clear it quickly and easily without needing extra tools.
Hold the tool if possible. Is it comfortable to grip? Is the weight balanced? Lighter is generally better for maneuverability, but don’t sacrifice power or features for a few extra ounces.
A built-in LED light can be very helpful for illuminating your work area, especially in dim conditions or tight spots.
A useful feature for easily hanging the tool on your belt or a ladder rung when not in use.
How to Use Your Battery Powered Pin Nailer Safely and Effectively
Operating a battery powered pin nailer is generally quite straightforward, but safety and proper technique are key to getting the best results. Think of it like learning to use a hammer with a bit more finesse!
Step-by-Step Operation Guide
1. Read Your Manual!
Seriously, every tool is a little different. Your owner’s manual is your best first resource for specific operating instructions and safety warnings from the manufacturer.
2. Charge the Battery
Ensure your battery is fully charged and properly seated in the tool. A low battery can lead to inconsistent performance.
3. Load the Pins
Open the magazine (usually by sliding a release or pulling back a spring-loaded cover) and insert a strip of the correct size and gauge pins. Make sure they are seated correctly against the pusher. Close the magazine securely.
4. Select Firing Mode (If Applicable)
If your nailer has selectable firing modes (e.g., sequential and contact), set it to the desired mode. For detailed work and safety, sequential is usually recommended for beginners. Consult your manual for how to switch modes.
5. Adjust Depth Setting
Before you fire, use the depth adjustment feature to set how deep the pin will be driven. Start with a medium setting and do a test fire on a scrap piece of the same material you’ll be working with. Adjust as needed until the pin head sits just below or flush with the surface, as desired.
Tip: You’ll need to drive the pin slightly below the surface for trim work so that any paint or caulk will cover it completely. For craft projects, flush might be fine.
6. Position the Nailer
Place the nose of the pin nailer firmly against the surface where you want to drive the pin. Ensure the safety contact tip (the little metal piece at the very end of the nose) is also pressed against the material. This is a safety feature that prevents accidental firing.
7. Fire the Nail
Once the tool is properly positioned and the safety engaged, pull the trigger. For sequential fire, this is the final step. For contact fire, you would pull the trigger, then* bump the nose against the wood.
8. Continue Nailing
Reposition the nailer slightly and repeat the process, working your way along the trim or joint. For consistent results, try to maintain consistent pressure and placement.
9. Clear Jams (If They Occur)
If a pin jams, disengage the tool (remove battery if possible). Consult your manual for the specific jam-clearing procedure, which usually involves opening the magazine or a nose cover and carefully removing the obstruction.
10. Battery Removal and Storage
When you’re finished, remove the battery for storage. Store the tool and accessories in a clean, dry place.
Safety First! Essential Precautions
Even with small pins, safety is paramount. Always remember:
- Wear Safety Glasses: This is non-negotiable. Always wear ANSI-approved safety glasses or goggles to protect your eyes from flying debris or misfired fasteners.
- Use the Safety Contact Tip: Never disable or bypass the safety mechanism on the nose of the tool. Always ensure it is pressed against the workpiece before firing.
- Never Point at Yourself or Others: Treat the tool like any firearm; it’s a power tool capable of causing injury. Never point it at yourself, others, or any part of your body.
- Keep Fingers Off the Trigger: Keep your finger off the trigger when you are not actively firing a nail, especially when moving the tool or clearing jams.
- Understand Firing Modes: Be aware of whether your tool is in sequential or contact fire mode and use it accordingly to avoid accidental discharge.
- Work in a Well-Lit Area: Good visibility helps prevent mistakes and accidents.
- Proper Maintenance: Keep your tool clean and in good working order.
- Secure Workpiece: Ensure the material you are working on is stable and won’t move unexpectedly.
Battery Powered Pin Nailer vs. Other Small Nailers
It’s helpful to compare battery powered pin nailers to other common small nailers to understand where they fit in your toolkit.
| Nailer Type | Nail Type | Typical Use Cases | Pros | Cons | Power Source |
|---|---|---|---|---|---|
| Battery Pin Nailer | 23 or 20 Gauge Pins (Headless) | Fine trim, molding, craft work, delicate details | Invisible fasteners, highly portable, no hoses/compressor | Limited holding power, not for framing or structural use | Battery |
| Battery Brad Nailer | 18 Gauge Brad Nails (Small Head) | Attaching trim, paneling, small furniture assembly | Decent holding power for small nails, good finish, portable | Visible nail heads (though small), less ideal for very delicate work than pin nailers | Battery |
| Battery Finish Nailer | 15 or 16 Gauge Finish Nails (Medium Head) | Baseboards, crown molding, door casings, cabinet installation | Good holding power, can often replace manual nailing, portable | Clearly visible nail heads require filling/sanding, larger than brad/pin nails | Battery |
| Pneumatic Brad/Finish/Pin Nailer | Various (Pins, Brads, Finish) | Similar to battery versions but often more power/speed | Often lighter tool weight, potentially lower initial tool cost, consistent power | Requires air compressor, hose, and airline maintenance; limited portability | Pneumatic (Air Compressor) |
As you can see, the battery powered pin nailer occupies a niche for the absolute finest, most delicate work where the fastener needs to disappear. For slightly more holding power or larger trim, a brad nailer or finish nailer (also available in battery models) becomes more appropriate.
Troubleshooting Common Issues
Even with the best tools, you might run into a snag. Here are a few common issues and how to address them:
- Nail Not Driving Fully:
- Check Battery Charge: A low battery can cause weak performance.
- Adjust Depth Setting: The depth might be set too shallow. Try increasing it.
- Material Too Hard: The wood you’re working with might be too dense for the pin nailer’s power. Try a slightly longer or different gauge pin if compatible, or consider a brad nailer.
- Tool is Jammed: A small jam might be hindering full power. Clear it.
- Nail Bending:
- Material Too Hard: Similar to above, dense wood can cause bending.
- Angled Entry: Ensure the