Quick Summary:
Prevent nail gun damage by avoiding 7 common maintenance blunders: neglecting cleaning, improper lubrication, using the wrong fasteners, ignoring air pressure, forcing jams, storing them in damp conditions, and skipping regular inspections. Addressing these prevents costly repairs and ensures your tool’s longevity.
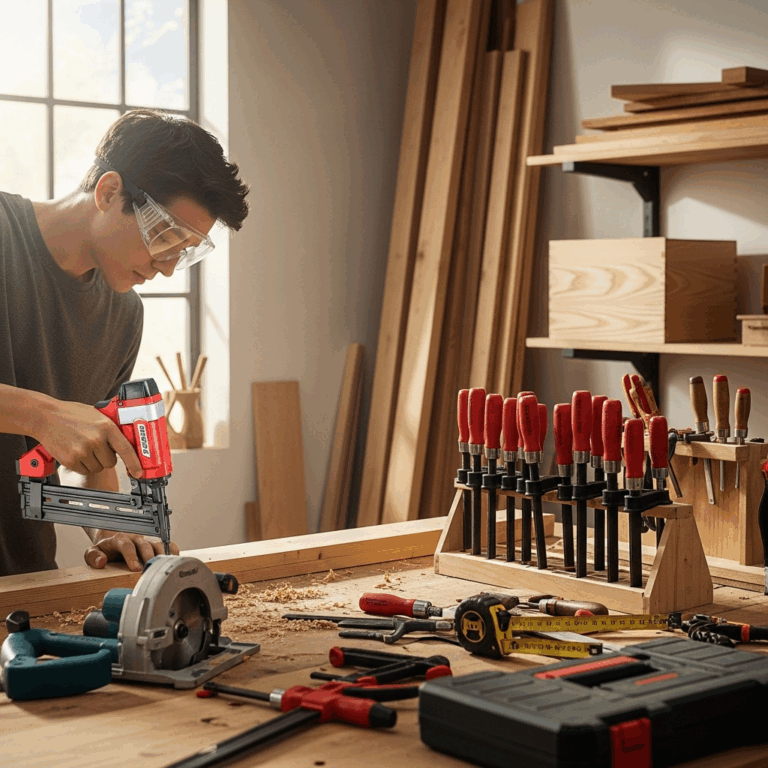
Hey there, fellow DIYers and woodworkers! Jack Shaffer here, your go-to guy for all things nail guns and woodworking. If you’ve ever picked up a nail gun, you know how much of a game-changer it can be for your projects. But, like any trusty tool, it needs a little TLC to keep it running smoothly. Sometimes, even with the best intentions, we make small mistakes during maintenance that can actually hurt our nail guns more than help. Don’t worry, though! It’s totally normal, especially when you’re starting out. We’re going to walk through the most common maintenance oopsies and show you exactly how to fix them, keeping your nailer in tip-top shape for years to come.
We’ll cover everything from simple cleaning routines to understanding air pressure, and learn how to spot and fix those frustrating jams before they become big problems. Let’s dive in and make sure you’re a nail gun pro, not just at firing nails, but at keeping your tool powered up and ready to go!
Table of Contents
Why Nail Gun Maintenance Matters (More Than You Think!)
Think of your nail gun as a hardworking partner on your DIY journey. When it’s working right, it speeds up tasks, makes projects look professional, and saves your hands from a lot of hammering. But just like any partner, it needs care. Neglecting its maintenance isn’t just about a tool breaking down; it can lead to:
- Project Delays: A jammed or malfunctioning nailer can bring your project to a screeching halt.
- Costly Repairs: Small issues, if ignored, can snowball into expensive repairs or even the need for a complete replacement.
- Reduced Performance: A poorly maintained nail gun won’t drive nails consistently, affecting the quality of your work.
- Safety Hazards: A tool not in proper working order can be more dangerous to operate.
The good news is that most of these issues stem from simple, avoidable maintenance mistakes. We’re talking about things that take minutes to fix but can save you hours of frustration and dollars later on. Let’s uncover these common pitfalls.
The Top 7 Nail Gun Maintenance Mistakes & How to Fix Them
You’re excited to get that deck built or that trim installed, and your nail gun is ready to help. But before you grab it, let’s make sure you’re not making these common errors that can sneakily damage your tool.
Mistake 1: Neglecting Regular Cleaning
This is probably the most common mistake. Dust, wood shavings, and debris can build up inside and around your nail gun, especially in the magazine and plunger area. This gunk can impede movement, leading to misfires or jams.
Why it’s a problem:
- Jamming: Debris can obstruct the nail feeding mechanism.
- Reduced Performance: A dirty plunger may not return properly, affecting firing power.
- Wear and Tear: Grit acts like sandpaper, wearing down internal parts over time.
The Fix:
Make it a habit to clean your nail gun after every few uses, or at least once a week if you use it frequently. Here’s how:
- Unload and Disconnect: Always remove all nails from the magazine and disconnect the air hose (for pneumatic guns) or battery (for cordless guns). Safety first!
- Wipe Down: Use a clean, dry cloth to wipe away loose dust and debris from the entire exterior of the gun.
- Clean the Magazine: Extend the magazine as much as possible and use a small brush (an old toothbrush works great!) or a clean cloth to remove any lodged debris. Pay attention to the feed path.
- Clean the Plunger Tube: If accessible, gently wipe out the plunger tube. You can often see if there’s buildup here. Some models allow for easier access to the plunger.
- Compressed Air (Optional): For pneumatic guns, a short burst of compressed air can help blow out stubborn dust from crevices. Be careful not to blow debris further into sensitive areas.
For a deeper clean, consult your owner’s manual. Some nail guns have components that can be removed for more thorough cleaning. Organizations like OSHA often provide guidelines on tool maintenance and safety, which indirectly emphasizes the importance of keeping tools clean and functional.
Pro Tip: Keep a dedicated small brush and a clean cloth with your nail gun kit to make cleaning a quick and easy step.
Mistake 2: Improper or No Lubrication
Many people forget to lubricate their nail guns, especially pneumatic ones. Moving parts need lubrication to reduce friction and wear. Using the wrong type or too much lubricant can also be detrimental.
Why it’s a problem:
- Increased Friction: Dry parts wear out faster.
- Seal Damage: Some lubricants can degrade rubber seals over time.
- Gumming Up: Too much or the wrong type of oil can attract dirt and create a sticky mess.
The Fix:
For Pneumatic Nail Guns:
- Use the Right Oil: Always use pneumatic tool oil. Never use WD-40 or regular motor oil, as they can damage seals.
- Lubricate Regularly: For pneumatic tools, add a few drops of oil (check your manual for the exact amount) into the air inlet fitting after each day of use or every few hours of operation.
- Run it Briefly: After adding oil, run the nailer a few times in the air to distribute the oil throughout the internal mechanisms. You’ll notice a puff of “exhaust” when it’s properly lubricated.
For Cordless (Battery) and Electric Nail Guns:
These types generally require less internal lubrication. Many have sealed mechanisms. However, check your manual. If lubrication is recommended, it’s often for specific external moving parts like the magazine or trigger mechanism. Use a light, appropriate lubricant as specified in the manual.
Tip: Over-oiling is a common issue. A few drops are usually sufficient for pneumatic tools. Less is often more!
Mistake 3: Using the Wrong Type of Fasteners
Nail guns are designed for specific types and sizes of nails, screws, or staples. Using the wrong fastener can cause jams, damage the tool’s driver blade, or simply not perform the task correctly.
Why it’s a problem:
- Jams: Nails that are too long, too short, too thick, or the wrong angle can jam the feeder.
- Driver Blade Damage: If a nail is too thick or doesn’t seat properly, it can damage the hardened steel driver blade.
- Poor Drive Quality: Incorrect fasteners lead to bent nails, insufficient driving depth, or nails sticking out.
- Magazine Issues: Fasteners that are the wrong size won’t feed smoothly from the magazine.
The Fix:
- Consult Your Manual: Your nail gun’s manual is the ultimate guide for compatible fasteners. It will specify the gauge, length, collation type (e.g., clipped head, round head), and angle.
- Buy Quality Fasteners: Cheap, off-brand fasteners can have inconsistent sizing and poor collation, leading to feeding problems. Stick to reputable brands recommended for your specific nail gun model.
- Match the Job: Different projects require different fasteners. For framing, you’ll need different nails than for trim work or roofing. Ensure the fastener you’re using is appropriate for the material and the holding power required.
Example Table of Common Nail Gun Types and Fasteners:
| Nail Gun Type | Common Fastener Type | Typical Use |
|---|---|---|
| Framing Nailer | 2″ – 3.5″ Framing Nails (e.g., 8d, 10d, 16d) | Building frames, decks, fences, general construction |
| Finishing Nailer | 1″ – 2.5″ Finishing Nails (e.g., 15-gauge or 16-gauge) | Attaching trim, molding, baseboards, cabinetry |
| Brad Nailer | 0.5″ – 1.5″ Brad Nails (e.g., 18-gauge) | Attaching delicate trim, shoe molding, crafts, small repairs |
| Stapler | Various Gauge Staples (e.g., 1/4″ crown staple) | Upholstery, sheathing, fencing (depending on staple size) |
Always double-check the fastener specifications before loading your nail gun.
Mistake 4: Incorrect Air Pressure Settings (Pneumatic Guns)
For pneumatic nail guns, air pressure is critical. Too low, and the nail won’t drive properly. Too high, and you risk damaging the tool, the workpiece, and even causing injury.
Why it’s a problem:
- Under-driving: Low pressure results in nails that don’t sink flush, requiring manual hammering.
- Over-driving: High pressure can drive nails too deep, damaging the wood surface or even piercing through thin materials. It also puts excessive stress on the internal components, seals, and O-rings.
- Tool Damage: Consistently running at high pressure can lead to premature wear of the driver blade, piston, and seals.
- Safety Risk: A nail driven with excessive force can ricochet or penetrate unexpectedly.
The Fix:
- Check Your Manual: The owner’s manual will recommend a specific PSI (pounds per square inch) range for your model. This is usually between 70-120 PSI, but varies greatly.
- Use a Regulator: Always connect your nail gun to an air compressor equipped with a regulator. This allows you to precisely control the output pressure.
- Start Low and Adjust: Begin with the lower end of the recommended PSI range. Test fire on a scrap piece of the same material you’ll be working with.
- Increase Gradually: If the nails aren’t driving flush, increase the pressure in small increments (2-5 PSI at a time) and test again.
- Find the Sweet Spot: Adjust until the nails are driving consistently to the desired depth without damaging the surface.
- Maintain Setting: Once you find the correct setting, keep it there for the duration of your work, assuming material consistency.
Resource: For more on air compressor and hose best practices, the OSHA standard for air-powered equipment provides valuable safety and operational guidance.
Important Note: The required PSI can also depend on the length and gauge of the nails you are using.
Mistake 5: Forcing Jams Instead of Clearing Them Properly
A jammed nail gun is frustrating, but trying to brute-force a fix can cause more damage than the jam itself.
Why it’s a problem:
- Bending the Driver Blade: Prying or forcing a jammed nail can bend or break the driver blade.
- Damaging the Magazine: Trying to dislodge a nail violently can warp or break the magazine.
- Trigger Mechanism Damage: Forcing the mechanism can bend or break critical internal parts.
- Personal Injury: A jammed nail gun can be unstable, and trying to clear it improperly can lead to accidental firing.
The Fix:
- Safety First: IMMEDIATELY disconnect the air supply (pneumatic), remove the battery (cordless), or unplug the tool (electric). Remove all nails from the magazine.
- Inspect the Jam: Look into the nose of the gun and down the magazine to see exactly where the nail is stuck and how it’s jammed.
- Gentle Persuasion: Most jams can be cleared with patience. Try gently tapping the jammed nail with a small block of wood or a rubber mallet.
- Use Pliers (Carefully): If a nail head is accessible and sticking out, use needle-nose pliers to gently pull it straight out.
- Access from the Magazine: Sometimes, you can access a jam by slightly opening or removing parts of the magazine (refer to your manual).
- Clear the Path: Once the offending nail is out, check the driver blade and plunger path for any damage or obstructions before re-loading.
- When to Seek Help: If you can’t clear the jam and are applying significant force, it’s time to consult your manual for deeper disassembly or consider taking it to a repair professional.
Tip: A small screwdriver might be needed to gently coax a nail out, but be extremely careful not to damage the tool’s delicate parts.
Mistake 6: Storing Your Nail Gun Improperly
Where and how you store your nail gun can significantly impact its lifespan, especially if you live in a humid environment.
Why it’s a problem:
- Rust and Corrosion: Moisture is the enemy. It can cause internal parts (especially on pneumatic guns) and exterior metal components to rust.
- Seal Degradation: Extreme temperatures or dampness can affect rubber O-rings and seals, causing them to dry out, crack, or become brittle.
- Damage to Accompanying Tools: If stored with air hoses, compressors, or batteries, moisture can also affect these accessories.
The Fix:
- Dry Storage: Always store your nail gun in a dry, climate-controlled environment. Avoid damp basements, sheds, or garages if they are prone to humidity.
- Use a Case: Your nail gun likely came with a sturdy carrying case. Use it! It protects the tool from dust, impacts, and helps maintain a controlled environment.
- Post-Use Care: After using a pneumatic nailer, especially if you’ve been in humid conditions, give it a quick wipe-down and run a few “dry fires” to expel any moisture from the air chamber. Some users recommend putting a drop of oil in the air inlet after use to help displace moisture.
- Battery Care: For cordless tools, store batteries in a temperate environment. Extreme heat or cold can shorten battery life. Check your manual for specific battery storage recommendations.
- Desiccants (Optional): For long-term storage, you can place a small packet of silica gel (desiccant) inside the tool case to absorb any residual moisture.
A consistent storage routine ensures your tool is protected from environmental damage.
Mistake 7: Skipping Pre-Use Inspections
It’s tempting to just grab the nailer and go, but a quick check before you start can prevent bigger headaches.
Why it’s a problem:
- Discovering Issues Too Late: You might find a bent driver blade or a clogged magazine only after you’ve started a project.
- Wasted Time: Having to stop mid-project to fix a preventable issue is a major time killer.
- Increased Risk: Operating a tool with a known, but ignored, issue can be unsafe.
The Fix:
Before each use, take these few moments:
- Visual Check: Look over the entire tool. Is anything obviously broken, cracked, or missing? Check hoses and connectors for damage.
- Magazine Inspection: Ensure the magazine opens and closes smoothly and is free from debris.
- Driver Blade Check: If visible, ensure the driver blade (the part that strikes the nail) looks straight and undamaged.
- Safety Mechanism: Test the safety contact tip (the safety mechanism on the nose of the gun). Does it depress and spring back correctly?
- Air Connection (Pneumatic): Ensure the air hose connector is secure and not leaking.
- Battery (Cordless): Ensure the battery is charged and locks into place properly.
A 60-second inspection can save you from hours of trouble. It’s a small habit that pays off big time.
Troubleshooting Common Nail Gun Issues: A Quick Guide
Even with perfect maintenance, occasional hiccups can occur. Here’s a quick rundown of common problems and their likely causes, tying back to our