When using a nail gun, always wear safety glasses or goggles, hearing protection, and sturdy work gloves. In some situations, steel-toed boots and knee pads can also be essential for complete protection against nail gun accidents.
Hey there, DIYers and workshop warriors! Jack Shaffer here from Nailerguy, ready to arm you with the knowledge to make your projects safer and more successful. Ever grabbed your nail gun, felt that surge of project excitement, but then paused, wondering, “What exactly should I be wearing?” You’re not alone! Nail guns are amazing tools that speed up our work, but they can also be dangerous if we’re not careful. The last thing anyone wants is an accidental nail in the wrong place. That’s why understanding the essential safety gear is super important, even before you fire that first nail. We’ll break it down, step-by-step, so you can feel confident and protected every time you head to the workshop. Let’s get your safety gear sorted, so you can focus on building!
Table of Contents
Why Safety Gear is Non-Negotiable with Nail Guns
Nail guns are powerful tools, and with power comes responsibility. They can drive nails at incredible speeds, and a moment of distraction or improper handling can lead to serious injuries. Think of it like driving – you wear a seatbelt not because you expect an accident, but because it’s the smart, safe choice to protect you in case one happens. The same principle applies to using nail guns. The right safety gear acts as your personal shield, minimizing the risk of common, and often preventable, injuries. These injuries can range from minor cuts and abrasions to more severe eye damage or even deeper penetration wounds. Understanding these risks is the first step to mitigating them.
The Occupational Safety and Health Administration (OSHA) provides extensive guidelines on the safe use of tools, including pneumatic nailers. Their recommendations highlight the critical importance of personal protective equipment (PPE) as a fundamental safety measure. Ignoring these guidelines isn’t just risky; it’s a gamble with your well-being. We’re here to make sure you never have to take that gamble. By equipping yourself properly, you’re not just protecting yourself; you’re also setting a great example if others are working alongside you or if you’re teaching someone new to the craft. Safety is paramount in any DIY or woodworking endeavor, and with nail guns, it’s especially true. So, let’s dive into the specific gear that will keep you safe and sound.
The Core Safety Gear: Your First Line of Defense
When you’re reaching for your nail gun, three pieces of safety equipment should be considered absolutely essential. These are the basics that should never be skipped, no matter how quick or simple the task seems. Think of them as your standard toolkit for safe nail gun operation.
1. Eye Protection: The Most Critical Piece of Gear
This is, hands down, the most important piece of safety gear you’ll use with a nail gun. Why? Because a runaway nail, a ricochet, or even debris kicked up by the nail can cause permanent vision loss. Never, ever operate a nail gun without proper eye protection.
- Safety Glasses: Look for safety glasses that meet ANSI Z87.1 standards. This means they are designed to withstand impact. They should fit snugly without gaps around the eyes. Many DIYers opt for clear safety glasses, which are great for general use and indoor work.
- Goggles: For a more robust seal around the eyes, especially in dusty environments or when there’s a higher risk of debris, safety goggles are an excellent choice. They offer a wider field of vision and better protection against particles entering from all angles.
- Face Shields: While not always a substitute for safety glasses or goggles underneath, a face shield can add an extra layer of protection for your entire face, particularly if you’re working with materials that tend to splinter or shatter. Always wear safety glasses or goggles under a face shield for complete eye protection.
Remember, prescription glasses are usually not sufficient unless they are specifically rated as safety glasses. Always choose gear designed for impact resistance. Investing in a good pair of safety glasses is one of the smartest decisions you can make for your DIY career.
2. Hearing Protection: Preserving Your Eardrums
Nail guns, especially pneumatic ones, can be surprisingly loud. Prolonged exposure to the noise they generate can lead to temporary or even permanent hearing loss. It’s a gradual process, so you might not notice the damage until it’s too late. That’s why hearing protection is vital for every use.
- Earplugs: These are small, often disposable, foam or silicone inserts that fit into the ear canal. They are convenient, inexpensive, and offer good noise reduction, often rated by their Noise Reduction Rating (NRR). For best results, ensure they are inserted correctly, creating a good seal.
- Earmuffs: Over-the-ear earmuffs provide excellent protection and are often more comfortable for extended wear than earplugs. They fit over the entire outer ear and effectively block out noise. Look for earmuffs with a high NRR. Many models are adjustable for a comfortable fit.
The National Institute on Deafness and Other Communication Disorders (NIDCD) emphasizes the importance of protecting your hearing from loud noises, and nail guns definitely fall into that category. A quiet workshop is a safe workshop, and protected ears are happy ears. Even if you think the noise level is manageable, it’s always better to be safe than sorry. The cumulative effect of noise exposure is significant.
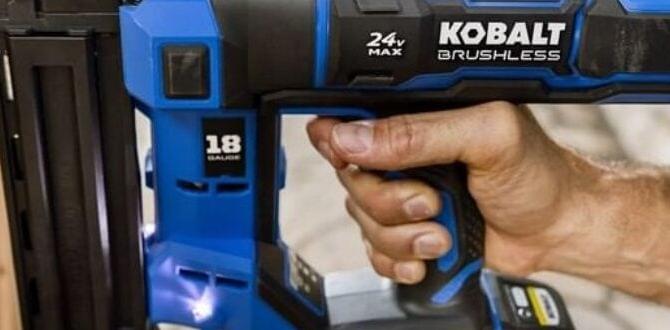
3. Hand Protection: Guarding Your Digits
While a nail gun is designed to drive nails, it’s also possible for your hands to get in the line of fire, especially when repositioning materials or clearing jams. Sturdy work gloves offer a crucial barrier against minor scrapes, abrasions, and can even offer some limited protection against accidental nail contact.
- Durable Work Gloves: Opt for gloves made from tough materials like leather or heavy-duty synthetic fabrics. They should provide a good grip, allowing you to handle materials securely without them slipping.
- Fit is Key: Make sure your gloves fit well. Gloves that are too loose can get caught in machinery or make it difficult to maintain control of the nail gun. Gloves that are too tight can be uncomfortable and lead to fatigue.
- Avoid Loose Threads: Ensure there are no loose threads or dangling parts on your gloves that could get caught.
It’s important to note that while gloves offer protection, they are not a substitute for careful handling. They won’t stop a nail from penetrating if your finger is directly in the path of the nailer’s nose, but they add a vital layer of defense against many common workshop hazards. A good grip also means better control over your tool, further enhancing safety.
Advanced Safety Gear: When to Step It Up
Beyond the absolute essentials, there are other pieces of safety gear that can significantly enhance your protection, depending on the type of nail gun you’re using, the materials you’re working with, and the nature of your project. These are the items that help you go from good protection to great protection.
4. Foot Protection: Keeping Your Foundation Strong
If you’re working with heavier nail guns, large framing nails, or on construction sites where dropped materials are a concern, then sturdy footwear is a must. Accidental nail gun misfirings can also happen, and a nail being driven into the sole of your shoe is a very real, very painful possibility.
- Steel-Toed Boots: These are the gold standard for foot protection in demanding work environments. The steel toe cap protects your toes from crushing impacts from falling objects or heavy tools.
- Puncture-Resistant Soles: Some work boots also feature puncture-resistant soles, which can provide an additional layer of defense against nails or sharp debris on the ground.
- Good Ankle Support: Ensure your boots offer good ankle support, especially when working on uneven surfaces or climbing ladders.
Even if steel toes aren’t strictly necessary for every light DIY job, wearing sturdy, closed-toe shoes with good soles is always recommended. Flip-flops and open-toed shoes are a definite no-go zone when a nail gun is involved.
5. Knee Pads: Protecting Your Joints
Many woodworking and DIY projects involve working at kneeling heights for extended periods. Whether you’re installing trim, building decks, or assembling furniture, your knees can take a beating. Knee pads provide cushioning and support, preventing discomfort and long-term joint issues.
- Padded Knee Pads: These typically have a foam or gel interior for comfort and a durable outer shell to protect against abrasions and impacts.
- Straps for Secure Fit: Ensure the knee pads have adjustable straps that allow for a snug but comfortable fit. You don’t want them slipping down or digging into your legs.
- Consider Mobility: Some knee pads are designed for more mobility, while others offer maximum padding. Choose a pair that balances protection with your need to move freely around your workspace.
Prolonged kneeling can lead to conditions like bursitis. Wearing knee pads is a simple preventative measure that makes a huge difference in comfort and long-term joint health. It’s a small investment for a big reward in comfort and well-being.
6. Respiratory Protection (In Specific Situations)
While a nail gun itself doesn’t typically produce harmful fumes (unless it’s a fuel-powered model, which has its own specific exhaust concerns), the materials you’re working with might. Sanding wood creates dust, and some finishes or glues can release volatile organic compounds (VOCs).
- Dust Masks: For simple tasks involving sawdust, a basic N95 dust mask can filter out fine particles. Make sure it forms a good seal around your nose and mouth.
- Respirators: If you’re working with strong adhesives, paints, solvents, or doing extensive sanding on treated wood, a half-face or full-face respirator with the appropriate cartridges might be necessary. Always choose cartridges rated for the specific chemicals you are exposed to.
Always consult the Material Safety Data Sheet (MSDS) for any materials you are using to understand the potential respiratory hazards. Good ventilation is also crucial. For more information on respiratory protection, the OSHA Respiratory Protection Standard offers comprehensive guidance.
Nail Gun Safety Features to Look For
Beyond the safety gear you wear, the nail gun itself often has built-in safety features. Understanding these can help you use the tool even more safely.
| Feature | Description | Benefit |
|---|---|---|
| Contact Trip Mechanism (Sequential Firing) | The tool will only fire a nail when the safety contact nose is pressed against the workpiece and the trigger is pulled. | Prevents accidental discharge. This is the safest mode for most general-purpose nailing. |
| Contact Firing (Full Sequential / Bump Fire) | The tool can fire nails as fast as the trigger is pulled, provided the safety contact nose is depressed. Some models allow for “bump fire” where holding the trigger down and tapping the nose will continuously fire nails. | Faster operation but requires extreme caution and a very deliberate trigger finger. Best for specific applications where rapid nailing is needed and absolute control is maintained. |
| Depth Adjustment | Allows you to control how deep the nail is driven into the material. | Prevents over-driving nails, which can damage the workpiece or create a hazard. Also helps with flush nailing or countersinking. |
| Safety Contact Nose | The tip of the nail gun that depresses against the material before firing. | Ensures that the nail gun only fires when intentionally placed against a surface, reducing the chance of firing into the air or at unintended targets. |
Most modern nail guns come with a “contact trip” or “sequential firing” mode as the default, which is the safest option for beginners and most users. It requires you to press the nose against your work and then pull the trigger. This two-step process significantly reduces accidental firings. Some nail guns also offer a “full sequential” mode, which is even more controlled, and others may have a “contact actuation” or “bump fire” mode. While faster, bump fire mode requires intense concentration and is best left for experienced users who truly understand its risks. Always check your nail gun’s manual to understand its specific firing modes and safety features.
Best Practices for Nail Gun Safety
Having the right gear is crucial, but how you use it and the habits you form are just as important. Here are some essential best practices to integrate into your workflow:
- Read the Manual: Seriously, every nail gun is a little different. Understand your specific tool’s features, safety warnings, and operating procedures.
- Inspect Your Tool: Before each use, check for any damage, loose parts, or obstructions in the magazine or air line (if pneumatic).
- Never Point the Nail Gun at Anyone: Treat it like a firearm – never point it at yourself or others, even if it’s not loaded or connected to air.
- Keep Fingers Away from the Trigger: Don’t place your finger on the trigger unless you are actively intending to drive a nail.
- Ensure Proper Workpiece Support: Never nail into anything that isn’t firmly supported. A workpiece that shifts can cause dangerous ricochets.
- Be Aware of Nailgun Placement: Make sure the safety mechanism is pressed flush against the material before you pull the trigger. Don’t operate the nailer in the air.
- Secure Your Work Area: Ensure you have stable footing and clear space to move. Tripping hazards should be eliminated.
- Double-Check for Hidden Obstacles: Before nailing into existing structures or materials, be aware of wires, pipes, or anything else that could be behind the surface you’re nailing into.
- Disconnect Power When Not in Use: For pneumatic nailers, disconnect the air hose. For cordless or electric models, remove the battery or unplug the tool when changing nails, clearing jams, or leaving the tool unattended.
- Clear Jams Safely: If a nail jams, disconnect the power source (air, battery, or plug) before attempting to clear it.
These practices, combined with your safety gear, create a robust safety net for all your projects. Remember, safety is an active process, not a passive state. It requires constant mindfulness and adherence to these guidelines. For more detailed information on tool safety, the Canadian Centre for Occupational Health and Safety (CCOHS) provides excellent resources on nail gun safety.
Choosing the Right Nail Gun for Your Project (Briefly)
While this article is about safety gear, it’s worth a quick mention that the type of nail gun can influence your safety needs. Different nail guns serve different purposes, and understanding these can help you choose the right tool, which is also a component of safety.
| Nail Gun Type | Primary Use | Typical Power Source | Safety Considerations |
|---|---|---|---|
| Framing Nailer | Building structures, framing walls, decks, fences | Pneumatic | High power, large nails; robust PPE essential, particularly eye and hearing protection. Often supports bump fire. |
| Finish Nailer | Installing trim, molding, baseboards, window/door casings | Pneumatic, Cordless (Battery), Corded Electric | Smaller nails, less power, but still requires full PPE. Good for detailed work. |
| Brad Nailer | Attaching small trim pieces, decorative molding, crafts | Pneumatic, Cordless (Battery), Corded Electric | Very small nails, less powerful. Still demand eye protection. |
| Pin Nailer | Attaching very delicate trim, small craft projects, tacking pieces | Pneumatic, Cordless (Battery) | Smallest fasteners, least power. Primarily eye protection needed, but always good practice to wear others. |
| Roofing Nailer | Attaching roofing shingles and underlayment | Pneumatic | Designed for outdoor power tool use; steep roofs add risk. Full PPE, including stable footwear and potentially fall protection, is vital. |
| Pallet Nailer | Disassembly and repair of wooden pallets | Pneumatic | Heavy-duty, designed for rough conditions. Strong PPE is a must. |
For extensive DIY projects like framing a deck or building a shed, a framing nailer might come into play. For finer woodworking tasks, like installing intricate trim, a finish nailer or brad nailer is more appropriate. Regardless of the type, always ensure you have the correct safety gear for the specific tool and application. A powerful framing nailer demands more robust protection than a small br