Don’t let a tripped safety lockout freeze your project! This essential guide shows you exactly how to reset the safety lockout feature on your nail gun, getting you back to building quickly and safely in just a few simple steps.
Hey there, fellow DIYers and woodworkers! Jack Shaffer here from Nailerguy. You know that feeling? You’re deep into a project, the wood is prepped, the nails are loaded, and then… nothing. Your trusty nail gun just won’t fire. More often than not, this means the safety lockout feature has done its job, protecting you and others. While it’s a crucial safety element, a sudden lockout can be frustrating when you’re on a roll. But don’t worry! Understanding how to reset it is straightforward, and I’m here to walk you through it every step of the way. We’ll get that nailer firing again in no time.
Table of Contents
Understanding Your Nail Gun’s Safety Lockout Feature
So, what exactly is this “safety lockout” we’re talking about? Think of it as an extra layer of protection built into your nail gun. Its primary job is to prevent accidental firing, which is super important when you’re handling such a powerful tool. Most modern nail guns use a contact-fire mechanism. This means you usually have to press something called a “safety contact tip” (or nose) against the material you’re working on before you can pull the trigger and drive a nail. If this tip isn’t properly engaged, or if something else is interfering with the mechanism, the nail gun might refuse to fire, even if you try to pull the trigger.
This feature is fantastic for safety, especially in busy workshops or when kids or pets might be around. It stops the gun from firing if you accidentally bump something or if it gets dropped. However, it can sometimes get “stuck” or tripped in a way that requires a simple reset. This guide is all about demystifying that process and empowering you to handle it confidently.
Why Does the Safety Lockout Engage?
Several things can cause your nail gun’s safety lockout feature to engage or prevent firing:
- Improper Contact: The most common reason is that the safety contact tip (that metal piece on the nose of the gun) isn’t pressed firmly enough or at the right angle against your workpiece.
- Debris or Obstruction: Small bits of wood, dust, or even a bent staple can get lodged in the mechanism, preventing it from retracting or engaging correctly.
- Dry Firing: Repeatedly firing the nail gun without nails loaded (dry firing) can sometimes stress the mechanism and trigger the lockout.
- Low Air Pressure (Pneumatic Guns): If your air compressor isn’t providing enough pressure, the safety mechanism might not fully disengage.
- Internal Mechanism Issue: Though less common, there might be a minor issue within the firing mechanism itself that needs a reset.
- Battery Depletion (Cordless Guns): For battery-powered nail guns, low battery can sometimes cause various features, including the safety lockout, to behave erratically.
The good news is that for most of these situations, a simple reset procedure can get you back to work. We’ll cover the general steps, but remember to always consult your specific nail gun’s manual for the most accurate information.
How to Reset Safety Lockout Feature in Nail Guns: Step-by-Step
Resetting the safety lockout is usually a quick process. While specific steps can vary slightly between brands and models (pneumatic, cordless electric, or gas-powered), the core principles remain the same. Always ensure your tool is powered off or disconnected from its power source before you start troubleshooting!
Step 1: Safety First – Disconnect Power!
This is the absolute, non-negotiable first step. Safety is paramount when working with tools, especially nail guns.
- For Pneumatic Nailers: Disconnect the air hose from the nail gun. This stops air pressure from being supplied, preventing any accidental firing.
- For Cordless Electric Nailers: Remove the battery pack from the tool. This completely cuts off electrical power.
- For Corded Electric Nailers: Unplug the tool from the power outlet.
- For Gas-Powered Nailers: Remove the fuel cell or battery, depending on the model.
Never skip this step. It ensures that while you’re manipulating the tool, there’s no chance of it firing unexpectedly and causing injury.
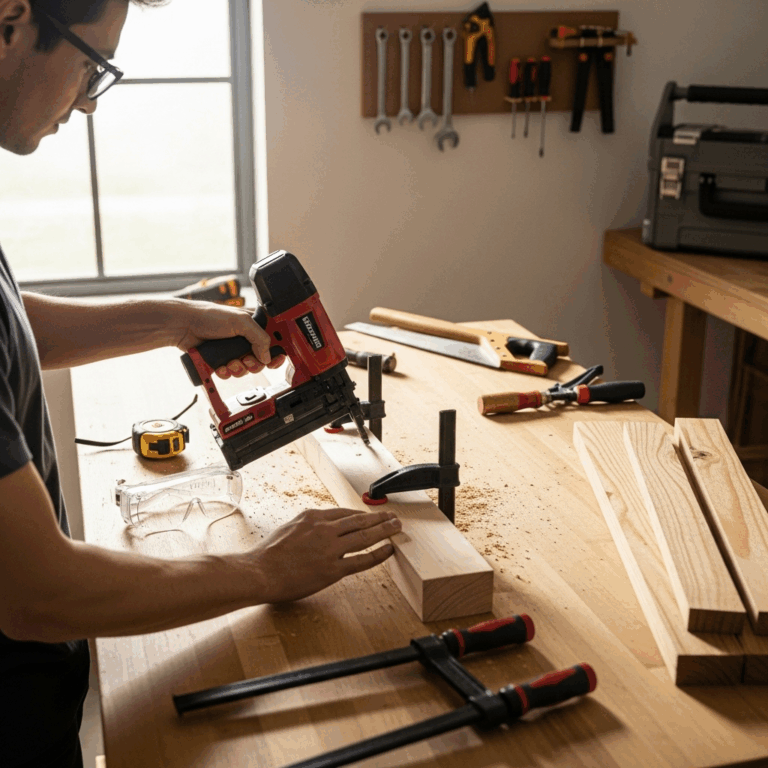
Step 2: Inspect the Safety Contact Tip (Nose)
This is where most lockout issues originate. The safety contact tip is that movable metal piece on the very front of your nail gun, right where the nail comes out.
- Carefully examine the tip. Is it stuck in the “depressed” or “engaged” position?
- Check for any debris, wood chips, or foreign objects lodged around the tip or in the track it slides in.
- Gently try to wiggle the tip. Does it move freely, or does it feel jammed?
If you see debris, use a soft brush or a compressed air can (with caution) to carefully clean around the safety contact tip. Do not use sharp objects that could scratch or damage the mechanism.
Step 3: Gently Press and Release the Safety Contact Tip
Once you’ve inspected and potentially cleaned the area, you need to ensure the safety contact tip moves freely through its full range of motion.
- With the power source disconnected, firmly press the safety contact tip against a sturdy, non-sensitive surface. A block of scrap wood is ideal.
- Hold it there for a second.
- Quickly release the pressure.
- Repeat this process several times. You’re essentially trying to “unstick” the mechanism and get it to cycle smoothly again.
Sometimes, the tip just needs a few solid presses to disengage from a slightly jammed position. Think of it as “waking it up.”
Step 4: Cycle the Trigger
After ensuring the safety contact tip is moving freely, it’s time to cycle the trigger. This helps clear any internal lingering issues or reset the firing mechanism.
- Still with the power source disconnected, pull the trigger.
- Hold the trigger down.
- Now, press and release the safety contact tip a few more times while holding the trigger.
- Release the trigger.
This back-and-forth action can help reset the internal firing pin and safety components. Again, you’re working to ensure free movement of all parts.
Step 5: Check the Depth Adjustment (If Applicable)
Some nail guns have an adjustable depth setting. While not directly related to the lockout feature, an incorrectly set depth can sometimes mimic a lockout issue or cause the nail to not seat properly, leading to perceived problems.
- Locate your depth adjustment knob or lever.
- Try moving it to different settings.
- Ensure it’s not set to an extreme depth that might bind the mechanism.
It’s worth checking this while you’re troubleshooting.
Step 6: Reconnect Power and Test
Once you believe you’ve cleared the issue, it’s time to reconnect the power source and test the nailer in a safe manner.
- Reconnect the air hose, battery, or plug.
- Take a piece of scrap wood.
- Place the safety contact tip firmly against the wood.
- Pull the trigger.
If all has gone well, the nail gun should now fire. Make a few test shots into the scrap wood to confirm everything is working as it should. Listen for any unusual sounds.
Troubleshooting Common Nail Gun Lockout Scenarios
Sometimes, the general reset steps might not be enough, or you might be dealing with a specific scenario. Here are a few common issues and how to handle them:
Scenario A: The Safety Contact Tip is Jammed Down
This is common if the gun has been dropped or hit.
- Disconnect Power: Crucial first step.
- Inspect Thoroughly: Look for bent metal, debris, or anything physically preventing the tip from retracting. You might need a flashlight.
- Gentle Persuasion: If you see a bent piece of metal, very gently try to straighten it with pliers. Be careful not to apply too much force, as you could cause more damage.
- Clean and Lube: Clean the area around the tip and its sliding mechanism. A tiny drop of machine oil (check your manual for recommended types) might help if it seems dry or stiff, but use sparingly.
- Work the Mechanism: As described in Step 3, press and release the tip repeatedly against scrap wood.
Scenario B: Nail Gun Fired Once, Now Won’t Reset
This can happen if the firing sequence didn’t complete correctly.
- Disconnect Power: Always disconnect first.
- Check Magazine: Ensure there are nails loaded correctly in the magazine and that they are feeding properly. Sometimes a misfed nail can jam the mechanism.
- Clear Jams: If a nail is jammed in the nose, carefully clear it according to your tool’s manual.
- Cycle Components: Perform the “press and release” routine on the safety contact tip and cycle the trigger a few times while the tip is depressed (power disconnected, of course).
Scenario C: Intermittent Lockout
If the lockout happens randomly:
- Check Air Pressure (Pneumatic): Ensure your compressor is set to the recommended PSI for your nailer. Low pressure is a common culprit for intermittent issues. Refer to your nail gun’s specifications, often found on the tool itself or in its official documentation.
- Inspect Air Hose and Fittings: Leaks in the air hose or a loose fitting can reduce pressure and cause issues.
- Check Battery (Cordless): If you have a cordless model, ensure the battery is fully charged and making good contact. Old or worn-out batteries can cause performance problems.
- Deep Clean: If the problem persists, the tool might need a more thorough cleaning internally. This is where consulting your manual or a professional might be necessary.
Essential Tools for Resetting Your Nail Gun
You likely won’t need many specialized tools for a basic safety lockout reset. However, having a few things on hand makes the process smoother:
- Scrap Wood: For pressing the safety contact tip against.
- Soft Brush: For cleaning away dust and debris. A paintbrush or a toothbrush works well.
- Compressed Air: A can of compressed air can be useful for blowing out debris, but use it in short bursts and wear eye protection.
- Flashlight: To get a good look at the contact tip and mechanism.
- Gloves: For safety and better grip.
- Safety Glasses: Always wear eye protection when working with tools.
- Pliers (Occasional Use): Only if something is visibly bent and needs very gentle straightening.
- Machine Oil (Sparingly): If recommended by your manufacturer for very stiff mechanisms.
Remember, the goal is usually to get the existing mechanisms to move freely again, rather than forcing anything. Often, a good clean and a few firm presses are all that’s needed.
When to Call a Professional or Consult Your Manual
While most safety lockout issues are simple to resolve, there are times when you should pause and get more help. If you’ve tried all the steps recommended here and the nail gun still won’t fire, or if you notice any of the following, it’s time to consult your tool’s manual or seek professional assistance:
- Visible Damage: If you see cracked plastic, bent metal that you can’t gently straighten, or other obvious physical damage to the tool.
- Strange Noises: Grinding, clicking, or other unusual sounds coming from the nailer when you try to operate it (even with power disconnected).
- Internal Jams You Can’t Reach: If you suspect a nail or other object is deeply jammed inside the firing chamber and you can’t access it.
- Water or Chemical Exposure: If the tool has been exposed to moisture or chemicals that could damage internal components.
- Persistent Issues: If the lockout problem keeps recurring despite resets.
Your nail gun’s instruction manual is your best friend. It will have specific troubleshooting tips for your model and outline the warranty information. For complex issues, contact the manufacturer’s customer support or take your tool to an authorized repair center. You can find extensive resources and manuals on many manufacturer websites, such as those from Stanley Black & Decker, which covers brands like DeWalt and Stanley.
Benefits of a Properly Functioning Safety Lockout
It might seem like a nuisance when it trips, but the safety lockout feature is incredibly beneficial. We’ve touched on this, but let’s highlight why it’s a feature you actually want working correctly:
- Prevents Accidental Discharge: This is the primary benefit. It stops the nail gun from firing if it’s accidentally bumped against a surface or if the trigger is pulled unintentionally.
- Protects Against Injury: An accidental discharge can cause serious injury to the user or anyone nearby. The lockout significantly reduces this risk.
- Safeguards Workpieces: It prevents unwanted marks or nail holes in your material when you’re just positioning the tool or moving around your project.
- Peace of Mind: Knowing your tool has an extra layer of safety allows you to work with greater confidence, especially in a shared or busy workspace.
- Tool Longevity: By preventing improper operation, the safety features can contribute to the overall lifespan and reliability of your nail gun.
Understanding how to reset it means you get the safety benefits without the unnecessary downtime. It’s about mastering your tools for both efficiency and safety.
Frequently Asked Questions (FAQs)
Q1: My nail gun won’t fire, and the safety contact tip is stuck down. What should I do?
First, disconnect the power source (air hose, battery, or plug). Then, inspect the safety contact tip and its housing for debris or damage. Clean the area gently. Press and release the tip firmly against a piece of scrap wood several times. If it feels loose, try cycling the trigger while the tip is depressed. If it remains stuck, there might be internal damage requiring professional attention.
Q2: How often should I clean the safety contact tip?
It’s a good practice to give the safety contact tip a quick clean before each major work session, especially if you’re working with dusty or prone-to-splintering materials. A more thorough cleaning might be needed if you notice any stiffness or if the lockout starts to engage more frequently.
Q3: Can I disable the safety lockout feature?
For safety reasons, it is strongly advised not to disable the safety lockout feature. It’s a critical safety mechanism designed to prevent accidents. Modifying or disabling it can void your tool’s warranty and, more importantly, significantly increase the risk of serious injury.
Q4: My cordless nail gun’s lockout keeps tripping. What could be the cause besides a jammed tip?
For cordless models, besides debris or a jammed tip, consider the battery. A low or failing battery can cause erratic behavior in the tool’s electronics, including the safety lockout. Ensure the battery is fully charged and making good contact. Also, check if the tool has been dropped, as internal components might be misaligned.
Q5: What’s the difference between a safety lockout and a depth adjustment problem?
The safety lockout prevents the tool from firing until the contact tip is pressed against a surface. A depth adjustment issue means the tool fires, but the nail doesn’t drive to the desired depth. Sometimes, a very deep setting might feel like a lockout because the nail isn’t penetrating, but these are distinct functions. Always ensure your depth is set appropriately for your material.
Q6: Is it normal for the safety contact tip to be slightly loose?
Yes, it’s normal for the safety contact tip to have a bit of play or movement, as it needs to depress to activate the firing mechanism. However, if it feels excessively wobbly, disconnected, or if there’s a significant gap when it should be engaged, it might indicate a problem with the internal springs or housing.
Conclusion
And there you have it! Resetting the safety lockout feature on your nail gun is usually a simple, quick fix that can get you back to your project without much fuss. By understanding the purpose of this crucial safety mechanism and knowing how to perform basic troubleshooting steps—like disconnecting power, inspecting the contact tip, and