Have you ever looked at your hardwood floors and wondered if they could look better? Pre-finished hardwood restoration might just be the answer you seek. This process can breathe new life into your floors without the mess and hassle of traditional refinishing.
Imagine walking across your living room and feeling the smooth, shiny finish beneath your feet. It’s like stepping into a brand-new home. But how do you get that fresh look? Pre-finished hardwood restoration is an easy way to enhance your floors. Many people don’t even know it exists!
This method brings back the beauty of your wood without stripping away its original charm. It saves you time and money, too! Why spend weeks on a project when you can restore your floors in days? Isn’t that exciting?
Stick around as we explore the world of pre-finished hardwood restoration. You might just discover a simple way to transform your space.
Table of Contents
Pre-Finished Hardwood Restoration: Revive Your Floors Today!

Understanding Pre-Finished Hardwood Restoration
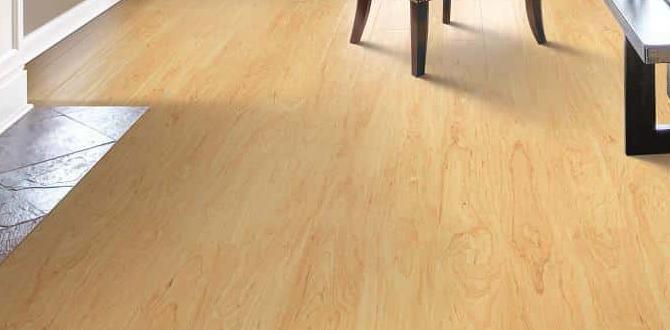
Pre-finished hardwood restoration offers a simple way to bring life back to your wood floors. Imagine your dull floors instantly looking new again! This process involves cleaning, repairing, and applying a protective finish, enhancing the wood’s natural beauty. Did you know this can save you time compared to sanding down the entire floor? With the right techniques and products, your restored floors can shine brilliantly and stand the test of time. Isn’t it amazing how little effort can yield such big results?Understanding Pre-Finished Hardwood Floors
Definition and characteristics of prefinished hardwood. Benefits of choosing prefinished over sitefinished hardwood.Prefinished hardwood floors come ready to use right out of the box. They are sanded, stained, and finished by a factory. This means no messy work for you! One big perk is that they dry faster, letting you enjoy your new floor sooner. Plus, they offer consistent quality that is hard to beat. Think of it as getting pizza delivered instead of making it at home—less mess, more yum!
| Features | Benefits |
|---|---|
| Factory-finished | No waiting! |
| Consistent color | No surprises! |
| Durable finish | Long-lasting! |
So, if you want an easy, attractive floor, go for prefinished hardwood. Your home will thank you!
Common Signs Your Pre-Finished Hardwood Needs Restoration
Scratches and dents. Discoloration and wear patterns.Spotting issues with pre-finished hardwood is easy. Look for these clear signs:
- Scratches and dents: If your floor has many marks or dents, it may need fixing.
- Discoloration and wear patterns: Notice any spots that look faded or uneven? This shows your hardwood is worn down.
Taking action early can help keep your floors beautiful. A little care goes a long way!
What should I look for in pre-finished hardwood restoration?
Check for visible scratches, dents, and fading. These signs mean your floors need attention to stay looking great.
Preparation for Restoration
Necessary tools and materials. Safety precautions to consider.Ready to dive into your hardwood floor adventure? First, gather your tools! You’ll need a sander, wood cleaner, and sealant. Don’t forget safety goggles, a dust mask, and ear protection! Because, trust me, you don’t want wood dust in your lungs or a surprise visit from your noisy neighbor! Here’s a handy table for quick reference:
| Tools | Materials |
|---|---|
| Sander | Wood cleaner |
| Vacuum | Sealant |
| Safety goggles | Microfiber cloth |
Now, put on your safety gear! You want to keep those peepers and lungs safe. Precautions make your project fun, not a trip to the hospital. So, gear up and make your floors shine!
Step-by-Step Restoration Process
Cleaning and preparing the surface. Sanding techniques for effective restoration. Applying stains or finishes: tips and techniques.Ready to give your wood floors a facelift? First, grab a broom and some soap. Cleaning the surface is key to great restoration. Next comes sanding. Use the right grit. Fine sanding helps, while too coarse can be like trying to reward a dog with broccoli!
For the final touch, apply stains or finishes. Spread it evenly and don’t rush. Remember, less is more. Want to impress? Use a foam brush for a smooth finish. For your hardwood’s new look, patience and these steps make a perfect match!
| Step | Action |
|---|---|
| 1 | Clean the Surface |
| 2 | Sanding Techniques |
| 3 | Apply Stains or Finishes |
Maintenance Tips for Restored Hardwood Floors
Best cleaning practices to maintain appearance. Preventative measures to avoid future restoration needs.Keeping your restored hardwood floors looking fresh is easier than you think! Regular cleaning is key. Sweep or vacuum frequently to remove dirt and dust. Use a damp mop with a gentle cleaner. Avoid soaking your wood; it doesn’t like to swim! Prevention is also important. Place rugs at entryways to catch dirt before it enters the house. Lastly, ensure furniture legs have pads to prevent scratches. Your floors will thank you with a warm, shiny smile!
| Tip | Description |
|---|---|
| Regular Sweeping | Remove dirt and dust to prevent scratches. |
| Damp Mopping | Use a gentle cleaner to keep surfaces shiny. |
| Rug Placement | Use rugs to trap dirt before it enters. |
| Furniture Pads | Protect floors from scratches with pads. |
Professional vs. DIY Restoration: Which is Right for You?
Factors to consider when deciding between DIY and hiring a professional. Cost comparison and potential outcomes for each option.Choosing between doing it yourself or hiring a pro can feel like picking between pizza toppings: so many options! First, consider your skills. If you can handle a hammer and some sandpaper without turning into a human pretzel, DIY might be fun. But, if that sounds scary, a professional could save the day.
Next, let’s talk money. DIY might seem cheaper at first, but wait! Mistakes can make it pricier, like buying five left shoes instead of a matching pair. Here’s a quick cost comparison:
| Option | Estimated Cost |
|---|---|
| DIY | $200 – $400 |
| Professional | $600 – $1200 |
Think about the outcomes, too. A pro can give you dreamy floors in a pinch, while DIY might end up more ‘art project’ than ‘magazine cover.’ So, weigh your choices wisely, and let the restoration adventure begin!
Frequently Asked Questions about Pre-Finished Hardwood Restoration
Common concerns and misconceptions addressed. Expert advice on restoration longevity and care.Many people wonder about pre-finished hardwood restoration. Some think it’s too hard or costly. However, proper care can keep your floors beautiful for years. Experts say that regular maintenance can add up to **20 years to your floor’s life**. Here are common questions many have:
What are the main concerns about restoration?
Some worry about the cost and effort involved. It is often easier than they think. Many are also unsure if restoration will last.
Common Misconceptions
- It’s too expensive: Many options fit most budgets.
- It takes too much time: Quick methods are available.
How do I care for restored hardwood floors?
Daily care is simple! Sweep or vacuum regularly. Mop with a damp cloth. Avoid harsh chemicals.
Conclusion
In summary, pre-finished hardwood restoration is a great way to revive your floors. It saves time and keeps the beauty of your wood. You can clean, polish, or apply protective coats. We encourage you to explore more tips online. You’ll find easy ways to keep your hardwood floors looking their best! Start your restoration journey today!FAQs
What Are The Most Common Signs That Pre-Finished Hardwood Floors Need Restoration?You can tell your pre-finished hardwood floors need help if you see scratches or deep marks. If the wood looks dull or faded, it’s time for restoration. You might also notice water spots or dark stains. If the boards are loose or creaking, they need fixing, too. Keeping an eye on these signs helps your floors stay beautiful!
What Steps Are Involved In The Restoration Process For Pre-Finished Hardwood Flooring?To restore pre-finished hardwood flooring, you start by cleaning the floor well. Next, you fill any cracks or holes with wood filler. Then, you lightly sand the surface to make it smooth. After that, you apply a new coat of finish to protect the wood. Finally, let it dry completely before walking on it again.
Can I Sand And Refinish Pre-Finished Hardwood Floors, Or Are There Specific Limitations I Should Be Aware Of?Yes, you can sand and refinish pre-finished hardwood floors, but there are some limits. You should check how thick the wood is first. If the wood is too thin, sanding can damage it. Also, be careful of the finish; some finishes are harder to remove than others. It’s best to ask a professional if you’re unsure!
What Products And Techniques Are Recommended For Cleaning And Maintaining Pre-Finished Hardwood Floors To Prolong Their Lifespan?To clean pre-finished hardwood floors, use a soft broom or a vacuum without a beater bar. For wet cleaning, dampen a microfiber cloth with a pH-balanced cleaner made for wood floors. Avoid using water directly, as it can damage the wood. Polish your floors occasionally to keep them shiny. Remember to place rugs in high-traffic areas to prevent scratches!
How Can I Determine Whether To Restore My Pre-Finished Hardwood Flooring Or Replace It Altogether?To decide if you should fix or replace your pre-finished hardwood floor, look at its condition. Check for deep scratches, water damage, or warping. If it’s just minor scratches, you can restore it easily. If the damage is too much, like large gaps or stains, replacing it is better. Always think about how much time and money you want to spend.
{“@context”:”https://schema.org”,”@type”: “FAQPage”,”mainEntity”:[{“@type”: “Question”,”name”: “What Are The Most Common Signs That Pre-Finished Hardwood Floors Need Restoration?”,”acceptedAnswer”: {“@type”: “Answer”,”text”: “You can tell your pre-finished hardwood floors need help if you see scratches or deep marks. If the wood looks dull or faded, it’s time for restoration. You might also notice water spots or dark stains. If the boards are loose or creaking, they need fixing, too. Keeping an eye on these signs helps your floors stay beautiful!”}},{“@type”: “Question”,”name”: “What Steps Are Involved In The Restoration Process For Pre-Finished Hardwood Flooring?”,”acceptedAnswer”: {“@type”: “Answer”,”text”: “To restore pre-finished hardwood flooring, you start by cleaning the floor well. Next, you fill any cracks or holes with wood filler. Then, you lightly sand the surface to make it smooth. After that, you apply a new coat of finish to protect the wood. Finally, let it dry completely before walking on it again.”}},{“@type”: “Question”,”name”: “Can I Sand And Refinish Pre-Finished Hardwood Floors, Or Are There Specific Limitations I Should Be Aware Of?”,”acceptedAnswer”: {“@type”: “Answer”,”text”: “Yes, you can sand and refinish pre-finished hardwood floors, but there are some limits. You should check how thick the wood is first. If the wood is too thin, sanding can damage it. Also, be careful of the finish; some finishes are harder to remove than others. It’s best to ask a professional if you’re unsure!”}},{“@type”: “Question”,”name”: “What Products And Techniques Are Recommended For Cleaning And Maintaining Pre-Finished Hardwood Floors To Prolong Their Lifespan?”,”acceptedAnswer”: {“@type”: “Answer”,”text”: “To clean pre-finished hardwood floors, use a soft broom or a vacuum without a beater bar. For wet cleaning, dampen a microfiber cloth with a pH-balanced cleaner made for wood floors. Avoid using water directly, as it can damage the wood. Polish your floors occasionally to keep them shiny. Remember to place rugs in high-traffic areas to prevent scratches!”}},{“@type”: “Question”,”name”: “How Can I Determine Whether To Restore My Pre-Finished Hardwood Flooring Or Replace It Altogether?”,”acceptedAnswer”: {“@type”: “Answer”,”text”: “To decide if you should fix or replace your pre-finished hardwood floor, look at its condition. Check for deep scratches, water damage, or warping. If it’s just minor scratches, you can restore it easily. If the damage is too much, like large gaps or stains, replacing it is better. Always think about how much time and money you want to spend.”}}]}