Quick Summary: For decking, a pneumatic framing nailer or a cordless framing nailer is generally your best bet. Look for one that drives 3-inch nails reliably, offers good power, and feels comfortable in your hand for extended use. Consider if you need the portability of cordless or the consistent power of pneumatic.
Building a deck is a fantastic DIY project that can truly transform your outdoor space. One of the biggest decisions you’ll make during this process is choosing the right nailer. It’s a common stumbling block for many DIYers, and frankly, picking the wrong tool can lead to frustration, wasted time, and a less-than-perfect finish. But don’t worry! As your go-to guy for all things nailers, I’m here to demystify the process. We’ll walk through everything you need to know to select the perfect nailer for your decking project, ensuring your new deck is built safely, efficiently, and beautifully. Let’s get started!
Table of Contents
Why the Right Nailer Matters for Decking
When it comes to decking, durability and safety are paramount. Your deck has to withstand the elements and support a lot of weight. The fasteners you use, and how well they’re driven, play a crucial role in this. A nailer designed for the job ensures that each nail goes in straight, to the correct depth, and with enough holding power to keep your deck boards secure for years to come.
Using the wrong tool can lead to:
- Bent or Crooked Nails: This weakens the hold and looks bad.
- Over-driven Nails: This can split the wood and reduce holding power.
- Under-driven Nails: These create tripping hazards and can loosen over time.
- Slowed Progress: Fumbling with the wrong tool eats up valuable building time.
- Increased Fatigue: A heavy or awkward nailer can make long days much harder.
Choosing the right nailer is an investment in your project’s success. It’s about accuracy, strength, speed, and your own comfort and safety.
Understanding Nailer Types for Decking
Not all nailers are created equal, and when it comes to decking, a few types stand out from the crowd. We’ll focus on the most suitable options for driving the robust nails needed for sturdy deck construction.
1. Pneumatic Framing Nailers
These are the workhorses of the construction world, and for good reason. Pneumatic nailers use compressed air from an air compressor to drive nails.
How they work: An air compressor stores pressurized air. When you pull the trigger on the nailer, a piston driven by this air forcefully pushes the nail into the wood.
Pros:
- Powerhouse Performance: They deliver consistent, high power, easily driving long nails into dense lumber.
- Lightweight (the tool itself): Compared to cordless models, the nailer itself is often lighter because the motor and battery are absent.
- Reliability: They tend to be very dependable and have a long lifespan with proper care.
- Cost-Effective (in the long run): Once you have a compressor, the nailers themselves can be more affordable than high-end cordless options.
Cons:
- Requires an Air Compressor: This is an additional piece of equipment to buy and maintain, and it adds to your overall setup cost and complexity.
- Hose Management: You need to manage an air hose, which can sometimes get in the way or limit your reach.
- Noise: Air compressors and pneumatic nailers can be quite loud, requiring hearing protection.
- Less Portable: You’re tethered to the compressor via the hose.
Nail Size: Look for framing nailers that can handle at least 3-inch nails. Decking typically uses 2.5-inch to 3-inch galvanized or stainless steel nails to prevent rust and ensure a strong hold.
Magazine Type: For framing, you’ll usually see either:
- Coil Nailers: These hold a coil of nails that are fed into the gun. They typically have a larger capacity but can be slightly bulkier.
- Stick (or Strip) Nailers: These hold nails in a straight strip. They are often more compact and easier to maneuver in tight spaces. For decking, both work well, but many prefer the larger capacity of coil nailers for long runs of boards.
2. Cordless Framing Nailers
These are battery-powered marvels. They offer the power of pneumatic nailers without the need for a compressor and hose, giving you ultimate freedom of movement.
How they work: Cordless nailers use one of two primary technologies:
- Gas/Battery Hybrid: These use a small, disposable fuel cell (like propane) ignited by a spark from the battery-powered system to drive the nail. They offer excellent power but require ongoing fuel cell purchases.
- All-Electric (or Battery-Powered): These use a high-power electric motor and a small compressed air cylinder within the tool to drive the nail. They rely solely on the battery charge.
Pros:
- Unmatched Portability: No hoses, no compressors! You can move around your job site freely.
- Fast Setup: Grab it and go – perfect for smaller jobs or when you need to cover a lot of ground quickly.
- Convenience: Easy to use and store.
Cons:
- Higher Upfront Cost: These tools, especially high-quality ones, can be significantly more expensive than pneumatic counterparts.
- Battery Dependency: You need charged batteries. Running out mid-project can halt your work unless you have spares.
- Weight: The onboard battery and motor can make them heavier than pneumatic nailers.
- Power Can Vary: While powerful, some models might struggle with very dense hardwoods or driving nails to a consistent depth in all conditions compared to a robust pneumatic setup.
- Maintenance: Fuel-based models require fuel cells, and all models need battery care.
Nail Size: Similar to pneumatic, ensure it handles 3-inch nails. Most cordless framing nailers are designed for this purpose.
3. Other Nailer Types (and why they’re generally not ideal for decking)
You might encounter other nailers, but they usually aren’t the best fit for driving deck boards:
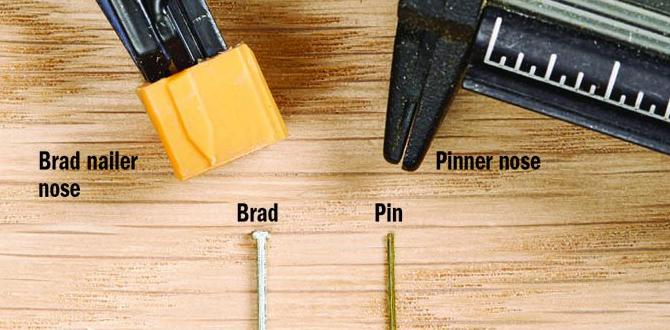
- Brad Nailers (18-gauge): These are for delicate trim work, not structural decking. Their nails are too small and lack the holding power.
- Finish Nailers (16-gauge): Better than brad nailers but still not strong enough for the demands of a deck. Good for smaller trim pieces on your deck railing, perhaps, but not the main decking boards.
- Siding Nailers: Designed for thinner materials like siding. While powerful, their nail collation and depth setting might not be optimized for thick deck boards.
- Roofing Nailers: These have a distinctive wide head to hold shingles. They drive nails into roof sheathing, but the nail length and collation type are not suitable for deck board fastening.
Key Features to Look For in a Decking Nailer
Regardless of whether you choose pneumatic or cordless, certain features will make your decking job smoother and more successful. Here’s what to keep an eye out for:
1. Nail Size and Type Compatibility
This is non-negotiable for decking. You need a nailer that can drive:
- Nail Length: At least 2.5 inches, but preferably 3 inches. This is crucial for securely attaching deck boards to joists.
- Nail Gauge: Framing nailers typically use .120 to .131 gauge nails, which provide adequate strength.
- Nail Material: For outdoor projects like decks, always use hot-dip galvanized or stainless steel nails. These resist corrosion. Your nailer needs to be able to drive these tougher nails consistently. Visit the ICC-ES (International Code Council Evaluation Service) for information on approved fasteners, which can give you a sense of what building codes look for in terms of performance and material integrity for structural components.
Ensure the nailer you choose is specifically listed as a “framing nailer” and can accommodate these specifications.
2. Driving Power
Decking lumber can be dense, especially hardwoods like Ipe or even pressure-treated pine. Your nailer needs enough power to drive nails flush without needing multiple shots or leaving nails proud (sticking out).
- Pneumatic: Look for a nailer that runs on adequate air pressure (usually 70-120 PSI) and has a good CFM (cubic feet per minute) rating for your compressor.
- Cordless: Check reviews for how well it handles hardwoods and if it drives nails consistently. Some models are better than others.
3. Depth Adjustment
Being able to control how deep the nail is driven is vital. You want nails to be flush or slightly countersunk, not sticking out (a trip hazard) or driven too deep (which can weaken the board).
- Most good framing nailers have an easy-to-access depth adjustment wheel or lever.
- Test it on scrap pieces of your decking material to find the perfect setting.
4. Sequential vs. Contact Fire (Nailer Modes)
Nailers have different firing modes:
- Sequential Fire (Safe Mode): Requires you to depress the safety contact tip against the wood before pulling the trigger. This is safer as it prevents accidental firing. It’s slower but precise.
- Contact Fire (Rapid Fire): Allows you to fire nails simply by pulling the trigger once the safety tip is engaged. This is much faster for quickly attaching boards but requires more control to avoid accidental drives.
For decking, a nailer that offers both modes is ideal. You can use sequential fire for critical placements and switch to contact fire for quickly driving nails along the length of a board.
5. Ergonomics and Weight
You’ll be holding this tool for extended periods, often overhead or at awkward angles. Comfort is key to avoiding fatigue and maintaining accuracy.
- Weight: Hold the nailer if possible. If buying online, read reviews focusing on its balance and how heavy it feels in hand.
- Grip: A comfortable, non-slip grip makes a big difference.
- Balance: A well-balanced tool feels less cumbersome.
6. Magazine Capacity and Loading
How many nails can the magazine hold? How easy is it to reload?
- Capacity: For decking, more is usually better. Coil nailers typically hold 100-300+ nails, while stick nailers might hold 50-100. More nails mean fewer interruptions.
- Loading: Is it a simple push-to-load system, or does it require complex steps? An easy reload system saves time and frustration.
7. Durability and Brand Reputation
Deck building is a substantial project. You want a tool that can handle the job and last for future projects. Stick with reputable brands known for their durability and customer support.
- Popular brands for framing nailers include Senco, Paslode, Dewalt, Bostitch, and Metabo HPT (formerly Hitachi).
- Check warranty information. A good warranty can be a sign of a manufacturer’s confidence in their product.
Pneumatic vs. Cordless: Making Your Choice
Here’s a breakdown to help you decide between pneumatic and cordless, specifically for your decking project:
| Feature | Pneumatic Framing Nailer | Cordless Framing Nailer |
|---|---|---|
| Power & Consistency | Excellent, very consistent drive depth. Handles dense wood with ease. | Generally very good, but can vary by model and battery charge. May struggle with extremely dense hardwoods. |
| Portability | Limited by air hose and compressor. | Excellent, completely free of hoses and compressors. |
| Setup Time | Requires setting up compressor, connecting hose, checking pressure. | Grab and go. Minimal setup. |
| Upfront Cost | Lower for the nailer itself, but requires compressor purchase. | Higher for the nailer, battery, and charger. |
| Running Costs | Electricity for compressor. | Electricity for charging batteries. Fuel cells for gas/battery hybrid models. |
| Weight (Tool) | Lighter tool body. | Heavier due to motor, battery. |
| Maintenance | Compressor oil/water draining. | Battery care, occasional cleaning of internal mechanisms. Fuel cell replacement for hybrids. |
| Best For | Large decks, long construction days, budget-conscious (if already owning compressor), consistent power needs. | Smaller decks, remote locations, convenience is key, frequent movability needed, willing to invest in higher upfront cost. |
Consider Your Project Size and Location
If you’re building a large deck, a pneumatic system might offer more consistent power over long workdays and potentially be more cost-effective once you factor in batteries and fuel cells for a cordless. If your deck is smaller, or if you have no power source nearby (or just want the ultimate freedom), a cordless nailer is a fantastic choice.
Consider Your Existing Tools
Do you already own a good air compressor? If so, a pneumatic nailer is a natural and cost-effective extension. If you’re starting from scratch, weigh the total investment for both systems.
Safety First: Essential Precautions
No matter which nailer you choose, safety is always the top priority. Power nailers are powerful tools and can cause serious injury if not used correctly.
1. Always Wear Safety Glasses
This is non-negotiable. Flying debris, nail fragments, or even a stray nail can cause severe eye damage. Look for ANSI Z87.1 compliant safety glasses.
2. Wear Hearing Protection
The percussive force of nailers can be loud. Prolonged exposure can lead to hearing loss. Earplugs or earmuffs are a must, especially when working with pneumatic tools or in enclosed spaces.
3. Read the Manual
Every nailer is slightly different. Familiarize yourself with your specific tool’s operation, maintenance, and safety features before you begin. You can often find tool manuals online via manufacturer websites or dedicated manual repositories if you’ve misplaced yours.
4. Keep Fingers Away from the Trigger and Nose
Never place your finger on the trigger unless you are ready to fire a nail. Avoid “dry firing” (firing without a nail) as it can damage the tool. Keep your hands and other body parts away from the nail exit point (the nose).
5. Be Aware of Your Surroundings
Ensure no one is behind you or in the path of a nail when you are about to fire. Be mindful of electrical wires and plumbing if you’re working near structures.
6. Secure Your Workpiece
Make sure the wood you are nailing into is stable. Clamps can be helpful for holding smaller pieces or preventing boards from shifting.
7. Proper Tool Maintenance
Keep your nailer clean, lubricated (if recommended by the manufacturer), and ensure all parts are in good working order. A well-maintained tool is a safer tool.
Step-by-Step: Using Your Decking Nailer
Here’s a general guide to using your new decking nailer. Always refer to your specific tool’s manual for precise instructions.
- Set Up Your Work Area: Clear the area of debris. If using a pneumatic nailer, set up your air compressor with the regulator set to the manufacturer’s recommended PSI (typically 70-120 PSI). Connect the air hose securely. If using a cordless nailer, ensure your battery is fully charged. Always wear your safety gear.
- Load the Nails: Open the nailer’s magazine and load the correct size and