Quick Summary: For most DIY projects, a nail gun significantly speeds up work and offers better precision than a hammer, but a hammer remains essential for smaller tasks, delicate work, and when you don’t have power. Choosing depends on project size, material, and your comfort level.
Table of Contents
Nail Gun vs Hammer: Your Essential DIY Choice
Hey there, DIY warriors! Jack Shaffer, Nailerguy here. Ever stood staring at a pile of lumber, wondering whether to grab that trusty hammer or reach for a power tool? It’s a common question for anyone starting out in DIY. The good news is, you don’t need to be a seasoned pro to figure it out. We’ll break down the great nail gun vs hammer debate, making it super simple to pick the right tool for your next project. Get ready to tackle your to-do list with confidence!
Why This Choice Matters for Your DIY Projects
Choosing between a nail gun and a hammer might seem small, but it makes a big difference in how your projects turn out. A hammer is a classic for a reason – it’s reliable and works everywhere. But nail guns are game-changers for speed and consistency, especially on bigger jobs. Getting this right means less frustration, better results, and more finished projects you can be proud of.
We’ll explore what each tool brings to the table, when to use which, and how to make sure you’re working safely. Let’s dive in!
The Humble Hammer: A DIY Staple
The hammer has been a builder’s best friend for centuries. It’s simple, effective, and doesn’t need a power outlet or compressed air. For many basic tasks, it’s still the go-to tool.
Pros of Using a Hammer
- Versatility: Great for anything from hanging pictures to building a birdhouse.
- Control: You have direct control over where and how deep the nail goes.
- No Power Needed: Works anywhere, anytime.
- Cost-Effective: A decent hammer is a one-time purchase and lasts forever.
- Precision for Small Jobs: Ideal for delicate work where a nail gun might be overkill.
- Disassembly: Can often be used to carefully pry apart pieces for corrections.
Cons of Using a Hammer
- Slow: Driving lots of nails by hand takes a lot of time and effort.
- Fatigue: Repeated hammering can lead to sore wrists and arms.
- Inconsistent Results: It’s harder to drive nails perfectly straight every time, increasing the risk of bending nails or splitting wood.
- Damage Risk: Missing a nail or hitting too hard can mar the surface of your material.
- Safety: Hitting your thumb is a classic (and painful!) hazard.
The Mighty Nail Gun: A DIY Powerhouse
Nail guns are power tools designed to drive nails quickly and efficiently. They come in various types, each suited for different tasks. Using one can transform your DIY experience, especially for larger projects.
Pros of Using a Nail Gun
- Speed: Dramatically reduces the time it takes to fasten.
- Efficiency: Drives nails with consistent depth and force, saving energy.
- Accuracy: Nails are driven straight, reducing bent nails and material damage.
- Less Fatigue: Significantly less physical strain compared to hammering.
- Professional Finish: Achieves a cleaner, more uniform look on your projects.
- Versatile Applications: From framing houses to installing trim, there’s a nail gun for it.
Cons of Using a Nail Gun
- Cost: Nail guns themselves can be expensive, plus you might need an air compressor or batteries.
- Power Source Required: Needs electricity, batteries, or an air compressor.
- Noise: Can be very loud, often requiring hearing protection.
- Learning Curve: While easier than hammering for speed, proper handling and safety require attention.
- Overkill for Small Tasks: Might be too powerful or cumbersome for very small or delicate jobs.
- Maintenance: Like any power tool, they require some upkeep.
Nail Gun Types: Which One Do You Need?
If you’re leaning towards a nail gun, it’s helpful to know the main types. Each is designed for specific jobs.
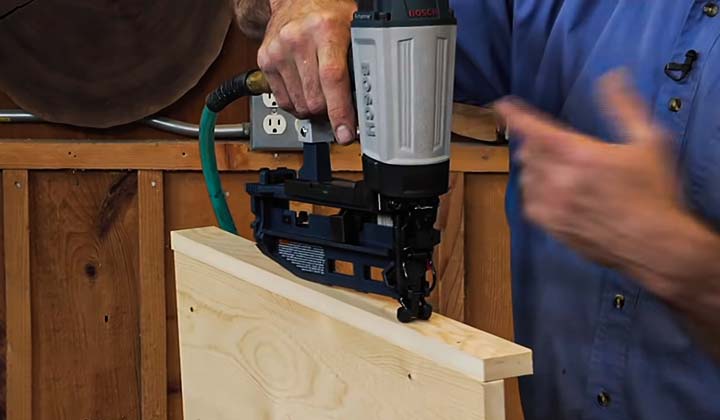
1. Framing Nailers
These are the heavy-duty champions. They drive large nails quickly and are perfect for building the sturdy framework of decks, fences, or sheds. They can be pneumatic (air-powered) or cordless.
2. Finish Nailers
Ideal for trim work, molding, and attaching smaller pieces of wood where you want a clean look. They use slimmer nails that leave smaller holes, often requiring minimal filling. They are typically electric or pneumatic.
3. Brad Nailers
Even smaller than finish nailers, brad nailers use very thin nails. They’re excellent for delicate trim, crafts, and projects where visibility of the fastener is key. They are usually electric or pneumatic.
4. Roofing Nailers
Specifically designed to rapidly install asphalt shingles and other roofing materials. They have a wider head to properly seat the nail without tearing the shingle.
5. Pin Nailers
These use extremely fine pins with tiny heads, making them virtually invisible. They’re great for attaching very small, delicate trim or securing pieces while glue dries, but they don’t offer much holding power on their own.
For most general DIYers, a finish nailer or a brad nailer is the most versatile starting point after a trusty hammer.
Nail Gun Power Sources: What Fuels Your Fastening?
Before you buy a nail gun, consider its power source. This affects portability, cost, and how you’ll use it.
1. Pneumatic (Air-Powered) Nailers
- How they work: These use an air compressor to deliver a burst of air that drives the nail.
- Pros: Generally lighter, more powerful, and less expensive than cordless models.
- Cons: Require an air compressor, air hose, and a power outlet for the compressor. Less portable.
- Best for: Workshops, consistent use where portability isn’t the main concern.
2. Electric Nailers
- How they work: Plug directly into a wall outlet or use a battery.
- Pros: No compressor needed, very portable (battery models). Easy to use.
- Cons: Corded electric models are limited by their cord length. Battery models can be heavier and more expensive.
- Best for: Home use, trim work, smaller projects where power is readily available.
3. Gas-Powered Nailers
- How they work: Use a small fuel cell (like a propane-like canister) and a battery to ignite the fuel, driving the nail.
- Pros: Very portable, no cords or hoses.
- Cons: Can be more expensive to operate due to fuel cells, sometimes have a specific smell, and may require more maintenance.
- Best for: Job sites without easy power access, like framing or fencing in remote areas.
For beginners tackling indoor projects like installing baseboards or building shelves, a cordless electric finish or brad nailer is often a fantastic choice due to its ease of use and portability.
Nail Gun vs Hammer: When to Use Which
So, you’ve got your tools. Now, let’s match them to the job. It’s not always one or the other; sometimes, it’s about the best tool for the specific stage of your project.
When a Hammer Shines
- Small, Delicate Projects: Think birdhouses, small craft boxes, or working with thin veneer.
- One or Two Nails: Hanging a mirror, securing a loose board with a single nail.
- Tight Corners/Awkward Angles: When a nail gun might be too bulky or difficult to position.
- Emergency Fixes: When you need a quick fix and don’t have power or air.
- Reclaiming Wood: When you need to carefully remove nails without damaging old lumber during deconstruction.
- Learning the Basics: Understanding the feel and force of driving a nail by hand is a fundamental skill.
When a Nail Gun Wins
- Framing: Quickly assembling the skeleton of furniture, sheds, or decks.
- Trim Installation: Baseboards, crown molding, window and door casing – for speed and a clean look.
- Siding and Fencing: Driving hundreds of nails efficiently.
- Flooring: Especially hardwood flooring installation.
- Cabinetry: Assembling cabinet boxes and attaching face frames.
- Large-Scale Projects: Any project involving a substantial number of nails where time and effort are significant factors.
- Desire for a Professional Finish: When consistency and minimal surface damage are priorities.
Safety First! Essential Precautions for Both Tools
No matter which tool you choose, safety is paramount. A moment’s carelessness can lead to injury.
Hammer Safety Tips
- Wear Safety Glasses: Always protect your eyes from flying debris or a glancing blow.
- Keep Fingers Clear: Use a nail holder or a technique that keeps your fingers away from the hammer’s path.
- Stable Footing: Ensure you have a solid, balanced stance.
- Inspect Your Hammer: Check for a secure head and a handle that isn’t cracked or loose.
- Use the Right Hammer for the Job: A heavy framing hammer isn’t ideal for small finishing nails.
Nail Gun Safety Tips
- Read the Manual: Every nail gun is different. Understand its specific safety features and operation.
- Always Wear Safety Glasses: This is non-negotiable.
- Never Point at Yourself or Others: Treat the nail gun like a loaded firearm.
- Keep Fingers Off the Trigger When Not Actively Nailing: Especially if the nose is depressed.
- Understand Contact Trip vs. Sequential Trip: Contact trip fires when the nose is depressed AND the trigger is pulled (faster, but riskier). Sequential trip requires nose depression THEN trigger pull (safer). Often, you can choose between these modes.
- Disconnect Power When Not in Use: Unplug electric models, remove the battery, or disconnect the air hose when clearing jams or changing nails.
- Don’t Overreach: Maintain balance and a secure grip.
- Be Aware of Your Surroundings: Ensure no one is behind your target material in case of a breakthrough.
- Proper Maintenance: Keep your nail gun clean and well-lubricated as per the manufacturer’s instructions.
The Occupational Safety and Health Administration (OSHA) provides excellent resources on nail gun safety. Always refer to these guidelines for comprehensive safety information.
Cost Comparison: Hammer vs. Nail Gun Investment
Let’s look at the financial side. Your budget plays a big role in tool choices for DIY.
| Tool | Typical Price Range (USD) | Additional Costs |
|---|---|---|
| Basic Claw Hammer | $15 – $40 | Nails (widely available and inexpensive) |
| Quality Framing Hammer | $30 – $70 | Nails |
| Corded Electric Brad/Finish Nailer | $60 – $150 | Specific nails for the gun (vary by brand/size) |
| Cordless Electric Brad/Finish Nailer | $150 – $300 (tool only) | Battery & charger (if not included), Specific nails |
| Entry-Level Pneumatic Nailer Kit (Nailer + Hose + Compressor) | $150 – $300 | Specific nails, Air tool oil (for some compressor/nailer types) |
| Framing Nailer (Pneumatic or Cordless) | $100 – $400+ | Specific nails, Compressor/Hose (for pneumatic), Battery/Charger (for cordless) |
Making the Financial Decision
- Beginner DIYer (Occasional Small Projects): A good hammer is all you need to start. Adding a corded electric nailer later for specific trim tasks is a cost-effective upgrade.
- Serious DIYer (Regular Larger Projects): Investing in a cordless electric finish or brad nailer can save you significant time and effort over the long run. If you do a lot of framing or deck building, a pneumatic framing nailer with a compressor might be a better long-term solution or a cordless framing nailer for maximum portability.
- Budget is Tight: Start with a quality hammer. You can always add a nail gun later as your needs and budget allow. Don’t forget the cost of nails themselves, which are essential for both tools!
DIY Project Examples: Hammer vs. Nail Gun in Action
Let’s visualize this with some common DIY scenarios.
Scenario 1: Building a Simple Wooden Planter Box
- Hammer: You can definitely build this with a hammer. It will take more time, and you’ll need to be careful to drive nails straight to avoid splitting the wood. Each nail requires several deliberate swings. You’ll likely want to pre-drill small pilot holes for easier nailing and to prevent splitting.
- Nail Gun (Brad or Finish Nailer): This is where a nail gun shines! You can assemble the sides and secure the bottom panel in minutes. Just place the gun against the wood, press the nose, and pull the trigger. The nails go in quickly and consistently. You’ll still need to file down any proud nail heads or fill tiny holes later for a super-smooth finish.
Scenario 2: Installing Baseboard Trim in a Room
- Hammer: Possible, but challenging. Driving finishing nails into baseboards requires precision. It’s easy to bend nails, create dimples in the wood, or hit your fingers. Each nail requires careful placement and several taps with the hammer. Anchoring securely to studs consistently is tough.
- Nail Gun (Finish Nailer): This is the ideal tool. A finish nailer drives thin nails with ease, creating minimal visible damage with each shot. You can quickly and securely attach baseboards to studs, achieving a professional, consistent look with far less effort and time. The speed allows you to complete a whole room efficiently.
Scenario 3: Building a Small Garden Fence (6ft section)
- Hammer: You could build a fence section with a hammer, but it would be a significant workout and take a long time. You’d be driving lots of nails into thicker lumber, making it physically demanding and prone to inconsistent results.
- Nail Gun (Framing Nailer): A framing nailer is built for this. It drives larger nails quickly into tougher wood, making fence construction much faster and more robust. You’d assemble the frame and attach the pickets in a fraction of the time it would take with a hammer.
FAQ: Your Nail Gun vs. Hammer Questions Answered
Q1: Is a nail gun essential for a beginner DIYer?
Not at all! A good hammer is a fantastic starting point for any beginner. A nail gun is more of an upgrade that makes larger or more repetitive tasks much easier and faster. Start with basics, and add tools as your projects demand them.
Q2: Which type of nail gun is best for general home repairs and small projects?
For general home repairs, installing trim, and smaller DIY projects, a cordless electric brad nailer or finish nailer is usually the most versatile and user-friendly choice. They don’t require an air compressor, making them very convenient.
Q3: Can I use a hammer for framing a small deck or shed?
Yes, you can, but it will be very time-consuming and physically demanding. A framing nailer is highly recommended for any construction framing to make the job faster, easier, and more consistent.
Q4: Are nail guns dangerous?
Like any power tool, nail guns require respect and proper safety precautions. They can be dangerous if used improperly. Always wear safety glasses, read the manual, and never point the gun at yourself or others.
Q5: How can I avoid damaging my wood when using a nail gun?
<p