Quick Summary:
Nail gun troubleshooting is easier than you think! Most common problems like jamming, not firing, or low power have simple fixes. Follow these essential steps to get your nailer working smoothly again and finish your project without frustration.
Hey there, fellow DIYers and woodworkers! Jack Shaffer here from Nailerguy. Ever been right in the middle of a project, feeling that momentum, only to have your nail gun sputter and refuse to fire? It’s one of those moments that can really slow you down and, let’s be honest, be a bit frustrating. But don’t worry! Most nail gun issues are pretty straightforward and can be fixed with a few simple steps. Think of this as your friendly guide to getting your trusty nailer back in action, so you can get back to building.
We’ll walk through the most common hiccups you might run into and how to tackle them with confidence. No need for a complicated manual or a service call! We’re going to cover everything from phantom jams to weak nails. Stick around, and you’ll be a nail gun troubleshooting pro in no time!
Table of Contents
Why Nail Guns Act Up: Understanding the Basics
Nail guns are amazing tools that make woodworking and DIY projects so much faster and easier. They can seem a bit complex, but understanding a few basic principles will make troubleshooting much simpler. Most problems stem from a few key areas: the power source (air, battery, or cord), the nail feeding mechanism, and the firing mechanism itself. When one of these parts isn’t working as it should, you might see issues like jams, misfires, or the gun not firing at all. By thinking about which of these core functions is failing, you can often pinpoint the problem quickly.
For example, if your air-powered nail gun isn’t firing, it’s likely an issue somewhere along the line from your compressor to the gun’s trigger. If it’s an electric or battery nailer, the problem might be with the power supply or the motor. Similarly, if nails are getting stuck, it’s usually related to how the nails are being presented to the firing pin or if something is physically blocking their path.
Common Nail Gun Problems and Their Fixes
Let’s dive into the most frequent issues you’ll encounter with nail guns and how to solve them. We’ll break it down problem by problem, so you can easily find the solution you need.
Problem 1: Nail Gun Won’t Fire
This is probably the most common and annoying problem. You pull the trigger, and nothing happens. Don’t panic! There are several simple reasons why this might be occurring.
Potential Causes and Solutions:
- Safety Tip Not Engaged: This is the absolute first thing to check. Most nail guns have a safety contact tip (also called a nose piece or safety mechanism) that must be pressed firmly against the work surface for the gun to fire. Make sure it’s pushed down completely.
- Low Air Pressure (Pneumatic Nailers): If you’re using an air-powered nailer, check your air compressor’s pressure gauge. Most framing nailers need around 90-120 PSI, while finishing nailers might require less. Consult your nail gun’s manual for the exact recommended PSI. Make sure the air hose is securely connected and not kinked.
- Dead Battery (Cordless Nailers): For battery-powered nailers, a dead or low battery is the obvious culprit. Try a fully charged battery. If it still doesn’t fire, the battery might be faulty or the charging system could have an issue.
- Power Cord Not Plugged In (Electric Nailers): For corded electric nailers, ensure the power cord is securely plugged into a working outlet. Try a different outlet to rule out an electrical issue.
- Air Leaks: Listen for hissing sounds. Significant air leaks can prevent the gun from building up enough pressure to fire. Check all connections, hoses, and the tool itself for any damage.
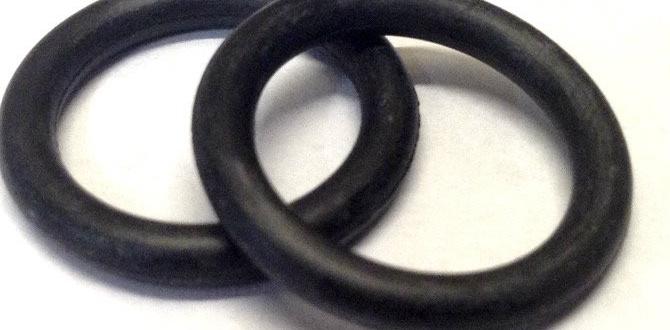
- Damaged O-Rings or Seals: Pneumatic nailers rely on seals. If these are worn or damaged, air can escape, preventing proper operation. This is a more advanced fix, but often doable with a repair kit.
- Sequential vs. Contact Trip Trigger Issue: Many nail guns have adjustable triggers for sequential firing (one nail per trigger pull) or contact firing (fire when pressed, then trigger pull). If it’s set to sequential and you’re trying contact firing, or vice-versa, it won’t work as expected. Check your trigger mode lever and settings.
For a deeper dive into air pressure specifics, you can check out resources on pneumatic tool safety and operation from organizations like the National Institute for Occupational Safety and Health (NIOSH), which often touches on safe use of power-actuated tools.
Problem 2: Nail Gun Jams
A jammed nail gun is incredibly disruptive. Nails can get stuck in the magazine, or worse, in the firing chamber itself. Tackling a jam requires patience.
Steps to Clear a Jam:
- Disconnect Power: THIS IS CRITICAL. For pneumatic tools, disconnect the air hose. For battery tools, remove the battery. For corded tools, unplug them. Always ensure the tool cannot fire while you’re working on it.
- Remove Nails from Magazine: Open the magazine or feeder mechanism. Carefully remove any loose nails. Sometimes, a bent nail can cause the whole strip to misalign.
- Locate the Jam: Gently try to see where the nail is stuck. Often, it’s at the very front of the magazine or just as it enters the firing chamber.
- Use a Clearing Tool (If Provided): Many nail guns come with a small tool specifically for clearing jams. Use this if available.
- Gentle Persuasion: If a nail is stuck, try wiggling it gently. If it’s at the front of the magazine, you might be able to pull it back out. Sometimes, a light tap with a rubber mallet on the magazine can dislodge a stubborn nail, but be careful not to damage the tool.
- Clear the Firing Chamber: If the jam is deeper in the firing chamber, you might need to remove the magazine and look into the port where the nails are fired. You may need needle-nose pliers or a similar tool to carefully extract the projectile.
- Inspect for Damage: Once cleared, check the nail feed path and the driver blade for any visible damage. If a nail was severely bent, it might have damaged the internal components.
- Reload and Test (Carefully): After clearing, reload with a fresh strip of nails. Reconnect the power (air, battery, or cord). Test fire the gun away from any person or surface into a scrap piece of wood to ensure it’s firing correctly and no longer jammed.
It’s also helpful to ensure you’re using the correct size and type of nails for your specific nail gun. Using the wrong nails is a common cause of jams. For example, using brad nails in a finish nailer designed for brad nails could cause issues if they are slightly different dimensions.
Problem 3: Nails Not Driving Fully
You’re getting good nail firing, but the nails aren’t sinking all the way into the wood. This is another frustration that can require rework.
Common Causes and Solutions:
- Insufficient Air Pressure (Pneumatic): This is the most common reason for under-driven nails in air nailers. As mentioned before, check your compressor’s PSI. Ensure it’s set to the manufacturer’s recommended level for your specific nailer and application. For framing, you’ll need more power than for trim work.
- Nails Too Long for the Wood Thickness: If you’re trying to drive a long nail into thin material, it might not have enough depth. Similarly, driving a nail into very hard wood like oak or maple requires more power than softer woods like pine.
- Depth Adjustment Set Too Shallow: Many nail guns have an adjustable depth setting, allowing you to control how far the nail sinks. Check this dial or lever and adjust it to sink the nails deeper. You’ll typically find this near the nose of the gun.
- Work Surface Too Hard or Dense: If you’re working with exceptionally hard wood, you might need to increase the air pressure slightly or use a shorter nail.
- Driver Blade Issues: If the driver blade (the part that strikes the nail head) is worn or damaged, it won’t impart enough force. This is less common but can happen with heavy use.
- Belt or O-Ring Issues (Internal Ailments): In some pneumatic nailers, worn internal components like belts or O-rings can lead to a loss of power and consequently, under-driven nails. This might indicate a need for internal maintenance.
Here’s a quick table to help summarize some common problems, their likely causes, and the first steps to fix them:
| Problem | Likely Cause | First Fix to Try |
|---|---|---|
| Nail gun won’t fire | Safety contact tip not engaged | Press tip firmly to surface |
| Nail gun fires weakly or not at all | Low air pressure (pneumatic) / Low battery (cordless) | Check and adjust air pressure / Use charged battery |
| Nail gun jams frequently | Wrong nail size/type or bent nail | Ensure correct nails are loaded and straight |
| Nails not sinking fully | Depth adjustment set too shallow / Insufficient air pressure | Increase depth setting / Increase air pressure |
| Air leaks (hissing sound) | Loose hose connection / Damaged seal | Tighten connection / Inspect tool for damage |
Problem 4: Nails Firing Sideways or Angled
This is less common but can happen. The nail doesn’t go in straight, which can ruin your material or cause it to stick out awkwardly.
What to Do:
- Check the Nose Piece: Make sure the nose piece, where the nail exits, isn’t bent or damaged. If it’s deformed, it can misdirect subsequent nails.
- Magazine Alignment: Ensure the magazine is properly seated and aligned. If it’s loose or crooked, it can feed nails into the firing chamber at an angle.
- Driver Blade Issue: In rare cases, a driver blade that is sticking or bent might not strike the nail head squarely, causing it to angle.
- Work Surface Angle: Double-check that you’re holding the nail gun perpendicular to the work surface. If the gun, and therefore the nail, is entering at an angle, the nail will go in at an angle.
Problem 5: Nail Gun Leaking Air
A constant hiss of air escaping from your nail gun is a sign of a leak. This not only wastes air but can also indicate a problem that needs fixing.
Common Leak Points and Fixes:
- Hose Connection: The most common leak is at the connection between the air hose and the nailer. Ensure the quick-connect coupler is securely attached and the O-ring on the fitting is intact.
- Trigger Valve Area: Leaks from the trigger area can indicate issues with the trigger valve or its seals.
- Around the Magazine: Air can sometimes escape around the magazine seal if it’s not properly seated.
- Main Body Seals: Internal O-rings and seals throughout the tool can wear out over time, especially with heavy use.
If you hear a leak, disconnect the air supply immediately and inspect the connections. For leaks coming from the body of the tool, you might be looking at an internal repair. Many manufacturers offer repair parts diagrams online, which can be invaluable for identifying and replacing worn seals. Often, a rebuild kit is available for your specific model.
Preventative Maintenance: Keeping Your Nail Gun in Top Shape
The best way to deal with nail gun problems is to prevent them from happening in the first place. A little bit of regular maintenance goes a long way!
Regular Checks and Actions:
- Keep it Clean: Dust, wood shavings, and debris can get into your nailer and cause jams or wear down parts. Wipe down your tool regularly with a clean, dry cloth. For pneumatic nailers, a quick blast of compressed air can clear out dust from crevices.
- Lubricate (Pneumatic Nailers): Most pneumatic nailers require a few drops of specialized pneumatic tool oil in the air inlet daily, or as recommended by the manufacturer. This keeps internal mechanisms lubricated and seals supple. Don’t over-oil; it can cause issues too.
- Check O-Rings and Seals: Periodically inspect the O-rings on your air fittings and the tool itself. If they look cracked, flat, or show signs of wear, replace them.
- Inspect the Driver Blade: Look at the tip of the driver blade. If it’s chipped, bent, or excessively worn, it won’t drive nails properly and might need replacement.
- Store Properly: When not in use, store your nail gun in a clean, dry place. Protect it from moisture and impacts. For pneumatic tools, release any pressure from the air hose before storing.
- Use the Right Consumables: Always use the nails recommended by the manufacturer for your specific nailer model. Using incorrect sizes, lengths, or shank types (e.g., smooth vs. ring shank) can lead to jams and damage.
- Follow Manufacturer Guidelines: Always refer to your nail gun’s owner’s manual. It contains specific instructions for operation, maintenance, and troubleshooting for your particular model.
Proper storage is often overlooked but is vital. For pneumatic tools, some experts recommend storing them with a small amount of oil in the cylinder to keep seals from drying out.
When to Call a Professional
While most nail gun problems are DIY-friendly, there are times when it’s best to seek expert help:
- Complex Internal Damage: If you suspect significant internal damage, stripped threads, or a broken main cylinder, it might be beyond a simple fix.
- Repeated, Unresolved Issues: If you’ve tried all the standard troubleshooting steps and the problem persists, there might be a less obvious issue requiring specialized tools or knowledge.
- Safety Concerns: If the tool feels unsafe to operate, or if you’re uncomfortable performing a repair, don’t risk it.
- Warranty Concerns: If your tool is still under warranty, attempting repairs yourself could void it. Check your warranty terms before proceeding with any significant disassembly.
For many mainstream tool brands, finding authorized service centers is usually straightforward through their websites.
FAQ: Your Nail Gun Questions Answered
Let’s address some common questions beginner woodworkers have about keeping their nail guns running smoothly.
Q1: How often should I lubricate my pneumatic nail gun?
A1: Most manufacturers recommend adding 2-3 drops of specialized pneumatic tool oil into the air inlet before each day’s use, or at least every few hours of operation. Always check your owner’s manual for the specific recommendation for your model.
Q2: Can I use any brand of nails in my nail gun?
A2: It’s highly recommended to use the brand and size of nails specified by your nail gun’s manufacturer. While some brands might be interchangeable, using the wrong type can cause jams, misfires, and even damage your tool.
Q3: My nail gun isn’t firing intermittently. What could be wrong?
A3: Intermittent firing can be tricky. It could be a loose connection, a partially clogged air intake, a weak battery (if cordless), a slightly damaged O-ring, or even a faulty trigger switch. Check all connections, try a different battery, and ensure the air intake isn’t obstructed. If it continues, it might need professional inspection.
Q4: What’s the difference between sequential and contact firing modes?
A4: Sequential firing means you must press the safety contact tip against the work surface first, and then pull the trigger to fire one nail. Contact firing (also called “bump firing”) allows you to repeatedly fire nails by simply continuing to hold the trigger down and bumping the safety contact tip against the surface. Most nail guns have a switch to change between these modes.
Q5: My air nailer is a bit slow. Is it the hose?
A5: A long or narrow air hose can restrict airflow, making your nailer perform weakly. Ensure you’re using an air hose of the appropriate length and diameter recommended for your nailer and compressor. Also, check for kinks in the hose.