Quick Summary:
A lightweight cordless nail gun offers brilliant, effortless power for DIYers. It simplifies projects by being easy to handle, highly portable, and removing the need for air hoses or extension cords, making woodworking and home repairs faster and more comfortable.
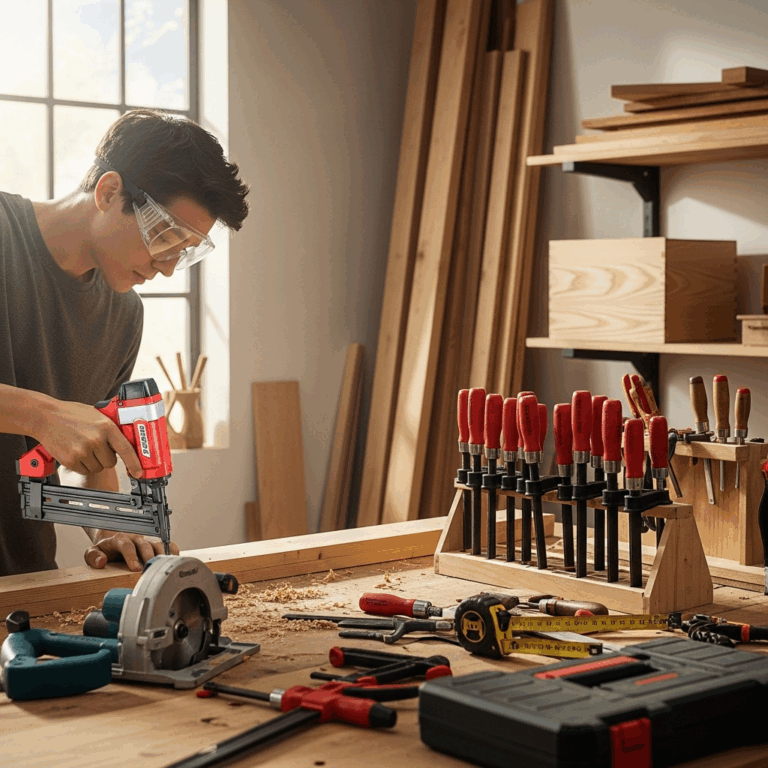
Hey everyone, Jack Shaffer here from Nailerguy! Ever wrestled with a heavy framing nailer or tripped over an air hose just as you were about to secure a piece of trim? It’s a common frustration, right? Well, I’ve got some fantastic news for you! The world of nail guns has advanced, and there’s a real game-changer out there: the lightweight cordless nail gun. Think of it as a pocket-sized powerhouse, ready to make your DIY projects smoother, faster, and just plain easier. No more lugging around compressors or dealing with pesky cords. Let’s dive into how this tool can bring genius, effortless power right to your fingertips, and how you can find the perfect one to tackle your next project with confidence.
Table of Contents
The Magic of Lightweight Cordless Power
Let’s face it, traditional nail guns, while powerful, can be cumbersome. You need an air compressor, an air hose, and often an extension cord. That’s a lot of gear to set up, manage, and haul around, especially for smaller jobs or when you’re working in tight spaces or up on a ladder. This is where the lightweight cordless nail gun steps in like a superhero for DIYers. It combines the convenience of no cords or hoses with impressive nailing power, all in a package that’s easy to handle, even for extended periods.
The “lightweight” aspect is key. When you’re doing a project that involves a lot of nailing – think wainscoting, crown molding, building shelves, or even some framing – the weight of your tool really adds up. A lighter tool means less fatigue, better control, and ultimately, a more enjoyable experience. And “cordless” means you’re free! Free to move anywhere, free from tangled cords, and free from the need for a bulky compressor. This liberation is what makes these tools so revolutionary for home improvement tasks.
Why Choose a Lightweight Cordless Nail Gun?
The benefits of switching to a lightweight cordless nail gun are pretty compelling, especially for the home DIYer. They’re designed with ease of use and portability in mind, making them ideal for a wide range of tasks around the house. Here’s why they’re such a smart choice:
- Ultimate Portability: No air compressor or hoses means you can grab it and go. This is fantastic for working in different rooms, outdoors, or in awkward spots where lugging a compressor is a hassle.
- Reduced Fatigue: Their lightweight design significantly cuts down on arm and shoulder strain, allowing you to work longer and more comfortably. This is a huge plus for detailed work or large areas.
- Quick Setup and Cleanup: No hoses to connect or disconnect, no compressor to start up. You’re ready to nail in seconds, and cleanup is a breeze.
- Consistent Performance: Modern cordless nailers use battery power or gas cartridges to drive nails, offering consistent depth and power without the fluctuations sometimes found with air-powered tools.
- Versatility: Many models are designed for specific tasks, from finishing and brad nailing to framing, so you can find one that perfectly suits your project needs.
Understanding the Technology: How Do They Work?
It’s not magic; it’s smart engineering! Lightweight cordless nail guns achieve their power and portability through a few different primary technologies. Understanding these can help you choose the best type for your needs:
Battery-Powered (Li-Ion) Nail Guns
These are probably the most common and increasingly popular type. They use a rechargeable lithium-ion battery to power an electric motor. This motor typically spins a flywheel at high speed, which then drives a piston to propel the nail. Think of it like a miniature, high-speed impact action. The power is consistent, and as battery technology improves, you get more shots per charge and faster charging times.
Fuel Cell (Gas) Nail Guns
These nail guns are a bit different. They use a small, disposable fuel cell (filled with propane or a similar gas) and a rechargeable battery. When you pull the trigger, the battery ignites a small burst of gas from the fuel cell. This ignition creates a powerful explosion that drives a piston, propelling the nail. The battery is usually just for the ignition system and fan. These tools are often very powerful and can pack a punch, making them great for tougher materials or framing, but they do have a slightly higher running cost due to the fuel cells and can sometimes have an odor.
Hybrid Nail Guns
Some manufacturers offer hybrid models that can run off either a battery or a standard air hose. While these offer flexibility, they often don’t fit the “lightweight” category as much as pure battery or gas models, as they might still require a smaller compressor for air-assist functions. For this article, we’re focusing on the truly cordless, hose-free experience.
For most DIYers looking for the ultimate in ease and portability, the battery-powered models are usually the sweet spot. They offer a clean, smell-free operation and the convenience of just swapping out a battery when needed.
Choosing Your Lightweight Cordless Nail Gun: A Beginner’s Guide
Navigating the world of nail guns can seem a bit daunting at first, but with a little guidance, picking the right lightweight cordless model is straightforward. As your go-to tool expert, I’m here to break it down for you, focusing on what really matters for comfortable and effective DIY work.
1. Identify Your Primary Projects
This is the MOST important step. What will you be using your nail gun for 80% of the time? This dictate the type and size of nails you’ll need.
- Finishing Nailers: Great for trim work, baseboards, crown molding, window casings, and built-in cabinetry. They use slimmer nails (usually 15 or 16 gauge) that leave smaller holes, minimizing the need for extensive filling and sanding.
- Brad Nailers: Perfect for delicate trim, small decorative pieces, and light-duty assembly. They use even slimmer nails (18 gauge) that are almost invisible when driven.
- Staplers: While not technically nail guns, they use staples and are excellent for upholstery, attaching fabric, or securing thinner materials like screening.
- Framing Nailers: Used for heavy-duty construction like building decks, framing walls, or fences. These use much larger nails (usually 8-12 gauge) and are often a bit heavier, even in their cordless versions. Most beginners don’t need a framing nailer unless they’re doing serious construction.
For most home DIYers, a lightweight cordless finishing nailer (16 gauge) or a brad nailer (18 gauge) will be your most versatile tools. They handle a wide array of common household projects.
2. Gauge the Weight and Ergonomics
When they say “lightweight,” it’s relative. For a tool that drives nails, you’re still going to feel it. But some are significantly lighter and better balanced than others. Here’s what to look for:
- Overall Weight: Aim for models under 6 pounds (without the battery, if possible) for maximum comfort.
- Grip and Balance: Hold the tool if you can. Does it feel comfortable in your hand? Is the weight distributed well? An awkward grip leads to fatigue faster.
- Trigger Design: Is the trigger easy to pull? Some have more sensitive triggers than others, which can affect your control.
3. Consider the Power Source and Battery System
As we discussed, most lightweight cordless nailers are battery-powered. Here’s what to think about:
- Battery Voltage (V): Higher voltage generally means more power. 18V and 20V systems are common and offer excellent performance for most tasks.
- Battery Capacity (Ah – Amp Hours): This determines how long the battery lasts on a single charge. For occasional use, a 2.0Ah or 3.0Ah battery might suffice. For more frequent or extended use, consider 4.0Ah or larger.
- Battery Compatibility: If you already own tools from a specific brand (e.g., DeWalt, Ryobi, Makita), see if their nail guns use the same battery platform. This can save you money on batteries and chargers.
4. Nail Depth Adjustment
Being able to control how deep the nail sinks is crucial. You don’t want nails sticking out or driven too far into your material. Look for tools with an easy-to-use depth adjustment wheel or lever. It’s a simple feature, but it makes a big difference in getting a professional finish.
5. Sequential vs. Contact Actuation
This refers to how the nailer fires:
- Sequential (Single) Firing: You must press the tip of the nailer firmly against the workpiece AND then pull the trigger to fire one nail. This is safer and more accurate for precise placement.
- Contact (Bump) Firing: You can hold the trigger down, and then simply bump the nose of the tool against the workpiece to fire nails continuously. This is faster for repetitive tasks but requires more control to avoid accidental firing.
Most modern cordless nailers come with a mode selector switch, allowing you to choose between these two. For beginners, sequential mode is often recommended for control and safety.
6. Air/Fuel Delivery System (If Applicable)
For battery-powered nailers, this is less of a concern, but if you’re looking at gas models, consider the fuel cell availability and cost. Battery-powered models need efficient air flow to drive the piston, and most good ones handle this well internally.
7. Budget and Brand Reputation
Like any tool, prices vary. You can find good entry-level models for a few hundred dollars. Established brands often offer better durability, customer support, and battery ecosystem integration. Don’t shy away from reputable brands; they often provide better value over the long run due to their reliability.
Some popular and reliable brands for cordless nail guns include:
| Brand | Typical Nail Gauge | Pros | Cons |
|---|---|---|---|
| DeWalt | 16 Ga, 18 Ga, 21 Ga | Excellent battery system, robust build, good power | Can be pricier |
| Makita | 16 Ga, 18 Ga, 23 Ga | Lightweight options, strong battery performance, efficient | Ergonomics may vary by model |
| Ryobi (ONE+) | 18 Ga, 16 Ga | Affordable, wide battery platform, good for DIYers | May lack the pro-grade durability of higher-end brands |
| Senco | 16 Ga, 18 Ga | Pro-grade performance, reliable, good drive consistency | Can be more expensive, fewer tool options outside nailers |
| Metabo HPT (formerly Hitachi) | 16 Ga, 18 Ga | Powerful, good value, offers unique features | Battery system less common in DIY circles |
For a beginner, a 16-gauge or 18-gauge finishing or brad nailer from a reputable brand like DeWalt, Makita, or Ryobi is usually a fantastic starting point. Focus on comfort and ease of use!
Mastering Your Lightweight Cordless Nail Gun: Tips for Success
You’ve got your new lightweight cordless nailer, and you’re ready to go! That’s awesome. To make sure your experience is as smooth and effective as possible, here are some expert tips to help you get the most out of your tool and achieve professional-looking results every time. Remember, practice makes perfect, and a little care goes a long way!
1. Read the Manual! Seriously.
Okay, I know, but every tool is a little different. The manual will tell you exactly how to load nails, adjust depth, switch firing modes, and the recommended nail types for your specific model. It’s the quickest way to understand its quirks and features. For a great overview of tool safety in general, the Occupational Safety and Health Administration (OSHA) provides valuable resources on power tool safety.
2. Load Correctly, Every Time
Nail guns have specific loading instructions. Most battery-powered models have a magazine that slides out. Look for the proper angle and position for your nails; they usually have a slight bevel on the head that needs to face a certain way (often towards the magazine’s internal driver). Always ensure the tool is off or the battery is removed before loading or clearing jams.
3. Test Fire on Scrap Material
Before you hit your main project, always test fire your nailer on a piece of scrap wood of the same type and thickness. This is where you’ll adjust the nail depth. You want the nail head to be flush with the surface or slightly countersunk, but not so deep that it tears through the wood or causes blow-out.
4. Use the Right Nails
Make sure you’re using the correct gauge and length of nails for your nailer and your project. Using the wrong size can cause jams, damage the tool, or result in poorly driven nails. Check the nailer’s specifications for acceptable nail sizes.
5. Master Depth Control
This is key for a clean finish. If your nails are sinking too deep, you’re likely to damage the wood or have to spend more time filling. If they’re not sinking enough, they won’t hold effectively. Most cordless nailers have an adjustable depth setting. Experiment with it on your scrap wood until you achieve perfect results. A good depth setting usually means the nail head is just kissing the surface of the wood.
6. Sequential Fire for Precision, Contact Fire for Speed
As mentioned earlier, sequential firing is excellent for carefully placing each nail exactly where you want it, especially critical for trim. Contact firing is much faster for tasks where placement isn’t as exact, like quickly attaching furring strips or building simple jigs. Get comfortable with both, and choose the mode that best suits the task and your comfort level.
7. Keep the Nose Clean and Clear
The contact trip or nose of the nailer is what tells it to fire. If it gets clogged with dust, sawdust, or debris, it might not engage properly, leading to misfires or delayed firing. Periodically wipe down the nose of the gun with a clean cloth. Also, ensure there are no obstructions like staples or bent nails jamming the firing mechanism.
8. Battery Management
Keep your batteries charged. A dying battery can sometimes lead to weaker nail drives, so try to start your project with a full charge. If you’re doing a big job, having a spare battery is a lifesaver. Store batteries in a cool, dry place when not in use.
9. Safety First, Always!
Even though they’re lightweight, these are power tools. Always wear safety glasses to protect your eyes from flying debris or ricocheting nails. Keep your non-firing hand well clear of the nail path. Never point the nailer at yourself or others. Always disconnect the battery or remove the power source before performing any maintenance, clearing jams, or when the tool is not in use. For more on safe tool use, check out resources from organizations like Tool Crib, which often share practical safety advice.
10. Listen and Feel for Changes
Your nailer will give you feedback. If you start to notice weaker drives, more frequent jams, or unusual noises, it’s time to check the nails, clean the tool, or perhaps investigate if a part needs maintenance. Early detection of an issue can prevent a minor problem from becoming a major repair. For example, some fuel cell models require occasional cleaning of the exhaust port.
Projects Perfect for Your Lightweight Cordless Nail Gun
The beauty of a lightweight cordless nail gun is its versatility. It opens up a world of quicker, cleaner, and more enjoyable DIY projects that might have previously felt like too much work with traditional methods. Here are some ideas to get your creative juices flowing:
1. Trim Work: Baseboards, Crown Molding, and Window Casings
This is where a 16-gauge finishing nailer truly shines. You can quickly and cleanly attach baseboards, make intricate crown molding look seamless, and install window and door casings with precision. The small nail holes are easy to fill, leaving a professional finish with minimal effort compared to manual nailing or even using a hammer and nails for large projects.