Using a finish nailer can be a game-changer for your home projects. Have you ever struggled with nailing wood pieces together? Traditional methods can be slow and messy. A finish nailer from Lowe’s lets you work faster and cleaner.
Imagine building a bookshelf or fixing a chair with just a press of a button. It feels almost like magic! You simply load the nails, aim, and shoot.
The best part? Finish nailers come in many styles. Some are electric, while others are air-powered. This means you can choose what fits your needs best.
Curious about how to use a finish nailer from Lowe’s? You’re in the right place! In this guide, we will help you understand all the steps. Let’s get started and unlock your inner builder!
Table of Contents
How To Use A Finish Nailer From Lowes: A Complete Guide

How to Use a Finish Nailer from Lowes
Using a finish nailer from Lowes can make your woodworking projects easier. These tools help you attach trim, molding, and more quickly. First, gather your materials and check the nailer for safety features. Adjust the depth control to suit your project. Did you know that using the right size fastener can improve the look of your work? Practice on scrap wood to build confidence before tackling your final piece. With a bit of skill, you’ll create professional-looking finishes in no time!Understanding Finish Nailers
Definition and purpose of finish nailers. Comparison between finish nailers and other types of nailers (e.g., brad nailers, framing nailers).A finish nailer is a handy tool that helps attach trim and moldings with tiny nails. It makes your work look neat and professional. Unlike brad nailers, which use thinner nails for lighter projects, finish nailers use thicker nails for sturdier work. On the other side, framing nailers are for major construction. They use larger nails for heavy-duty jobs, like building a house. It’s like comparing a fine pen to a strong hammer!
| Type of Nailer | Nail Size | Best Use |
|---|---|---|
| Finish Nailer | 16-18 gauge | Trim and moldings |
| Brad Nailer | 18 gauge | Light projects |
| Framing Nailer | 10-12 gauge | Heavy construction |
Choosing the Right Finish Nailer at Lowes
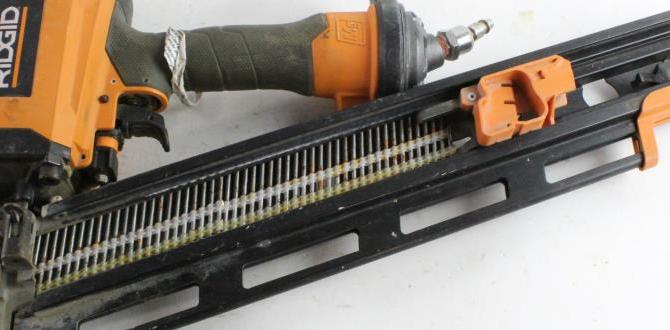
Different brands and models available at Lowes. Key features to consider when selecting a finish nailer.Choosing a finish nailer at Lowes is important for your projects. Many brands have options that fit your needs. Look for brands like DeWalt, Bostitch, and Ryobi. Key features to consider include:
- Power source: Choose between cordless or corded options.
- Nail size: Check what sizes the nailer supports.
- Weight: Lighter nailers are easier to handle.
- Depth adjustment: This feature helps control how deep the nails go.
Your choice will make your tasks easier and more fun!
What should I consider when buying a finish nailer?
Consider the power source, nail size, weight, and depth adjustment features. These features help ensure you pick the right tool for your project.
Essential Safety Tips for Using a Finish Nailer
Personal protective equipment (PPE) requirements. Common safety hazards and how to avoid them.Before reaching for a finish nailer, safety should be your best buddy. Wear protective goggles to shield your eyes and ear protection to keep your ears happy. Slip on a pair of sturdy gloves to protect your hands from the sneaky nails. Watch out for common hazards, like tripping over tools or nailing your thumb. Always place the nailer away from your body when firing. Remember: a finish nailer doesn’t need a magic wand; it just needs safety first!
| Personal Protective Equipment (PPE) | Purpose |
|---|---|
| Goggles | Protects eyes from flying debris. |
| Ear Protection | Reduces noise from the nail gun. |
| Gloves | Protects hands from sharp objects. |
Preparing for Your Project
Necessary tools and materials for using a finish nailer. Steps to prepare your workspace for optimal efficiency.Getting ready to use a finish nailer is as exciting as preparing for a treasure hunt. First, gather your tools: a finish nailer, safety goggles, ear protection, and your trusty measuring tape. Now, clear your workspace. A tidy area helps keep you from tripping over pesky tools.
| Tools & Materials | Purpose |
|---|---|
| Finish Nailer | Drives nails quickly into wood |
| Safety Goggles | Protects your eyes from flying debris |
| Ear Protection | Reduces noise from the nailer |
| Measuring Tape | Helps you measure twice, cut once |
Make sure you have everything needed before starting. You wouldn’t want to chase after a missing nailer while the thrilling journey begins! Happy nailing!
How to Load a Finish Nailer
Stepbystep instructions for loading nails. Tips for selecting the right nail size and type.To load a finish nailer, first, make sure it’s unplugged or the battery is removed. Open the magazine at the back. Insert the nails with the pointy side down. Push them all the way in. Close the magazine tightly. Remember, a 16-gauge nail works well for most projects. If you’re working on trim, consider a 18-gauge nail. Always check the nail size matches your project. Using the right nails helps ensure a strong hold.
What size nails should I use?
For most tasks, use 16-gauge nails. For finer work, like trim, go with 18-gauge.Tips for selecting nails:
- For thicker wood, use longer nails.
- Choose galvanized nails for outdoor projects.
- Check the length based on your material thickness.
Techniques for Using a Finish Nailer Effectively
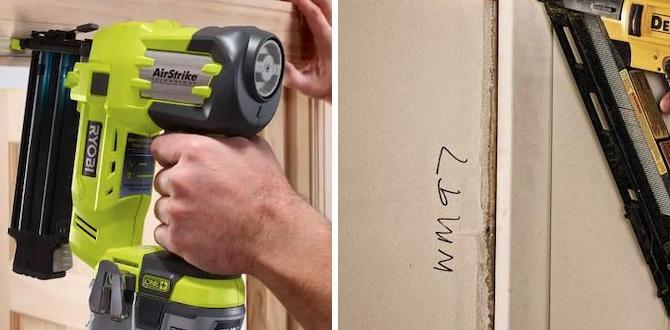
Proper grip and positioning of the nailer. Techniques for nailing into different materials (wood, trim, etc.).Using a finish nailer needs careful technique. First, hold the nailer firmly. Your grip should be steady, with your finger ready to pull the trigger. Next, position the nailer at a right angle to the surface for a clean shot. Remember, different materials require different techniques. For wood, aim for sturdy spots. When nailing trim, use soft pressure. The nail should sink just below the surface.
How do you effectively use a finish nailer?
To use a finish nailer effectively, know your grip and angle. It helps to practice on scrap pieces first. This builds your skill and confidence!
Key Tips:
- Grip tightly for control.
- Angle the nailer correctly.
- Adjust pressure based on the material.
Common Issues and Troubleshooting
Identifying and fixing jams in the nailer. Solutions for misfiring or inconsistent nailing.Sometimes, your finish nailer might jam. This happens due to stuck nails or debris. To fix a jam, turn off the tool, disconnect it, and check for blockages. Once clear, reconnect and power it on.
If your nailer misfires or nails go in unevenly, check your air pressure. It should be within the recommended range. Inspect the nails too; they should fit correctly. Finally, make sure the trigger is working properly.
What to do if my finish nailer keeps jamming?
Clear the jam, check the nails, and clean the tool. Always ensure everything is correctly set before usage.
Tips for troubleshooting:
- Check for debris inside.
- Upgrade nails if they are old.
- Ensure proper air pressure.
Maintenance and Care for Your Finish Nailer
Routine maintenance tips to prolong the life of your nailer. When to seek professional servicing.To keep your finish nailer happy, routine maintenance is key. Check the air pressure and oil it regularly. Clean it after every big project to avoid clogs. If it starts making strange noises, it might be time to call a pro. Experts say, “A well-maintained tool is a happy tool!” Here’s a quick table for your maintenance checklist:
| Maintenance Task | Frequency |
|---|---|
| Check air pressure | Before each use |
| Oil nailer | Every 1-2 uses |
| Clean tool | After big projects |
| Professional check | Every 6 months |
Staying on top of these steps helps extend your nailer’s life. Remember, a few minutes now can save you from a trip to the repair shop later!
Frequently Asked Questions about Finish Nailers
Common queries from users and expert answers. Troubleshooting tips and best practices as per user experiences.Many users wonder about finish nailers and how to use them best. Common questions include how to prevent jams and what size nails to use. A key tip? Always choose the proper nail length, ideally 1.5 to 2.5 inches for most projects. If you face jams, check the nail slot or clean the drive chamber. Remember: a little maintenance goes a long way! Here’s a table with more frequent questions and answers that might tickle your curiosity!
| Question | Answer |
|---|---|
| What nail size should I use? | 1.25 to 2.5 inches usually works well! |
| How often should I clean my nailer? | Every few uses keeps it happy! |
| Why is my nailer jamming? | Check if you’re using the right nails and if the slot is clear. |
Conclusion
In conclusion, using a finish nailer from Lowe’s is easy and effective. Remember to choose the right nails and settings for your project. Always keep safety in mind by wearing protective gear. We encourage you to practice on scrap wood first. For more tips, check out Lowe’s guides or ask their staff. Now, let’s get started on your next project!FAQs
What Safety Precautions Should I Take When Using A Finish Nailer From Lowes?When using a finish nailer, always wear safety goggles to protect your eyes. Use ear protection to keep your ears safe from loud sounds. Make sure to keep your fingers away from the nail area to avoid getting hurt. Always point the nailer away from yourself and others. Finally, check the tool before using it to ensure it works properly.
How Do I Choose The Right Type And Size Of Finish Nails For My Project?To choose the right finish nails, think about your project. If you are attaching thin wood, use smaller nails, like 1 inch long. For thicker wood, use longer nails, like 2 to 3 inches. Check the nail’s thickness, too. Thicker nails are stronger, but they can leave bigger holes.
What Techniques Should I Use To Ensure Precise Nailing With A Finish Nailer?To use a finish nailer accurately, hold it steady against the wood. Make sure the safety tip is flat on the surface before you press the trigger. Keep your hands away from the spot where the nail will go. Practice a few times on scrap wood to get used to it. This will help you aim better and make clean holes.
Are There Specific Brands Of Finish Nailers Available At Lowes That Are Recommended For Beginners?Yes, Lowes has some good finish nailers for beginners. Brands like Ryobi and DeWalt are popular and easy to use. They are lightweight and have simple features. You can find these options at your local Lowes store.
How Do I Troubleshoot Common Issues With A Finish Nailer, Such As Misfires Or Jammed Nails?To fix misfires with a finish nailer, check the power source first. Make sure it’s plugged in or the battery is charged. Next, look for jammed nails. If you find any, carefully remove them using the tool’s release button or lever. Always keep the nailer clean and check that you’re using the right nails. If it still doesn’t work, ask an adult for help.
{“@context”:”https://schema.org”,”@type”: “FAQPage”,”mainEntity”:[{“@type”: “Question”,”name”: “What Safety Precautions Should I Take When Using A Finish Nailer From Lowes? “,”acceptedAnswer”: {“@type”: “Answer”,”text”: “When using a finish nailer, always wear safety goggles to protect your eyes. Use ear protection to keep your ears safe from loud sounds. Make sure to keep your fingers away from the nail area to avoid getting hurt. Always point the nailer away from yourself and others. Finally, check the tool before using it to ensure it works properly.”}},{“@type”: “Question”,”name”: “How Do I Choose The Right Type And Size Of Finish Nails For My Project? “,”acceptedAnswer”: {“@type”: “Answer”,”text”: “To choose the right finish nails, think about your project. If you are attaching thin wood, use smaller nails, like 1 inch long. For thicker wood, use longer nails, like 2 to 3 inches. Check the nail’s thickness, too. Thicker nails are stronger, but they can leave bigger holes.”}},{“@type”: “Question”,”name”: “What Techniques Should I Use To Ensure Precise Nailing With A Finish Nailer? “,”acceptedAnswer”: {“@type”: “Answer”,”text”: “To use a finish nailer accurately, hold it steady against the wood. Make sure the safety tip is flat on the surface before you press the trigger. Keep your hands away from the spot where the nail will go. Practice a few times on scrap wood to get used to it. This will help you aim better and make clean holes.”}},{“@type”: “Question”,”name”: “Are There Specific Brands Of Finish Nailers Available At Lowes That Are Recommended For Beginners? “,”acceptedAnswer”: {“@type”: “Answer”,”text”: “Yes, Lowes has some good finish nailers for beginners. Brands like Ryobi and DeWalt are popular and easy to use. They are lightweight and have simple features. You can find these options at your local Lowes store.”}},{“@type”: “Question”,”name”: “How Do I Troubleshoot Common Issues With A Finish Nailer, Such As Misfires Or Jammed Nails? “,”acceptedAnswer”: {“@type”: “Answer”,”text”: “To fix misfires with a finish nailer, check the power source first. Make sure it’s plugged in or the battery is charged. Next, look for jammed nails. If you find any, carefully remove them using the tool’s release button or lever. Always keep the nailer clean and check that you’re using the right nails. If it still doesn’t work, ask an adult for help.”}}]}