Have you ever dreamed of being a brave knight? Imagine swinging a shiny sword in a friendly duel with your friends. But wait! What if I told you that you can make your very own wooden sword? Crafting a wooden sword is not just fun; it’s also a great way to spend your time.
Making your sword can be a cool project! You get to use tools and let your creativity flow. Picture this: you and your friends gathering around a pile of wood, ready to bring your ideas to life. Sounds exciting, right?
Plus, did you know that wooden swords have been made for centuries? They were used for training and even in fun games. Now it’s your turn to join this age-old tradition! With just a few steps, you’ll learn how to make a wooden sword that your friends will admire. So, are you ready to start your adventure into sword-making?
Table of Contents
How To Make A Wooden Sword: A Step-By-Step Guide

How to Make a Wooden Sword
Making a wooden sword can be a fun project! You’ll learn to gather materials like wood, tools, and safety gear. The steps include designing your sword shape, cutting the wood, and sanding it for smooth edges. Imagine wielding your own handcrafted sword in a backyard adventure! Did you know that wooden swords have been used for practice by real warriors? It’s a great way to unleash your creativity while enjoying imaginative play.Planning Your Design
Tips on creating sword sketches or templates. Importance of dimensions and proportions.Before you start swinging your imaginary sword, it’s time to plan! Grab some paper and sketch your sword design. Make it as cool as you can! Include details like the handle and blade shape. Remember, dimensions matter. A sword too big might make you a tripping hazard, while a tiny one might not impress your friends. Check out the basic sizes in the table below!
| Part of the Sword | Ideal Length |
|---|---|
| Blade | 30-36 inches |
| Handle | 6-8 inches |
| Total Length | 36-44 inches |
Keeping proportions right will make your sword look epic. Don’t forget to double-check your sketches. They are your battle plans, after all. Remember, every knight needs a trusty sword, even if it’s made of wood!
Cutting the Wood
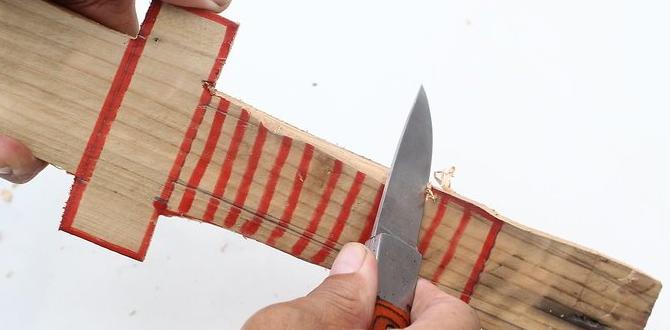
Stepbystep guide to cutting the wood to shape. Safety tips for using saws and cutting tools.First, grab your wooden plank. Cut it to a length that feels right for your sword—around 3 feet is a good start. Next, mark where the blade and hilt will go. Use a saw to cut along these lines carefully. Remember, slow and steady wins the race. Safety comes first! Always wear goggles and keep fingers clear of the blade. Think of it as a workout for your arms, but with fewer dumbbells and more… sawdust!
| Tool | Tip |
|---|---|
| Saw | Keep it steady! |
| Goggles | Protect those peepers! |
| Gloves | Watch out for splinters! |
Take your time. Every slice brings you closer to your mighty sword!
Shaping the Blade
Techniques for refining the edge and blade shape. Tools for shaping (chisels, rasps, etc.).To shape the blade of your wooden sword, start by selecting the right tools. Chisels and rasps are your best buddies here. Use a chisel to carve out the rough shape, like sculpting a masterpiece. Then, grab a rasp to refine the edges, giving your blade that smooth, fierce look. Remember, a sharp blade is like a smile—everyone appreciates it!
| Tool | Purpose |
|---|---|
| Chisel | Carves the basic shape |
| Rasp | Refines the edges |
With a few practice swings, you’ll feel like a woodworking ninja. Don’t forget to keep your workspace tidy. A messy shop is like a chicken with its head cut off—nothing good comes from that!
Creating the Handle
Instructions for designing and shaping the handle. Discussion on grip styles and ergonomics.Start by deciding how you want the handle to look. You can make it straight or curved. Use a pencil to mark where to cut. You want the handle to fit your hands well, so think about the way you will hold it. A good grip makes the sword easier to use.
- For a straight handle, keep it simple and smooth.
- For a curved handle, make sure it hugs your fingers.
- Try different shapes and see what feels best for you.
When shaping the handle, be patient. Sand it until it feels soft and nice to hold. Remember, a good handle helps you feel like a warrior!
What is the best grip style for a wooden sword?
The best grip style is one that feels comfortable. Experiment with different grips to find what suits you best.
Steps to a Perfect Grip:
- Hold the sword lightly.
- Keep your fingers spread for better control.
- Wrap your thumb around the handle for stability.
Sanding and Smoothing
Importance of finishing the wood surface. Recommended sanding techniques and grit levels.Finishing the wood surface is very important. It makes the sword look nice and feel smooth. Sanding helps remove rough spots. The right tools and techniques matter too. Start with coarse sandpaper (about 80 grit) for rough areas. Then, switch to finer sandpaper (120 to 220 grit) for a smooth finish. This makes the sword safer and more comfortable to hold.
Why is sanding important?
Sanding helps create a smooth, safe surface for your wooden sword. This prevents splinters and improves its appearance.
Recommended sanding techniques:
- Use circular motions for even sanding.
- Change sandpaper as it wears out.
- Always sand in the direction of the wood grain.
Finishing Touches
Options for painting, staining, or sealing the sword. Ideas for adding decorative elements or designs.After shaping your wooden sword, add finishing touches to make it special. Choose how to color your sword. You can paint it bright colors, use stain for a natural look, or seal it for protection. Each option brings out its charm.
- Painting: Use spray paint or brush for fun designs.
- Staining: Adds a rich color while showing wood grain.
- Sealing: Protects from scratches and moisture.
You can also add designs! Think about carving or using stickers. Adding a unique handle wrap or drawing symbols can personalize your sword. The right touches make it truly yours.
What can I use to decorate my sword?
You can use stickers, markers, or even wood burning tools. These ideas help you express your style!
Final Assembly
Steps for assembling the handle and blade, if applicable. Tips on ensuring structural integrity and balance.Once your sword’s handle and blade are ready, it’s time for the final assembly. Start by carefully aligning the handle with the blade. Use strong wood glue to secure them together. Let it dry completely before moving on.
To keep your sword strong and balanced:
- Ensure that the handle is centered with the blade.
- Test the weight by holding it. It should feel even.
- Sand any rough edges for comfort.
This will help you create a sturdy, fun sword!
How do you attach the handle to the blade?
To attach the handle to the blade, align them carefully, and use strong wood glue. Allow it to dry fully for the best results.
Maintenance and Care
Best practices for preserving the wooden sword. Guidance on storage and display options.Keeping your wooden sword in great shape is easier than you think! First, avoid exposing it to harsh sunlight or moisture; these can make it warp like a soggy piece of toast. For storage, try a cool, dry place or a wall display, where it can be the knight of your room! Regular dusting with a soft cloth helps too. You don’t want your sword to become a dust magnet, right? Happy sword-swinging!
| Best Practices | Storage Tips |
|---|---|
| Keep away from direct sunlight | Store in a cool, dry place |
| Dust regularly with a soft cloth | Consider displaying it on a wall |
| Avoid moisture exposure | Use a protective cover if needed |
Conclusion
In conclusion, making a wooden sword is a fun project! You need some wood, tools, and safety gear. Start by planning your design and measuring carefully. Remember to sand it down for smooth edges. Now that you know the basics, grab your materials and give it a try! For more tips and ideas, check out additional guides on woodworking. Happy crafting!FAQs
What Types Of Wood Are Best Suited For Making A Wooden Sword, And Why?The best woods for making a wooden sword are oak, maple, and ash. Oak is strong and stable, so it won’t break easily. Maple is hard and smooth, which feels nice to hold. Ash is light and flexible, making it easier to swing. You want a wood that’s sturdy but not too heavy.
What Tools And Materials Are Needed To Construct A Wooden Sword?To make a wooden sword, you need a few tools and materials. First, get a piece of wood, like pine or plywood. You will also need a saw to cut the wood, sandpaper to smooth the edges, and a drill for any holes. Lastly, have some paint or varnish to make it look nice. With these items, you can build your own wooden sword!
How Do You Design And Measure The Dimensions For A Wooden Sword?To design a wooden sword, you start by choosing the length. A good length for kids is about 3 feet. Next, you’ll measure the width. A width of about 4 inches is nice for holding. Finally, decide on the thickness, which should be around 1 inch. You can use a ruler or a tape measure to help with these measurements.
What Safety Precautions Should Be Taken While Making And Using A Wooden Sword?When making a wooden sword, always use safety goggles to protect your eyes. Be careful with sharp tools; ask an adult for help if you need it. While using the sword, never swing it near people or pets. Keep your space clear to avoid accidents. Always check the sword for splinters before playing.
What Techniques Can Be Used For Finishing And Protecting The Wood After Crafting The Sword?After making a wooden sword, we can finish and protect it in a few ways. You can sand the wood to make it smooth. Then, you can apply a clear finish like varnish or polyurethane. This helps keep the wood safe from water and damage. Lastly, you can use wood oil to give it a nice shine.


