Have you ever looked at your wooden table and thought it was too low? Many people face this problem. A table that’s too short can make dining uncomfortable, especially for tall folks or kids growing up. But don’t worry! You can easily lengthen wooden table legs. With just a few tools and simple steps, you can make your table the perfect height.
Imagine being able to adjust your favorite piece of furniture in under an hour! Did you know that a small change can make a big difference in how you enjoy your meals? Lengthening table legs is a fun DIY project that can breathe new life into your old furniture. Plus, it’s a great way to improve your home without spending a lot of money.
In this quick DIY guide, we’ll show you how to lengthen wooden table legs. You’ll be amazed at how simple it is to transform your space. So grab your tools, and let’s get started!
Table of Contents
How to Lengthen Wooden Table Legs: Quick DIY Guide
Want to make your wooden table taller? It’s easier than you think! This guide shows simple steps to lengthen wooden table legs effectively. Start by measuring the height you need. Use sturdy materials like blocks or metal extensions for support. A power drill and screws will secure everything in place. Imagine your dining experience with a table that fits your needs better! This DIY project turns old furniture into something new. Are you ready to transform your space?
Assessing Your Table’s Current Height
Importance of measuring the existing height of the table. Factors to consider for the desired height.
Before making changes to your table, measure its current height. Knowing this helps you decide how much to raise it. The right height can make a big difference. You need to think about who will use the table. Will kids or adults sit there? Also, consider the type of chairs you use. This will help you find a comfortable height for everyone.
- Who will use the table?
- What chairs are you using?
- What is the height of similar tables?
Why is measuring the table height important?
Measuring the height helps ensure comfort and functionality. It prevents awkward seating arrangements and promotes better posture during meals or tasks.
Choosing the Right Materials
Types of wood suitable for leg extension. Recommended tools for the project.
Picking the right wood is key for your table’s new legs. You could use sturdy types like oak, maple, or pine. They are tough and easy to find. Don’t forget tools! Grab a saw, drill, and screws. Your table will be standing tall in no time. Below is a quick guide.
| Type of Wood | Features |
|---|---|
| Oak | Strong and weather-resistant |
| Maple | Durable with a smooth finish |
| Pine | Lightweight and easy to work with |
So, choose wisely and let those legs strut their stuff!
Methods for Lengthening Table Legs
Techniques for using wood blocks or extenders. Stepbystep instructions for cutting and attaching.
One way to lengthen table legs is by using wooden blocks or extenders. This method is simple and effective. Follow these easy steps:
- Measure the desired height of your table.
- Cut blocks from strong wood. Each block should match the table leg size.
- Attach the blocks to the legs using wood glue or screws.
- Check the stability. Let the glue dry if used.
- Finish with paint or stain to match your table.
Using wooden blocks makes your table taller and stronger. Now, let’s see some common questions!
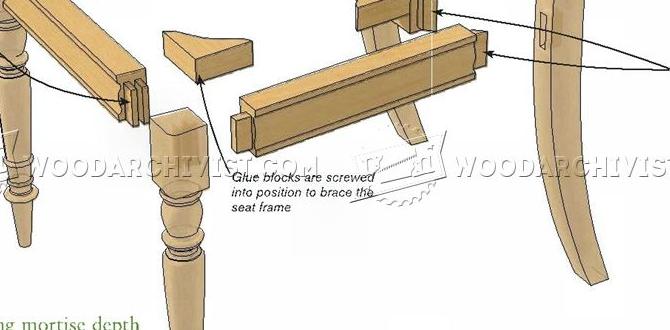
How to attach wood extenders securely?
To attach extenders, use a drill for screws. Make sure to align them properly. You can also add wood glue for extra strength. Always check the stability after attaching.
Maintaining Stability and Balance
Strategies to ensure the table remains stable after extension. Checking for evenness in all legs.
After you’ve given your table legs a lift, it’s important to keep things stable. Stand back and check if all legs touch the ground. If they don’t, your table might wobble like a cat on a hot tin roof! A quick way to check is to put a level on top. If it’s off, adjust the legs until they’re even. You want your table to hold your snacks and not to have a mini rocking party!
| Leg Position | Stability Check |
|---|---|
| Leg 1 | ✔️ Even |
| Leg 2 | ✔️ Even |
| Leg 3 | ❌ Uneven |
| Leg 4 | ✔️ Even |
So grab your tools and keep that table standing tall! Remember, a stable table is a happy table, and happy tables hold happy snacks!
Finishing Touches
Sanding and painting to match the existing finish. Tips for sealing and protecting the new leg extensions.
Once you finish adding the leg extensions, it’s time for the finishing touches. Start by sanding the new legs. This helps them feel smooth and blend in with the rest of the table. Next, paint them in a shade that matches the original finish. For protection, use sealant to guard against scratches and damage. A good seal will keep your table looking nice.
How can I seal and protect the new legs?
To protect your new legs, apply sealant. Sealant keeps wood safe from water and wear! A clear sealant works best. It keeps the wood looking great while offering protection.
- Smooth the wood with sandpaper.
- Choose a sealant made for wood.
- Apply a thin layer with a brush.
- Let it dry completely before using the table.
Common Mistakes to Avoid
Overestimation of height adjustments. Skipping measurements during the process.
It’s easy to make blunders while lengthening table legs. One big mistake is overestimating how much height to adjust. If you think it needs to be taller, you might end up with a table meant for giants! Another common pitfall is skipping measurements. Measure twice, cut once—remember that saying? It’s there for a reason! Trust me, a little patience goes a long way in DIY. Check out the table below for a quick recap of these blunders:
| Mistake | Consequence |
|---|---|
| Overestimation of height | Table too tall for comfort |
| Skipping measurements | Uneven legs and wobbling |
DIY Safety Tips
Importance of wearing protective gear. Safe handling of tools and materials.
Before you dive into your project, remember that safety is key. First, always wear protective gear, like goggles and gloves. It might make you look like a superhero, but hey, better safe than sorry! Tools can be tricky. Always handle them with care. One slip and you might have a new pet rock instead of a table leg. Here’s a quick table of must-have safety gear:
| Safety Gear | Purpose |
|---|---|
| Goggles | Protects your eyes from dust and debris |
| Gloves | Shields your hands from sharp edges |
| Mask | Keeps out dust and fumes |
| Steel-toed boots | Safeguards your toes from heavy objects |
Staying safe makes your DIY experience much more fun! Remember, a happy DIYer is a safe DIYer.
When to Consider Professional Help
Signs that a DIY approach may not be sufficient. How to find a skilled carpenter or handyman for the job.
Some signs show that a DIY project may be too tough. If the legs are very uneven, or your tools feel inadequate, it’s often time to seek help. Complex structures can be tricky as well. A skilled carpenter can make fixing much easier.
- Look for local reviews online.
- Ask friends or family for recommendations.
- Check if the person has experience with wooden furniture.
Hiring someone can save time and ensure quality results!
How do I find a good carpenter?
Start by asking for recommendations. Friends and family often have great suggestions. You can also check online platforms for reviews.
Conclusion
In conclusion, lengthening wooden table legs is a simple DIY project. You can use wooden blocks or pipe extensions to add height. Measure carefully and secure everything tightly. This will help your table fit better in your space. Try these tips today and enjoy your taller table. For more ideas, explore other DIY projects that make your home more functional!
FAQs
What Tools And Materials Do I Need To Lengthen Wooden Table Legs Effectively?
To lengthen wooden table legs, you need a few tools and materials. First, get a saw to cut the wood. You’ll also need wood blocks to add height. A drill helps you attach the blocks securely. Don’t forget screws or wood glue to hold everything together. Finally, use sandpaper for smooth edges.
How Do I Determine The Optimal Height For My Wooden Table Legs?
To find the best height for your wooden table legs, first measure how tall you want the table to be. A good table height is usually between 28 to 30 inches. Next, think about what you’ll use the table for. If you’re using it for eating or drawing, make sure it’s comfy for you to sit at. Finally, remember to add the thickness of the table top to your leg height.
What Techniques Can I Use To Securely Attach Extensions To The Existing Table Legs?
You can use screws to attach the table extensions to the legs. First, drill small holes in both the extension and the leg. Then, insert the screws using a screwdriver to make them tight. You can also use clamps to hold everything together while you screw them in. Make sure everything is straight and strong!
Are There Any Specific Wood Types Or Finishes That Work Best For Leg Extensions?
For leg extensions, you can use strong wood types like pine or oak. These woods are sturdy and won’t break easily. Finishes like varnish or polyurethane help protect the wood from scratches and water. You want the wood to look good and last a long time.
What Safety Precautions Should I Consider When Modifying Wooden Table Legs?
When you change wooden table legs, you should wear safety goggles to protect your eyes. Use gloves to keep your hands safe from splinters. Always work in a well-lit area so you can see what you’re doing. Keep your tools clean and organized to avoid accidents. Finally, be careful with sharp tools and ask an adult for help if needed.