Have you ever thought about how great wood looks in a home? It’s warm, inviting, and always in style. Imagine walking up your stairs and finding a beautiful wood landing waiting for you. Sounds nice, right?
Installing wood on your stair landing can be a fun project. It’s a great way to add charm to your stairs. Plus, it’s easier than you might think! With a little planning and the right steps, you can transform that space.
In this guide, we’ll show you how to install wood on stair landing. We’ll break it down step by step. You’ll learn everything from choosing wood to finishing touches. So, roll up your sleeves and let’s get started!
Table of Contents
How To Install Wood On Stair Landing: A Step-By-Step Guide

How to Install Wood on Stair Landing: A Step-by-Step Guide
Installing wood on a stair landing can seem tricky, but it’s easier than you think. Start by measuring your landing area to ensure the wood fits perfectly. Then, choose the right type of wood for durability and style. Follow a simple process: prepare the surface, cut the wood to size, and secure it using adhesive and nails. It’s like putting together a puzzle. With a few tools and some patience, you’ll transform your stair landing into a beautiful feature of your home.Understanding Stair Landings
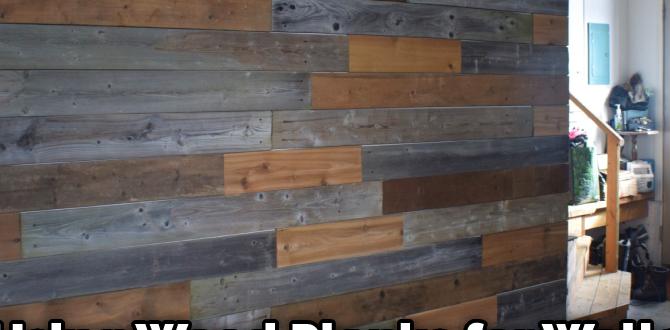
Definition and purpose of stair landings. Importance of floor choice for safety and aesthetics.Stair landings are flat areas that transition between stairs or connect different levels of a home. Their main job is to keep us safe as we ascend and descend. Imagine trying to juggle while climbing stairs; it wouldn’t end well! Your choice of flooring is crucial here. It impacts both safety and how nice everything looks. Smooth surfaces can be slippery, while textured wood can help prevent falls. So, pick wisely—your feet will thank you!
| Flooring Type | Safety | Aesthetics |
|---|---|---|
| Wood | Good grip | Warm look |
| Tile | Slippery | Modern style |
| Carpet | Soft landing | Cozy feel |
Tools and Materials You’ll Need
List of essential tools for installation. Required materials for wood installation on stair landings.Before you jump into the fun of installing wood on your stair landing, let’s gather what you need. First off, grab your tools. You’ll want a tape measure, saw, hammer, and some nails. Don’t forget safety glasses—unless you want to look like you’ve just fought a bee swarm!
Next, gather the materials. You’ll need wooden planks, wood adhesive, and sandpaper. If you want shiny steps, maybe a little varnish too! Here’s an easy table to keep track:
| Tools | Materials |
|---|---|
| Tape measure | Wooden planks |
| Saw | Wood adhesive |
| Hammer | Sandpaper |
| Safety glasses | Varnish (optional) |
With everything ready, you’re just a few steps away from a stylish stair landing! Happy building!
Preparing the Stair Landing Area
Steps to clean and measure the landing. Checking for structural integrity and levelness.Start by cleaning the stair landing area. Remove dust, dirt, and any old glue. Next, measure the space carefully. Use a tape measure to ensure you have the right dimensions for your wood. After that, check for structural integrity. Make sure the landing is strong and solid. Look for any signs of damage like cracks or soft spots. Lastly, use a level tool to see if the surface is flat. A level space is crucial for a good wood installation.
How do I measure the stair landing properly?
To measure the stair landing, take accurate length and width measurements. Use a tape measure for best results. Write down the numbers for easy reference.
Key Steps to Clean and Measure:
- Remove dust and debris.
- Measure length and width.
- Check for cracks and soft spots.
- Use a level tool for flatness.
Installing the Wood Planks
Stepbystep method for laying down wood planks. Techniques for cutting and fitting wood accurately.Laying down wood planks can be a piece of cake if you follow these steps. First, measure your landing area carefully. You don’t want to end up with planks that are too short or too long. Cut your wood accurately using a saw, and remember to wear safety goggles! Fitting is crucial; make sure each plank clicks into place. A snug fit is like a good hug, but without the awkwardness. Your stair landing will soon look fantastic!
| Step | Action |
|---|---|
| 1 | Measure space |
| 2 | Cut wood |
| 3 | Fit planks |
Finishing Touches and Sealing
Importance of sanding and finishing the wood surface. Recommended sealants and stains for wood durability.After you install the wood, it’s time for the finishing touches. Sanding the wood is key for a smooth surface. It helps the stain or sealant stick better. For protecting the wood, choose a good sealant. Water-based ones are easy to clean up, while oil-based ones last longer. Here are some recommended options:
- Water-Based Sealants: Quick-drying and low odor.
- Oil-Based Sealants: Great for durability, but take longer to dry.
- Wood Stains: Choose colors that enhance the grain.
These finishing touches will keep your wood looking great for years.
What is the importance of sanding and sealing wood?
Sanding and sealing wood is important because it protects the surface and keeps it looking nice.
Maintaining Your Wood Stair Landing
Routine maintenance tips to extend the life of the wood. Common issues to watch for and how to address them.Taking care of your wood stair landing keeps it looking nice and lasting longer. Here are some easy tips:
- Wipe up spills right away to prevent water damage.
- Sweep or vacuum weekly to remove dirt and dust.
- Use a wood cleaner every month to keep it shiny and new.
- Check for scratches and fix them with wood filler.
Look out for common problems, like squeaky steps or loose boards. Fix squeaks by tightening screws. For loose boards, add some glue and press them down. Regular care helps your wood landing stay beautiful!
What common problems occur with wood stair landings?
Common problems include scratches, squeaks, and loose boards. Regularly checking for these issues can help you fix them early and save money on costly repairs later.
Conclusion
In conclusion, installing wood on your stair landing is fun and rewarding. First, measure and choose your wood. Then, prepare the surface, cut the pieces, and secure them in place. Finally, finish with stain or sealant. Now you can enjoy your beautiful landing! For more tips, check out related guides or ask a friend for help.FAQs
What Tools And Materials Do I Need To Install Wood On A Stair Landing?To install wood on a stair landing, you will need a few tools and materials. First, get a measuring tape to measure the space. Next, use a saw to cut the wood pieces. You’ll also need wood glue or nails to hold the wood in place. Finally, have a hammer or a drill ready for fastening.
How Do I Properly Measure And Cut Wood For The Stair Landing?To measure wood for your stair landing, first, use a tape measure to find the length and width of the area. Write down these numbers. Next, mark the wood where you need to cut, using a pencil. Then, carefully cut along the lines with a saw. Finally, check that the wood fits well in the space.
What Type Of Wood Is Best Suited For A Stair Landing Installation?The best wood for a stair landing is strong and durable. Hardwoods like oak, maple, or cherry are great choices. They can handle a lot of foot traffic. Plus, they look nice and can last a long time. Make sure to choose wood that fits your home’s style!
Are There Any Specific Safety Precautions I Should Take While Installing Wood On A Stair Landing?Yes! First, wear safety gear like goggles and gloves. This helps protect your eyes and hands. Make sure the area is clean and free of trip hazards. Use a sturdy ladder if you need to reach high spots. Finally, be careful with sharp tools and follow instructions. Stay safe and have fun!
How Can I Ensure A Seamless Transition Between The Wood On The Stair Landing And The Adjacent Flooring?To make a smooth change from the wood on your stair landing to the floor next to it, start by choosing wood that matches. You can use a special strip called a transition strip to cover the spot where they meet. Make sure both surfaces are even and clean. You can also add some stain or finish to help them look the same. This way, it will feel nice and look good too!