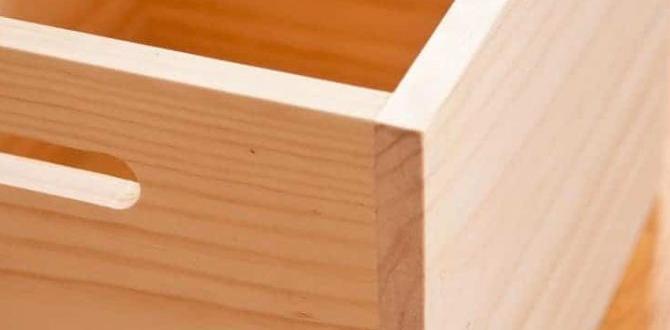
Have you ever wondered how to add a bit of flair to your wooden box? Installing hinges is a simple way to do just that. It can turn your plain box into a handy storage solution. But where do you start? You might think it’s too hard. But don’t worry! With the right steps, you can learn how to install hinges on a wooden box easily.
Imagine opening a beautifully crafted box that swings open smoothly. It’s like magic, right? This guide will show you how to make that magic happen. Whether you’re storing toys, art supplies, or treasures, knowing how to install hinges will be a valuable skill. Plus, it’s a fun project you can do at home.
Did you know that the right hinges can also enhance the look of your box? They come in many styles and colors. Each choice adds a unique touch. This article will take you through each step of the process. Get ready to dive into the world of woodworking!
Table of Contents
How To Install Hinges On A Wooden Box: A Step-By-Step Guide

How to Install Hinges on a Wooden Box: A Step-by-Step Guide
Installing hinges on a wooden box is easier than you think! First, gather your tools and select the right type of hinges. Measure and mark where the hinges will go. Pre-drill holes to avoid splitting the wood. Attach the hinges securely and test for smooth opening. Did you know that proper hinge placement can enhance the box’s durability? Follow these steps, and you’ll create a functional and stylish wooden box in no time!Choosing the Right Hinges
Types of hinges suitable for wooden boxes. Factors to consider when selecting hinges (size, material, style).Choosing hinges can feel like picking a favorite ice cream flavor—so many options! For wooden boxes, you have a few great types to consider. Here’s a handy table:
| Type of Hinge | Best For | Style |
|---|---|---|
| butt hinge | Heavy lids | Simple and strong |
| piano hinge | Long edges | Seamless beauty |
| concealed hinge | Hidden designs | Sleek and modern |
Think about size, material, and style when making your choice. Big boxes need bigger hinges! Brass is fancy but wood is cozy. It’s all about what looks good and works well. Who knew such tiny things could make such a big difference? Pick wisely, and your box will be as happy as a puppy at the park!
Gathering Necessary Tools and Materials
List of essential tools (screwdriver, drill, measuring tape). Recommended types of screws and hinges to use.Before you start, gather your tools and materials. This makes the task easier. Here’s what you will need:
- Screwdriver: A regular or electric one works well.
- Drill: An electric drill helps make holes quickly.
- Measuring tape: This ensures precise measurements.
For screws and hinges, choose strong ones. Use wood screws that fit tightly. For hinges, look for butt hinges or piano hinges. These options will make your box sturdy.
What tools are essential for installing hinges?
The essential tools are a screwdriver, drill, and measuring tape.
Preparing the Wooden Box
Steps to measure and mark hinge placement. Tips for ensuring alignment and fit.Start by measuring where to place the hinges. Use a ruler to find the best spots on both the box’s lid and body. Mark these spots lightly with a pencil. To ensure a perfect fit, double-check your markings. Align the hinges carefully and keep them straight. You can check alignment by closing the box. The lid should sit evenly on top. Here are some quick tips:
- Use a square for accuracy.
- Mark hinge positions about 2 inches from the edge.
- Take your time; check twice before drilling.
How do you measure for hinges on a box?
Measure from the top of the lid and mark the spot on the box where the hinges will go. This ensures a smooth opening every time.
Drilling Pilot Holes
Importance of pilot holes for hinge installation. How to drill accurate pilot holes for different hinge types.Drilling pilot holes is very important for putting hinges on a wooden box. Pilot holes help guide screws and prevent the wood from cracking. This makes sure your hinges stay in place. To drill pilot holes, first measure where the hinges will go. Next, use a drill bit that matches the screw size. Remember these simple tips:
- Mark your spots clearly.
- Drill straight down.
- Use a drill bit slightly smaller than the screws.
Doing this makes the job easier and your box stronger.
How do pilot holes help with hinge installation?
Pilot holes help prevent wood damage and ensure screws fit well. They guide screws to go in the right place without splitting the wood.
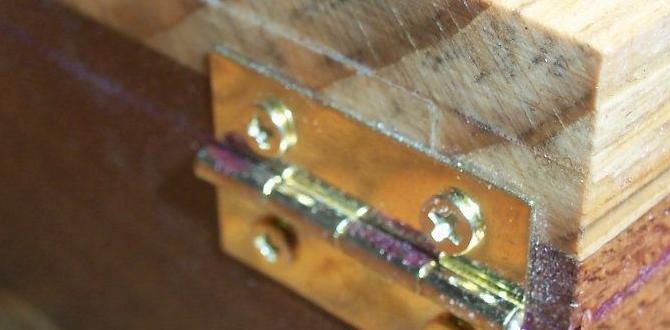
Attaching the Hinges
Stepbystep instructions for attaching hinges to the box. Common mistakes to avoid during hinge attachment.First, hold the hinge against the box. Make sure it’s straight and even. Mark the spots where screws will go. Now, drill small pilot holes. This helps to avoid splitting the wood. Then, screw the hinge in place gently. Don’t go too fast; we’re not racing!
Common mistakes? Avoid using too long screws. They might poke out the other side and give your box a “porcupine” look. Also, forgetting to check if everything lines up can lead to a lid that won’t close properly.
| Common Mistakes | What Happens |
|---|---|
| Using long screws | Pokes out of the box |
| Not measuring | Uneven lid |
Remember, it’s not just about getting it done, it’s about having fun!
Testing the Hinge Mechanism
How to ensure smooth operation of the hinges. Troubleshooting tips for hinge issues.Once your hinges are installed, it’s time to check them. Open and close the box several times. The hinges should move smoothly. If they squeak or stick, check these points:
- Ensure screws are tight.
- Make sure the hinge is straight.
- Look for bumps or debris in the hinge area.
If you notice problems, here are tips to fix them:
- Use lubricant if hinges squeak.
- Adjust screws if the hinge is loose.
- Clean any dirt between the hinge parts.
This will help keep your box working well!
How do I know if my hinges are working properly?
Check if they move smoothly and make no noise. If you hear squeaks or feel resistance, something might be wrong.
Finishing Touches
Options for sealing and finishing the box. Final inspection checklist for a completed project.To give your wooden box a lovely finish, consider sealing it with wood varnish or wood oil. These options protect the wood and enhance its natural look. After sealing, give your project a final check. Look for:
- No gaps in the hinges
- Smooth surface with no splinters
- Proper opening and closing of the box
A good finish makes your box look great and last longer!
What is the best way to seal a wooden box?
Use wood varnish for a shiny look or wood oil for a natural finish.
Conclusion
In conclusion, installing hinges on a wooden box is a fun and easy project. You learned to measure carefully and choose the right hinges. Always drill pilot holes first to prevent wood damage. Now, grab your tools and give it a try! If you want to learn more, check out other DIY guides for more exciting projects.FAQs
What Types Of Hinges Are Best Suited For Wooden Boxes?The best hinges for wooden boxes are butt hinges and Europe hinges. Butt hinges fit flush with the wood and are easy to install. European hinges, also called concealed hinges, hide inside the box. They are great if you want a clean look. Both kinds help your box open and close smoothly!
How Do You Measure And Mark The Placement For Hinges On A Wooden Box?To measure for hinges on a wooden box, first decide where you want the hinges. You can use a ruler to find the center line on the top edge of the box. Next, hold the hinge in place and mark where the screw holes are with a pencil. Make sure the marks are straight and even, so the hinge works smoothly. Finally, double-check your measurements before you start drilling!
What Tools Do You Need To Install Hinges On A Wooden Box?To install hinges on a wooden box, you need a few simple tools. First, grab a screwdriver, which helps tighten screws. Next, use a pencil to mark where the hinges go. You might also need a ruler to measure and place them evenly. Finally, having wood glue can help make everything extra strong!
How Do You Ensure That The Hinges Are Aligned Correctly For Smooth Operation?To ensure the hinges are aligned, you start by holding the door in place. Next, you check the top and bottom gaps between the door and the frame. Make small adjustments to the hinges if needed. Finally, open and close the door to see if it moves smoothly. If it does, you did a great job!
What Are Some Common Mistakes To Avoid When Installing Hinges On A Wooden Box?When you install hinges on a wooden box, make sure to measure carefully. If you measure wrong, the box won’t open or close well. Also, check the placement of the hinges. If they are not level, your box might wobble. Finally, don’t forget to use the right screws. Using the wrong size can make your hinges weak.