Table of Contents
How To Fix Cracked Wood: Expert Tips For Seamless Repair

How to Fix Cracked Wood: Expert Tips for Seamless Repair
Fixing cracked wood can be simpler than you think! Learn expert tips to restore your wooden furniture. Start with cleaning the crack to remove dirt. Next, use wood glue for strong adhesion. Sand it down for a smooth finish. Did you know wood expands and contracts with temperature changes? Understanding this can help prevent cracks in the future. With these easy steps, your wood can look as good as new!
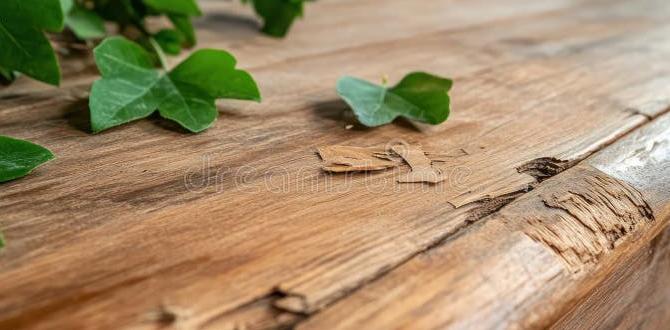
Understanding Wood Cracks
Types of wood cracks: surface vs. deep. Common causes of cracks in wood.
Wood cracks can be tricky! There are surface cracks that look like tiny lines and deep cracks that can reach all the way through. Surface cracks often happen because of temperature changes. Deep cracks may be caused by dryness or pressure on the wood. These splits can be sneaky, appearing out of nowhere, like that missing sock you can never find! Understanding these cracks helps you know how to fix them.
| Type of Crack | Description | Common Causes |
|---|---|---|
| Surface Cracks | Shallow lines on the surface. | Temperature changes, moisture loss. |
| Deep Cracks | Penetrates through the wood. | Extreme dryness, strong pressure. |
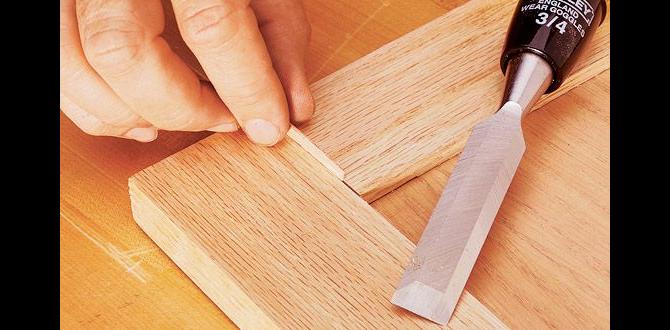
Tools and Materials Needed for Repair
Essential tools for fixing wood cracks. Recommended wood fillers and adhesives.
To tackle those pesky wood cracks, having the right tools makes all the difference. You’ll need a few essentials to start your repair journey. Grab some sandpaper, a putty knife, and a paintbrush. These will help you smooth out the area and apply your fix with flair.
When it comes to fillers, choose wood fillers like epoxy or acrylic. They work wonders and can be painted over easily. Don’t forget a strong adhesive for stubborn cracks, like polyurethane glue. It’s like a superhero for wood!
| Tool/Material | Purpose |
|---|---|
| Sandpaper | Smooths the cracked area |
| Putty Knife | Applies filler smoothly |
| Paintbrush | Perfect for touch-ups |
| Wood Filler | Fills gaps and cracks |
| Polyurethane Glue | Strong adhesive for repairs |
With these tools and materials in hand, you’re ready to make your wood look as good as new. Remember, a little bit of humor and patience goes a long way in your repair adventure!
Step-by-Step Guide to Repairing Surface Cracks
Cleaning the cracked area. Applying wood filler and smoothing the surface.
Fixing surface cracks is easy if you follow a few steps. Start by cleaning the cracked area. Use a dry cloth to wipe away any dust or dirt. This helps the repair stick better. Next, prepare your wood filler. Apply it into the cracks using a putty knife. Make sure to fill the cracks completely. Smooth the surface with the knife. This makes it even and nice to look at. Let it dry before you sand it down for a perfect finish.
How to clean the cracked area?
You can simply wipe the cracks with a dry cloth. This helps remove dust and dirt to ensure proper adhesion of the wood filler.
How do I apply wood filler and smooth the surface?
- Fill the cracks with wood filler.
- Use a putty knife to spread and smooth it out.
- Let it dry completely before sanding.
Addressing Deep Cracks and Splits
Techniques for deeper repairs. Reinforcing structural integrity with additional supports.
Dealing with deep cracks in wood can feel like a daunting puzzle. But don’t worry, fixing them can be as easy as pie! First, you can use a wood filler to pack the cracks. It’s like giving the wood a cozy blanket. Reinforcing the structure is also crucial. Think of adding extra supports or brackets. This strengthens the wood and prevents future splits. And remember, measure twice—cut once! Or you might end up with too many funky-shaped pieces.
| Technique | Description |
|---|---|
| Wood Filler | Packs cracks and smooths the surface. |
| Brackets | Provides additional support to prevent splits. |
Preventing Future Cracks in Wood
Proper storage and humidity control. Regular maintenance tips for wood items.
Keeping wood safe from cracks is easier than you think. Start by controlling humidity. Too much or too little moisture can cause wood to crack. Store wood in a cool, dry place. This helps keep its shape.
Regular maintenance is also important. Check your wooden items for signs of wear. Wipe them clean and apply oil every few months. This keeps wood moisturized and happy.
- Control humidity levels.
- Store wood properly.
- Check for wear regularly.
- Clean and oil wood items.
How can I prevent wood from cracking?
Store wood in a stable environment and check it often. Regular care helps maintain its quality and appearance.
Finishing Touches After Repair
Sanding and finishing the repaired area. Staining or painting tips for a seamless blend.
After fixing the cracks, you need to make the area look smooth. Start by sanding the repaired spot. This makes it even and ready for finishing. Use fine-grit sandpaper to avoid scratches. After sanding, apply a stain or paint that matches the rest of your wood. Here are some tips:
- Choose a stain that matches your wood color.
- Test the stain on a small scrap piece first.
- For paint, use a primer to help it stick.
- Apply several thin coats instead of one thick coat.
These steps will help blend the repair and keep your wood looking great!
How to achieve a smooth finish after repairs?
Use fine-grit sandpaper and then choose a matching stain or paint to blend well. Make sure to test colors to find the perfect one! It’s all about getting that seamless look.
When to Seek Professional Help
Signs of serious damage that require expertise. Evaluating the costeffectiveness of DIY vs. professional repair.
Not all cracks are created equal. If your wooden furniture is cracking, it might be a sign of deeper issues. Look out for large gaps or extensive warping. These could mean it’s time to call a pro! Evaluating whether to fix it yourself or hire an expert can be tricky. DIY fixes might seem cheaper but could lead to more expensive mistakes. So, if you feel you’re in over your head, remember: “Better safe than splintered!”
| Warning Signs | Action Needed |
|---|---|
| Large cracks or gaps | Seek professional help |
| Severe warping | Consider expert repair |
| Recurring damage | Professional evaluation |
Conclusion
In conclusion, fixing cracked wood is easy with the right tips. Clean the area and choose the right filler. Sand and paint for a smooth finish. You can make your wood look good as new! Try these simple steps today. For more detailed guidance, check out additional resources. Let’s keep our wood strong and beautiful!
FAQs
What Are The Best Materials And Tools Needed For Repairing Cracked Wood Furniture?
To fix cracked wood furniture, you need some special materials and tools. First, get wood glue to help stick the pieces back together. A putty knife helps spread the glue smoothly. You’ll also need sandpaper to make the surface nice and smooth. Finally, finish with wood polish to make your furniture look new again!
How Can You Identify The Cause Of Wood Cracks To Prevent Future Damage?
To find out why wood cracks, start by looking at the wood closely. Check for signs of dryness or moisture. You can also feel the wood to see if it’s rough or smooth. If your home has big temperature changes, this might cause the cracks too. By knowing the cause, you can make your wood stay stronger and last longer!
What Step-By-Step Process Should Be Followed For Filling And Sealing Cracks In Wood?
To fill and seal cracks in wood, first, clean the area. You can use a damp cloth to remove dust. Next, choose wood filler that matches your wood. Apply the filler into the cracks with a putty knife. Let it dry completely. After it dries, sand it smooth. Finally, seal the wood with a clear finish for protection.
Are There Specific Techniques For Repairing Different Types Of Wood (E.G., Hardwood Vs. Softwood)?
Yes, there are different ways to repair hardwood and softwood. For hardwood, like oak, we can use wood filler to fix small holes. Softwood, like pine, is easier to sand down. We might also use glue for cracks in both types. Always choose the right method for the wood you have!
How Can You Finish Or Refinish Repaired Wood To Ensure A Seamless Look?
To finish or refinish repaired wood, first, sand the area where you fixed the wood. This makes it smooth and helps the new finish stick. Then, match the color of the finish to the rest of the wood. You can use paint, stain, or varnish. Finally, apply a clear coat to protect everything and make it shiny.