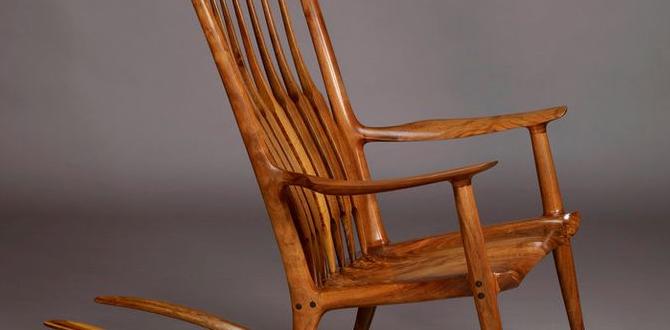
Have you ever sat on a wooden chair and felt uncomfortable? It might be because of a flat seat. Learning how to contour a wooden chair seat can make it much better. Imagine sitting in a chair that fits your body perfectly. Sounds nice, right?
Many people do not know that a little shaping can change everything. With just a few tools and efforts, you can turn a boring wooden chair into a cozy spot. Did you know that contouring your chair can even make it look more beautiful? It’s true!
In this guide, we will take you step by step through the process. You will learn how to contour a wooden chair seat easily. Are you ready to turn your chair into a work of art and comfort? Let’s get started!
Table of Contents
How To Contour A Wooden Chair Seat: A Step-By-Step Guide

How to Contour a Wooden Chair Seat: A Step-by-Step Guide
Crafting a comfortable wooden chair seat is easy with the right steps. Start by measuring your chair carefully. Use a template to trace the shape you want. Next, choose the right tools for cutting and sanding. Each step lets you create a custom contour that fits your body perfectly. Did you know that the right angle can make sitting more enjoyable? Following this guide transforms your chair into a true masterpiece!Understanding the Basics of Wood Contouring
Definition and significance of contouring in woodworking. Tools and materials needed for contouring a wooden chair seat.Wood contouring shapes wood for comfort and style. It makes furniture, like a chair seat, fit our bodies better. Contouring is important because it improves both appearance and usability. To contour wood, you’ll need the right tools and materials. Here are some essentials:
- Saw
- Chisel
- Sandpaper
- Measuring tape
- Wood glue
- Pencil
With these tools, you can create a beautiful chair seat that is comfy and looks great!
What tools do you need for contouring a wooden chair seat?
You need basic tools for contouring a wooden chair seat. Essential tools include a saw, chisel, and sandpaper. These help you shape and smooth the wood effectively.
Preparing Your Workspace
Essential safety precautions while contouring. Setting up an efficient workspace for woodworking projects.Start by making your workspace safe and organized. First, wear protective gear like goggles and gloves. Clear your work area of any clutter. This helps avoid accidents. Make sure you have your tools handy, so you don’t waste time searching for them. Good lighting is important too. It helps you see clearly.
- Always wear safety glasses.
- Keep tools nearby and organized.
- Ensure proper lighting for better visibility.
- Check for distractions like pets or children.
With a clean and safe space, you can focus better on contouring your chair seat.
What should I consider for safety while contouring?
Wear safety goggles and gloves, keep tools organized, and work in a clean area to ensure safety.
Measuring and Marking the Chair Seat
Techniques for precise measurements of chair seat dimensions. Effective marking methods for contour patterns.Start by gathering your tools, like a ruler and a pencil. Measure the chair seat’s width and length carefully. Don’t forget to check twice; a mistake here could lead to a lopsided seat! Use a tape measure for those tricky spots. Then, grab your pencil for marking. A good tip? Use light marks so they’re easy to erase later. This will help you create smooth contour patterns that fit your behind just right!
| Measurement | Technique |
|---|---|
| Width | Use a tape measure |
| Length | Measure from front to back |
| Contour Marking | Light pencil strokes |
With precise measurements and clever marking, you’re on your way to a comfy chair seat that could even give a cloud a run for its money! Remember, a well-measured chair is a happy chair!
Selecting the Right Contouring Techniques
Comparison of contouring methods: hand tools vs. power tools. Advantages and disadvantages of each technique.Choosing between hand tools and power tools is important for contouring a wooden chair seat. Each method has its own pros and cons.
- Hand Tools: Great for detailed work. They offer precision and control. However, they require more time and physical effort.
- Power Tools: Faster and easier. They can save you energy and time. On the flip side, they may lack the precision of hand tools.
Think about what you need before you start. Do you want speed or accuracy? That can help you pick the right tools for your chair seat.
Which tools should I use for contouring?
Hand tools and power tools both work well for contouring. Your choice should depend on your skill level and the design you want.
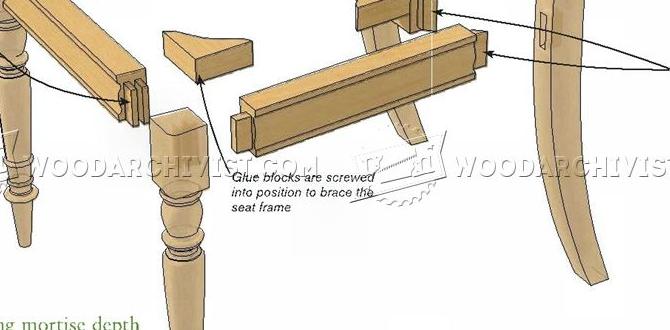
Step-by-Step Contouring Process
Detailed steps for contouring using hand tools. Detailed steps for contouring using power tools.Ready to give your wooden chair seat a cozy hug? Start with the hand tools. First, grab a chisel and mark your contours gently. Take your time like you’re sculpting a masterpiece! Then, use a hand plane to smooth out the edges. Remember, patience is key; we want a comfy seat, not a roller coaster! Now, if you’re feeling a bit more adventurous, switch to power tools. A power sander can work wonders in no time! Just be sure to follow the contours you’ve marked. Keep your workspace tidy, or your chair might start looking like it needs a nap instead!
| Tools | Steps |
|---|---|
| Hand Tools | 1. Mark contours with a chisel. 2. Smooth edges with a hand plane. |
| Power Tools | 1. Use a power sander for quick smoothing. 2. Follow your marked contours carefully. |
Sanding and Finishing the Contoured Seat
Importance of sanding for a smooth finish. Recommended finishing products and techniques for wooden seats.Sanding is very important for a smooth finish on your wooden chair seat. It removes rough spots and helps the wood feel nice to the touch. Use the right tools and techniques for the best results. Here are some finishing products you can try:
- Wood stains for color
- Polyurethane for shine
- Natural oils for a warm look
Apply these products in thin layers. Let each layer dry before adding more. This creates a beautiful, durable surface!
What is the best way to finish a wooden chair seat?
Start with sanding, then use wood stains or oils based on your style. Finish with polyurethane for protection.
Common Mistakes to Avoid When Contouring
List of frequent errors novices make during the contouring process. Tips for troubleshooting problems that may arise.Many beginners make simple mistakes when contouring a wooden chair seat. Here are some frequent errors to avoid:
- Not measuring correctly before starting.
- Using the wrong tools for shaping.
- Applying too much pressure during sanding.
- Forgetting to check the curves from different angles.
To fix issues:
- Stop and reassess if something feels wrong.
- Use a finer sandpaper to smooth rough spots.
- Consult guides or videos for better techniques.
Contouring takes patience. Mistakes happen. Learn from them to improve.
What common issues arise during contouring?
New woodworkers often struggle with uneven surfaces and over-sanding, which can ruin the shape. Focus on technique and take your time.
Maintaining Your Contoured Chair Seat
Best practices for regular maintenance of wooden chairs. Cleaning and restoration tips to prolong the life of the chair seat.Taking care of your wooden chair seat doesn’t have to be a chore! First, remember to dust it regularly. Use a soft cloth to wipe away crumbs and dirt. Next, give it a gentle wash with mild soap and water, then dry it off quickly. Avoid soaking it! Every few months, treat it with wood polish to keep that shine—like putting on a fancy suit! If scratches appear, sand them lightly and apply some matching varnish. Your chair will thank you with years of comfy seating!
| Maintenance Tips | Frequency |
|---|---|
| Dusting | Weekly |
| Soap & Water Cleaning | Monthly |
| Wood Polish Treatment | Every 3 Months |
| Scratch Repair | As Needed |
Conclusion
In conclusion, contouring a wooden chair seat can enhance comfort and style. We learned to gather supplies, measure carefully, and shape the wood step by step. Remember to sand for smoothness and finish to protect your work. Now that you know how to contour, grab your tools and start your project! For more tips, keep exploring our guides.FAQs
What Tools Do I Need To Contour A Wooden Chair Seat Effectively?To contour a wooden chair seat, you need a few tools. First, get a chisel to carve the wood. Then, use a hand plane to smooth the surface. You will also need sandpaper to make it really nice. Finally, a measuring tape helps you get the right shape.
How Do I Choose The Right Type Of Wood For Contouring A Chair Seat?To choose the right wood for contouring a chair seat, think about comfort and strength. You want a type of wood that feels nice to sit on. Good choices are oak, maple, or cherry because they are strong and last a long time. Also, check if the wood is easy to shape and doesn’t splinter easily. Always pick a wood that fits your style and feels good!
What Techniques Can I Use To Achieve A Smooth And Ergonomic Contour On The Seat?To create a smooth and comfy shape for your seat, you can start by using a soft foam. Cut the foam to fit the shape you want. Next, cover it with a nice fabric to make it look good. You can also add some padding to make it even softer. Lastly, test it out to see if it feels good when you sit down!
How Do I Ensure That The Contouring Process Maintains The Structural Integrity Of The Chair?To keep the chair strong while contouring, you should plan carefully. Use the right tools to shape the chair without removing too much material. Check the design often to make sure it stays strong. You can also test the chair after each step to ensure it holds up well. Always remember, safety and strength come first!
Are There Specific Design Considerations To Keep In Mind When Contouring Different Styles Of Chair Seats?Yes, there are things to think about when designing chair seats. First, you need to consider comfort. Make sure the seat is shaped to fit the body well. Second, think about the style. Different chair styles need different shapes, like a soft chair or a stiff one. Finally, use materials that feel nice and are strong. This will make the chair look good and last longer.