Framing nailers are your indispensable powerhouses for rapid, robust construction. They drive nails quickly and deeply, making framing walls, decks, and roofs faster and more efficient. Mastering their use ensures strong, reliable structures for any DIY or professional project.
Hey there, fellow builders! Jack Shaffer here, and if you’ve ever wrestled with a hammer, trying to drive home dozens, maybe hundreds, of nails for a big project like a deck or a shed, I get it. It’s tiring, time-consuming, and let’s be honest, sometimes those nails bend and buckle, making for a frustrating finish. That’s where the unsung hero of construction comes in: the framing nailer. It’s a tool that dramatically speeds up your work and makes joints rock-solid. If you’re looking to build bigger, better, and faster, you’ve come to the right place. We’re going to dive deep into what makes a framing nailer your best friend on the job site.
Table of Contents
What is a Framing Nailer and Why You Need One
Simply put, a framing nailer is a power tool designed to drive large nails quickly and efficiently. Think of it as a super-powered hammer. It’s essential for any major construction project, from building the skeleton of a house to constructing decks, fences, and even larger DIY projects. Its primary job is to join pieces of lumber together, creating strong connections that can withstand significant stress.
When you’re building something substantial, like the frame of a house or a sturdy deck, you’re talking about a lot of nails. Doing this by hand with a hammer can take a huge amount of time and physical effort. A framing nailer can drive a nail in a fraction of a second. This massive speed increase means you can complete projects in a much shorter timeframe, getting you from the planning stage to enjoying your finished work faster.
Beyond speed, framing nailers ensure a consistent and powerful drive. They’re designed to sink nails deep into the wood, creating very secure joints. This is crucial for structural integrity. A well-built frame is a safe frame, and a framing nailer helps you achieve that safety and stability with every nail driven.
Key Benefits of Using a Framing Nailer:
- Speed: Dramatically reduces the time it takes to fasten lumber.
- Efficiency: Drives nails accurately and powerfully, reducing wasted effort.
- Strength: Creates strong, secure joints that are vital for structural integrity.
- Ergonomics: Reduces the physical strain on your arms and wrists compared to hammering.
- Consistency: Every nail is driven to a similar depth, providing a uniform look and feel.
Types of Framing Nailers
Not all framing nailers are created equal, and the best one for you depends on your power source and specific needs. The three main types you’ll encounter are pneumatic, corded electric, and cordless electric.
1. Pneumatic Framing Nailers
These are the workhorses of the job site and have been around the longest. Pneumatic nailers rely on compressed air to drive nails. This means you’ll need an air compressor and an air hose to operate one.
Pros:
- Power: Generally the most powerful type, capable of driving the longest nails into the hardest woods.
- Reliability: Simple design often leads to fewer mechanical issues and longer lifespan.
- Lightweight: The nailer itself is often lighter than cordless electric models, as the power source (compressor) is separate.
- Cost: Can be more affordable upfront, especially if you already own a compressor.
Cons:
- Air Compressor Required: You need to purchase or rent an air compressor, which adds significant cost and bulk.
- Hose Management: The air hose can be cumbersome to manage on a job site, potentially tripping hazards or getting snagged.
- Noise: Compressors can be very loud.
- Maintenance: Air compressors and hoses require regular maintenance (draining water, checking pressure).
2. Corded Electric Framing Nailers
These nailers plug into a standard electrical outlet. They are a good option for workshops or stationary projects where access to power is readily available.
Pros:
- No Compressor Needed: Eliminates the need for an air compressor and hose.
- Consistent Power: As long as you have electricity, you have consistent power.
- Simpler Operation: Generally easier to set up and use than pneumatic tools.
Cons:
- Limited Portability: You’re tethered to an electrical outlet, restricting your range.
- Extension Cords: Managing extension cords can be a hassle and a safety concern.
- Less Power: Typically less powerful than pneumatic or high-end cordless models, they may struggle with very dense wood or long nails.
3. Cordless Electric Framing Nailers
These are the modern marvels, powered by rechargeable battery packs. They offer the ultimate in portability and convenience, making them a favorite for many DIYers and contractors alike.
Pros:
- Maximum Portability: No cords, no hoses, and no compressors mean you can take them anywhere.
- Convenience: Easy to set up and use right out of the box.
- Good Power: Modern cordless models offer substantial power, capable of handling most framing tasks.
- Integrated Solutions: Eliminate the need for separate air systems.
Cons:
- Battery Life: You’re limited by battery charge; owning multiple batteries or planning charging time is necessary for extended use.
- Weight: Can be heavier due to the integrated battery pack.
- Cost: Often the most expensive option upfront.
- Maintenance: Batteries have a finite lifespan and will eventually need replacement.
Choosing the Right Framing Nailer for Your Project
Selecting the perfect framing nailer involves considering a few key factors. Think about the scale of your projects, your budget, and your existing tool collection. No single nailer is perfect for everyone, so let’s break down what matters most.
1. Nail Type and Size
Framing nailers drive specific types of nails, usually collated (held together in a strip) by either plastic or wire. The angle of the collation is crucial for reaching tight spots.
- 21-Degree Nailers: These use nails with plastic collation. The nails are typically larger and more robust, ideal for heavy-duty framing where maximum holding power is needed.
- 30-34 Degree Nailers: These use nails with either plastic or wire collation. They have a slimmer profile, allowing them to get into tighter corners and spaces. Wire-collated nails can be useful as residual wire on them can help hold the nail in place.
Always check the nail size capacity of the nailer. Common framing nail lengths range from 2 inches up to 3-1/2 inches. Ensure the nailer you choose can drive the length of nails required for your specific lumber dimensions.
2. Power Source (Revisited)
As discussed, your choice between pneumatic, corded electric, and cordless electric will heavily influence your workflow. If you’re building extensively on a construction site with access to power, a pneumatic or cordless might be best. If you’re a DIYer working on a deck in your backyard with no power nearby, a cordless model is likely your go-to.
3. Features to Consider
Beyond the basics, several features can enhance your experience:
- Depth Adjustment: This allows you to control how deep the nail is driven without changing the air pressure or power setting. Crucial for not damaging delicate wood surfaces or for ensuring nails are set perfectly flush.
- Rafter Hook: A small hook that lets you hang the nailer on joists or rafters when not in use. A surprisingly handy feature on larger projects.
- Sequential vs. Contact Fire:
- Sequential (Single Shot): You must intentionally pull the trigger for each nail. This offers the highest level of precision and safety, preventing accidental firing.
- Contact (Bump Fire): Once the trigger is held down, you can fire nails by simply bumping the nose of the nailer against the wood. Much faster, but requires more control to avoid accidental shots. Many modern nailers offer a selector switch for both modes.
- Jam Clearing: Look for a nailer with an easy, tool-free mechanism to clear stuck nails.
- Ergonomics and Weight: You’ll be holding this tool for extended periods. A comfortable grip and manageable weight are important to reduce fatigue.
4. Budget
Framing nailers can range from around $100 for basic electric models to $400 or more for high-end cordless or pneumatic kits. Factor in the cost of necessary accessories like hoses, compressors, batteries, and nails. For professionals, the long-term value and efficiency gains justify higher-end tools. For DIYers, a reliable mid-range option often provides the best balance of performance and cost.
Essential Accessories for Your Framing Nailer
A framing nailer is just one piece of the puzzle. To operate it safely and effectively, you’ll need a few other things. Investing in good quality accessories will not only make your job easier but also safer.
For Pneumatic Nailers:
- Air Compressor: Choose one with sufficient CFM (cubic feet per minute) to keep up with the nailer’s demand for air. A 4-6 gallon compressor is usually a good starting point for DIYers.
- Air Hose: Look for a high-quality, flexible hose that’s long enough to reach your work area without being a constant burden. 3/8-inch diameter is common.
- Fittings and Couplers: You’ll need the correct fittings to connect the hose to the compressor and the nailer.
- Air Tool Oil: Some pneumatic nailers require a few drops of oil periodically to keep the internal mechanisms lubricated. Check your manual!
For All Nailer Types:
- Safety Glasses: This is non-negotiable. Always wear safety glasses that meet ANSI Z87.1 standards to protect your eyes from flying debris or nail fragments.
- Hearing Protection: Nail guns are loud. Earplugs or earmuffs are essential for protecting your hearing, especially during prolonged use.
- Gloves: Work gloves protect your hands from splinters and provide a better grip on the tool.
- Framing Nails: You’ll need a supply of the correct size and type of nails for your specific nailer (e.g., 21-degree plastic collated nails, 30-degree wire collated nails). Always use nails designed for your nailer to avoid damage or jams.
- Carry Case: Most nailers come with a case, which is great for protecting the tool and keeping it organized.
You can find a comprehensive guide on portable air compressors from the U.S. Department of Energy, which discusses efficiency and usage, touching on the importance of proper tool selection and maintenance.
How To Use a Framing Nailer Safely and Effectively
Operating a framing nailer is straightforward, but safety and proper technique are paramount. Think of it as respecting the power of the tool. Here’s a step-by-step guide to get you going:
Step 1: Preparation is Key
- Read the Manual: Seriously, every nailer is a little different. Take a few minutes to read your owner’s manual.
- Inspect Your Nailer: Check for any damage, loose parts, or debris. Ensure the magazine is clean.
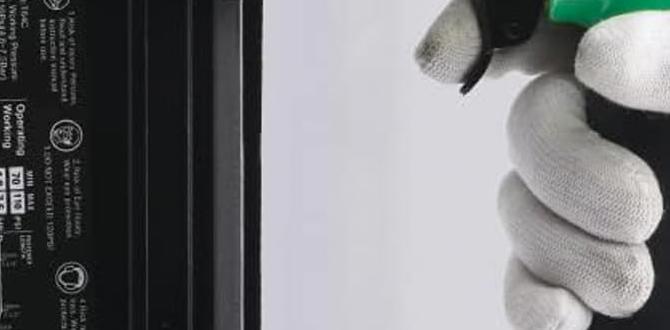
- Connect to Power:
- Pneumatic: Ensure your compressor is filled with air and set to the correct PSI (pounds per square inch). Most framing nailers operate between 70-120 PSI. Connect your air hose securely.
- Electric/Cordless: Ensure batteries are charged or that you have a clear path to an outlet and your extension cord is in good condition.
- Load Nails: Open the nail magazine (usually by pulling back a spring-loaded sled) and insert a strip of the correct nails. Ensure they are seated properly. Close the magazine securely.
- Wear Your Safety Gear: Put on your safety glasses and hearing protection.
Step 2: Setting Up Your Workpiece
- Position Lumber: Arrange the pieces of lumber you intend to join. Ensure they are stable and won’t move when you fire the nailer.
- Check for Obstructions: Make sure there are no hidden wires, pipes, or other materials within the lumber that could be hit.
Step 3: Operating the Nailer
Crucial Safety Note: Never point the nailer at yourself or anyone else. Never engage the trigger without the nose of the nailer pressed firmly against a solid surface.
- Selector Switch (if applicable): If your nailer has a mode selector for sequential or contact fire, set it to your desired mode. For precision work or when starting out, sequential fire is recommended. For faster framing, contact fire can be used once you’re comfortable.
- Position the Nailer: Place the nose of the nailer firmly against the wood where you want the nail to go. Ensure the contact tip (firing mechanism) is flush with the surface.
- Drive the Nail:
- Sequential Mode: Press the nose against the wood, then pull the trigger.
- Contact Mode: Hold the trigger down, then press the nose against the wood. The nail will fire as soon as contact is made.
- Relocate and Repeat: Lift the nailer, reposition it for the next fastener, and repeat the process.
Step 4: Depth Adjustment
Most nailers have a depth adjustment dial or mechanism. Practice on scrap wood first. If nails are not driven deep enough, increase the depth (or air pressure if applicable). If they are overdriven and burying themselves too deep into the wood, decrease the depth.
Step 5: Clearing Jams
If a nail jams, release the trigger, disconnect the air hose (for pneumatic) or remove the battery (for cordless), and follow your manual’s instructions for tool-free jam clearing. This usually involves opening a small access port on the nose of the tool.
Step 6: Storage and Maintenance
- Disconnect Power: Always disconnect the air hose or battery before storing or performing maintenance.
- Empty the Magazine: Remove any remaining nails.
- Clean the Tool: Wipe down the exterior with a damp cloth.
- Lubricate (Pneumatic): If your model requires it, add a few drops of air tool oil.
- Store Safely: Store the nailer in its case in a dry place.
Tips for Maximizing Your Framing Nailer’s Performance
Once you’ve got the basics down, a few tricks can make your framing nailer work even better:
- Use the Right Nails: This can’t be stressed enough. Using incompatible nails is the fastest way to damage your tool and create dangerous jams.
- Maintain Proper Air Pressure (Pneumatic): Too little pressure, and nails won’t sink fully. Too much, and you risk damaging the wood or the nailer. Consult your nailer’s manual for recommended PSI ranges. The Occupational Safety and Health Administration (OSHA) provides guidelines related to power-actuated tools, emphasizing safe operating pressures and procedures.
- Keep the Nose Clean: Wood dust and debris can build up, affecting how the tool sits against the surface and potentially causing jams.
- Angle for Access: Use the collation angle to your advantage. A 30-34 degree nailer is fantastic for toenailing (driving nails at an angle into the end of a stud) and getting into tight spots.
- Don’t Force It: If a nail isn’t sinking, check your air pressure or depth adjustment before assuming the tool is failing.
- Bump Fire Control: If using contact fire, practice smooth trigger control. Don’t “ride” the trigger; press it once to enable firing and then let the contact action do its job for subsequent nails. This prevents over-penetration or unintended nail placement.
- Regular Maintenance: Follow your manufacturer’s maintenance schedule. A little care goes a long way in ensuring your tool performs reliably for years.
Common Framing Nailer Problems and How to Fix Them
<