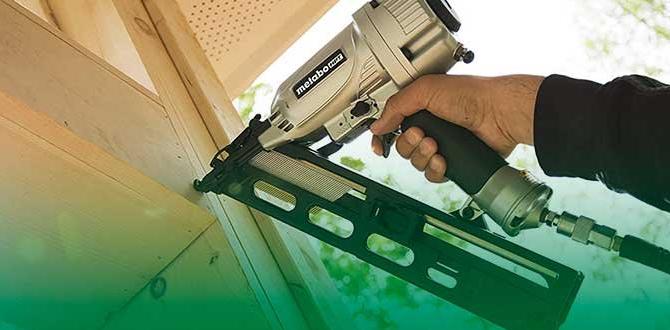
Have you ever used a finish nailer? It’s a tool that helps you join pieces of wood quickly. Many people wonder about headless pin nails because they seem different than regular nails. What makes them special?
Imagine building a birdhouse. You want it to look perfect. You don’t want to see any big nail heads on the outside. This is where headless pin nails come in handy. They hide away, leaving a clean look. Isn’t that cool?
These tiny nails may be small, but they pack a punch! They hold things together well without ruining your project’s beauty. As we explore headless pin nails, you’ll learn how they can change your woodworking game. Are you ready to discover their secrets?
Table of Contents
Complete Guide To Finish Nailer Headless Pin Nails Use

Understanding Finish Nailer Headless Pin Nails
Finish nailer headless pin nails are essential for precise woodworking. These tiny nails have no heads, making them nearly invisible in projects. They are perfect for attaching delicate trims and moldings. Have you ever tried to hide a nail? This type guarantees a clean look! The finish nailer makes driving these pins easy and fast. When woodworking, using headless pins helps achieve a professional finish without extra sanding or filling. Isn’t that handy?What are Finish Nailers?
Definition and purpose of finish nailers in woodworking and construction. Comparison with other types of nail guns.Finish nailers are handy tools that shoot small nails into wood. They help join pieces together neatly, making projects look great. Unlike other nail guns, like framing nailers, finish nailers use headless pin nails, which are tiny and hide well. This means no big holes in your beautiful woodwork! Plus, they are lighter and easier to handle. Just think of them as the superhero of nail guns—always zipping in and saving the day!
| Type of Nail Gun | Best For | Nail Size |
|---|---|---|
| Finish Nailer | Trim and molding | 1.25″ to 2.5″ |
| Framing Nailer | Building structures | 2″ to 3.5″ |
| Brad Nailer | Thin moldings | 5/8″ to 2″ |
Understanding Headless Pin Nails
Characteristics of headless pin nails. Benefits of using headless pin nails over traditional nails.Headless pin nails are small and thin. They don’t have a visible head, making them perfect for finish work. These nails blend into your project, leaving a clean look. They are great for delicate materials like trim and molding. Here are some benefits:
- Less damage: They cause minimal splitting in wood.
- Easy to hide: No nail heads mean no extra filling needed.
- Smoother finish: They provide a neat and tidy end look.
- Strong hold: They still grip well, keeping everything together.
Using headless pin nails can elevate your work. They let your creativity shine without distracting from your project!
What are the advantages of using headless pin nails?
Headless pin nails are excellent for a clean finish. They provide great strength without showing nail heads. This keeps your projects looking neat and professional. They are often preferred for fine woodworking and crafting.
Applications of Finish Nailers with Headless Pin Nails
Common uses in woodworking projects. Advantages in furniture assembly and trim work.Finish nailers with headless pin nails are great tools for many woodworking projects. They are perfect for adding small pieces smoothly. You can use them for:
- Crafting fine furniture
- Trimming edges in homes
- Joining delicate moldings
These nails leave tiny holes, making them hard to see. This helps furniture look neat. They hold parts together tightly, ensuring solid builds. Using a finish nailer speeds up work and improves results. With these tools, your projects will shine!
What are the main benefits of using finish nailers with headless pin nails?
They create strong and clean joins without visible nail heads. This means you can focus on your design without distractions. They save time and help your work look professional.
Choosing the Right Finish Nailer for Headless Pin Nails
Key features to consider (depth adjustment, fire mode). Recommendations based on project types.Picking the right finish nailer for headless pin nails is crucial to your success. First, look for depth adjustment. This feature lets you control how far the nail goes in, preventing damage to your projects. Then, check the fire mode. Some nailers are single-fire, while others can shoot multiple nails quickly. For small projects like trim work, a lighter nailer is best. Heavy-duty tasks may need a more robust option. Think of it this way: you wouldn’t use a butter knife to cut a steak!
| Project Type | Recommended Nailers |
|---|---|
| Trim Work | Lightweight Nailer |
| Furniture Assembly | Medium-Duty Nailer |
| Heavy-Duty Tasks | Heavy-Duty Nailer |
How to Properly Use a Finish Nailer with Headless Pin Nails
Stepbystep guide on loading and operating the tool. Safety precautions to follow when using the nailer.Using a finish nailer with headless pin nails is simple. Here’s how to do it:
- First, read the manual for specific details.
- Load the nails into the magazine by sliding them in carefully.
- Set the nailer to the correct depth.
- Test on scrap wood before starting your project.
- Press the nozzle against the surface and pull the trigger.
Always remember safety. Wear goggles to protect your eyes. Use gloves to avoid cuts. Keep fingers away from the firing area. Finally, never point the tool at anyone.
What are the best safety tips for using a finish nailer?
Always wear eye protection and gloves. Keep hands clear of the nail area and avoid distractions.
Maintenance Tips for Finish Nailers
Regular maintenance practices to prolong the life of the tool. Troubleshooting common issues with finish nailers.Taking care of your finish nailer can make it last longer and work better. First, always clean it after use to keep dust bunnies away. Check the air filter often; a dirty filter is like a stuffy nose! If you hear weird noises, it might be time for some oil. Also, keep an eye on the nails—using the right size matters. To help you out, here’s a quick troubleshooting table:
| Issue | Solution |
|---|---|
| Misfiring | Check the air pressure and nail size. |
| Jams | Look for stuck nails and clean the chamber. |
| No power | Inspect the connections and air supply. |
Remember, a happy nailer means happy projects. So, treat it well, and it will treat you like a superstar!
Buying Guide for Finish Nailers and Headless Pin Nails
Where to purchase quality tools and nails. Price ranges to expect for different brands and models.Finding quality tools like finish nailers and headless pin nails is important. You can check online stores like Amazon or local hardware shops for the best selection. Always look for brands known for their reliability. Prices can vary, but budget around $50 to $200, depending on the brand and features. High-end models may cost more, but they often last longer. Don’t break the bank; remember, even tools need a “snappy” personality!
| Brand | Price Range |
|---|---|
| DeWalt | $100 – $200 |
| Ryobi | $50 – $150 |
| Bostitch | $70 – $180 |
| Makita | $150 – $300 |
Remember to compare prices before buying. It can save you a few bucks. Shop smart and nail it!
Reviews of Top Finish Nailers for Headless Pin Nails
Comprehensive reviews of popular models in the market. Comparison of features, performance, and user feedback.Choosing the right finish nailer for headless pin nails is essential. Many models are popular among users. These tools vary in features, performance, and user ratings. Here’s what you need to know:
- Model A: Great ergonomics and lightweight design, making it easy to handle.
- Model B: High power for tough materials, but a bit heavier.
- Model C: Battery-operated for convenience, but charges take time.
User feedback shows that many prefer models with reliable power and easy maintenance. Features like adjustable depth and quick jam clearing are also loved. These factors help you find the best tool for your needs.
What features do I need to look for in a finish nailer?
Look for adjustable depth control, lightweight design, and fast jam clearing. These features make your work easier and more efficient.
Frequently Asked Questions (FAQs)
Common inquiries regarding finish nailers and headless pin nails. Expert answers and tips to enhance user understanding.Many users wonder about finish nailers and headless pin nails. Here are some common questions that often arise:
What is a finish nailer used for?
A finish nailer is used to attach trim and moldings. It gives a clean look to your projects.
How do headless pin nails differ from regular nails?
Headless pin nails are tiny and do not have a head. This makes them almost invisible in the finished work.
Can I use headless pin nails in any finish nailer?
No, headless pin nails require a specific type of nailer designed for them. Always check the tool’s specifications.
Tips for Using Finish Nailers:
- Always wear eye protection.
- Test on scrap wood first.
- Keep the nailer clean and well-maintained.
Conclusion
In summary, headless pin nails are great for finish nailers. They are small and leave little to no mark. You can use them for delicate projects, like trim and crafts. They deliver a strong hold without damaging your materials. If you want to learn more, check out tutorials online or visit your local hardware store for tips!FAQs
Sure! Here Are Five Related Questions On The Topic Of Finish Nailers And Headless Pin Nails:Sure! A finish nailer is a tool that helps you put nails into wood. It’s great for attaching pieces together. Headless pin nails are very small nails without a big head. They are used for delicate work, like making furniture. With these tools, you can create strong and pretty projects easily!
Sure! Please provide the question you want me to answer.
What Are The Key Differences Between Headless Pin Nails And Traditional Finish Nails In Terms Of Application And Hold?Headless pin nails and traditional finish nails are different in how they work. Headless pin nails are very small and don’t have a big head. You use them for tiny jobs where you don’t want nail heads to show. Traditional finish nails are bigger with a head, so they hold more tightly. We use finish nails for bigger jobs when we need strong support.
What Types Of Materials Are Best Suited For Fastening With A Headless Pin Nailer?A headless pin nailer works best on thin materials. You can use it on wood, like small trim or craft projects. It also works well with plywood and some soft plastics. This tool is great when you want to keep the nail hidden.
How Do You Adjust The Depth Setting On A Finish Nailer When Using Headless Pin Nails For Delicate Projects?To adjust the depth on a finish nailer, first find the depth control knob. Turn it to make the nails go deeper or shallower. For delicate projects with headless pin nails, you usually want it shallower so the pins don’t go too far in. Test it on a scrap piece before using it on your project. This way, you can make sure it works just right!
What Safety Precautions Should Be Taken When Using A Headless Pin Nailer?When you use a headless pin nailer, always wear safety goggles to protect your eyes. Keep your hands clear of the nailer’s path. Make sure you have a firm grip on the tool. Check that the nailer is not jammed before you use it. Finally, never point it at anyone.
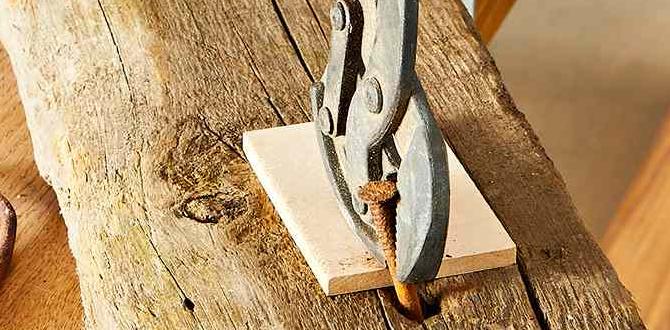
Can Headless Pin Nails Be Removed Easily If Adjustments Are Needed, And What Techniques Should Be Used For Removal?Yes, headless pin nails can be removed, but it takes some care. You can use a pair of pliers to grip the nail and pull it out. If it’s stuck, try using a thin flat tool, like a putty knife, to help pry it out gently. Be careful not to damage the wood around the nail while you work.
{“@context”:”https://schema.org”,”@type”: “FAQPage”,”mainEntity”:[{“@type”: “Question”,”name”: “Sure! Here Are Five Related Questions On The Topic Of Finish Nailers And Headless Pin Nails:”,”acceptedAnswer”: {“@type”: “Answer”,”text”: “Sure! A finish nailer is a tool that helps you put nails into wood. It’s great for attaching pieces together. Headless pin nails are very small nails without a big head. They are used for delicate work, like making furniture. With these tools, you can create strong and pretty projects easily!”}},{“@type”: “Question”,”name”: “”,”acceptedAnswer”: {“@type”: “Answer”,”text”: “Sure! Please provide the question you want me to answer.”}},{“@type”: “Question”,”name”: “What Are The Key Differences Between Headless Pin Nails And Traditional Finish Nails In Terms Of Application And Hold?”,”acceptedAnswer”: {“@type”: “Answer”,”text”: “Headless pin nails and traditional finish nails are different in how they work. Headless pin nails are very small and don’t have a big head. You use them for tiny jobs where you don’t want nail heads to show. Traditional finish nails are bigger with a head, so they hold more tightly. We use finish nails for bigger jobs when we need strong support.”}},{“@type”: “Question”,”name”: “What Types Of Materials Are Best Suited For Fastening With A Headless Pin Nailer?”,”acceptedAnswer”: {“@type”: “Answer”,”text”: “A headless pin nailer works best on thin materials. You can use it on wood, like small trim or craft projects. It also works well with plywood and some soft plastics. This tool is great when you want to keep the nail hidden.”}},{“@type”: “Question”,”name”: “How Do You Adjust The Depth Setting On A Finish Nailer When Using Headless Pin Nails For Delicate Projects?”,”acceptedAnswer”: {“@type”: “Answer”,”text”: “To adjust the depth on a finish nailer, first find the depth control knob. Turn it to make the nails go deeper or shallower. For delicate projects with headless pin nails, you usually want it shallower so the pins don’t go too far in. Test it on a scrap piece before using it on your project. This way, you can make sure it works just right!”}},{“@type”: “Question”,”name”: “What Safety Precautions Should Be Taken When Using A Headless Pin Nailer?”,”acceptedAnswer”: {“@type”: “Answer”,”text”: “When you use a headless pin nailer, always wear safety goggles to protect your eyes. Keep your hands clear of the nailer’s path. Make sure you have a firm grip on the tool. Check that the nailer is not jammed before you use it. Finally, never point it at anyone.”}},{“@type”: “Question”,”name”: “Can Headless Pin Nails Be Removed Easily If Adjustments Are Needed, And What Techniques Should Be Used For Removal?”,”acceptedAnswer”: {“@type”: “Answer”,”text”: “Yes, headless pin nails can be removed, but it takes some care. You can use a pair of pliers to grip the nail and pull it out. If it’s stuck, try using a thin flat tool, like a putty knife, to help pry it out gently. Be careful not to damage the wood around the nail while you work.”}}]}