Quick Summary: Driving nails at corners requires precision and the right technique to avoid splitting wood or creating an uneven joint. This guide offers essential tips for beginners, covering tool selection, proper nail placement, common challenges, and safety to ensure strong, professional-looking corner joints every time.
Hey there, DIYers! Jack Shaffer here from Nailerguy. We’ve all been there: you’re working on a project, maybe building a simple frame or assembling some trim, and you reach that tricky corner. Driving a nail perfectly straight where two pieces of wood meet can feel like a bit of a puzzle, right? Sometimes it feels like the nail just wants to go wherever it pleases, or worse, split the delicate edge of your wood. But don’t sweat it! Getting those corner nails right is totally achievable, even if you’re just starting out. We’re going to walk through it step-by-step, making sure you feel confident and end up with solid, good-looking joints. Let’s get those corners looking sharp!
Table of Contents
Why Driving Nails at Corners Can Be Tricky (And How We’ll Fix It!)
Corners are where woodworking magic happens, but they’re also where mistakes can become really obvious. When you’re trying to join two pieces of wood at a right angle, or even a different angle, the grain of the wood can fight back. Nails can easily veer off course, creating gaps or pushing the wood apart. And nobody wants to see a nail head sticking out awkwardly or witness a beautiful piece of lumber split right at the seam. It’s a common frustration, but with a few key techniques and the right approach, you can conquer any corner. We’ll cover everything from choosing the right nail to preparing your wood and mastering the art of the perfect nail placement. You’ll be driving nails into corners like a pro in no time!
Essential Tools for Corner Nailing Success
Before we start hammering, let’s make sure you have the right crew of tools ready. The “perfect nail” is really about the right nail for the job, and that starts with how you plan to drive it. For beginners, using a nail gun can make a world of difference in speed and accuracy. However, traditional hammers are still fantastic and require great skill. We’ll cover both!
Hammering Your Way to Great-Looking Corners
If you’re going the traditional route with a hammer, here’s what you’ll need:
- A Good Quality Hammer: For general woodworking, a claw hammer around 16-20 ounces is a good all-around choice. Look for one with a comfortable, non-slip grip.
- The Right Nails: This is crucial. For corners, especially in softer woods or near edges, brad nails or finish nails are often best. Their smaller diameter means they are less likely to split the wood. Nails that are too long will poke through the other side, and nails that are too thick are a recipe for splitting.
- Workbench or Stable Surface: Ensure your project is securely held down so it doesn’t move while you’re swinging.
- Safety Glasses: Always, always wear these! Flying nail fragments or wood slivers are no joke.
- Clamps: Holding pieces of wood securely in place is vital for accurate nailing.
Nail Gun Options: Speed and Precision
Nail guns can be a game-changer, especially for repetitive tasks or when you want maximum precision with minimal effort. The key is choosing the right type:
- Brad Nailer: These are fantastic for trim work and smaller projects. They use thin, short nails (often called brads) that leave very small holes, making them easy to fill. They are excellent for corners where you want a clean look.
- Finish Nailer: Similar to brad nailers but use slightly thicker and longer nails. Good for attaching heavier trim or parts of a frame where you need a bit more holding power, but still want a relatively clean finish.
- Framing Nailer: These are for heavy-duty construction like building wall frames. They use much larger nails and are generally overkill for intricate corner work on furniture or trim.
For driving nails at corners on most DIY projects, a brad nailer or a small finish nailer is usually your best bet. They offer enough power without being overly aggressive, giving you great control.
Before You Drive the First Nail: Preparation is Key
Skipping the prep work is like trying to build a house on sand – it won’t end well. Taking a few extra moments now will save you a lot of headaches, and potentially, some repair work later.
1. Measure Twice, Nail Once
It sounds cliché, but it’s the golden rule of DIY. Double-checking your measurements and the fit of your pieces at the corner ensures they are perfectly aligned before you even pick up a nail. A slight misalignment can make driving nails at a corner incredibly difficult and result in a weak or unsightly joint.
2. Position Your Workpiece Correctly
Whether you’re using a hammer or a nail gun, your workpiece needs to be stable. Clamp it down to a workbench or sawhorses. Use clamps to hold the two pieces of wood firmly together at the corner. This prevents movement, which is crucial for accuracy. For tricky angles, consider using a corner clamp or a miter box. A miter box can help guide your cuts for perfect angles, making the nailing part much easier.
3. Pre-Drilling (Especially for Hardwoods or Near Edges)
This is a lifesaver! Driving a nail directly into the end grain or close to the edge of hardwood can almost guarantee a split. Pre-drilling a small pilot hole that’s slightly smaller than the diameter of your nail can relieve the pressure on the wood fibers. This makes driving the nail much smoother and prevents splitting. For softer woods, you might be able to skip this for smaller nails, but it’s always a good practice to consider, especially when working near an edge.
To pre-drill properly:
- Choose a drill bit that is about 70-80% the diameter of your nail shaft.
- Drill to the depth of your nail (or slightly more).
- Drill straight to ensure the nail will also go in straight.
4. Mark Your Nail Placement
Don’t just wing it! Use a pencil to mark exactly where you want each nail to go. For corners, aim to place nails slightly in from the edge of the face you’re nailing into, but not so far that they won’t have enough material to hold onto. For a typical butt joint where one piece butts up against the end of another, you’ll be nailing into the end grain. For a miter joint, you’ll be nailing at an angle through the mitered edges. More on placement in the next section!
The Art of Nail Placement: Where to Hit for the Best Hold
This is where the magic happens. Where you place the nail is just as important as how you drive it.
For Butt Joints (Where one piece meets the end of another)
This is common when building simple boxes or frames. You’re essentially nailing into the end grain of one piece with the face of another.
- Nail Depth: Don’t nail too close to the edge of the piece you’re nailing into. Aim for about 1/2 inch to 3/4 inch in from the side edge. If you go too close, you risk splitting the end grain, which doesn’t hold nails well.
- Nail Spacing: Space your nails about 1-2 inches apart, depending on the size of the workpiece and the strength required.
- Nail Angle: Try to drive the nail straight down into the end grain. If you’re using a nail gun, a slight angle might be needed to keep from blowing out the opposite side, but aim for as close to 90 degrees as possible for maximum holding power.
For Miter Joints (Angled corners, like in picture frames)
Miter joints are popular because they look clean, but they can be trickier to nail. You’re nailing through the angled face of one piece into the angled face of the other.
- Nail Angle: This is the biggest consideration. When using a hammer, you’ll want to strike the nail slightly angled to match the miter. If using a nail gun, you might need to adjust the angle based on the thickness of your material and the nailer’s power. Often, nailing at about a 45-degree angle works well, but you might need to experiment. For a 45-degree miter, the nail might enter the face of the wood and exit at a corresponding angle into the mating piece.
- Nail Length: Ensure your nails are long enough to go through one piece of wood and into the second piece for a good hold, but not so long that they poke out the other side. For a 3/4 inch thick piece, a 1 1/4 inch or 1 1/2 inch nail might be appropriate.
- Pilot Holes are Crucial: Due to the angle and the grain, pre-drilling is almost always recommended for miter joints, especially in hardwoods.
- Reinforcement: For stronger miter joints, consider using wood glue in addition to nails. You can also use specialized corner clamps or even a block of wood strategically placed to help drive nails at the correct angle.
A great resource for understanding wood joints and fasteners is WoodworkingTalk.com, a community of woodworkers sharing practical advice.
How to Drive Nails at Corners: Step-by-Step Guides
Let’s get down to the hands-on part. Here’s how to do it with both a hammer and a nail gun.
Method 1: Hammering Nails at Corners
This method requires a steady hand and a bit of practice, but it’s very rewarding!
- Secure Your Materials: Clamp your two pieces of wood firmly together at the corner. Ensure they are flush and aligned perfectly.
- Mark the Spot: Lightly mark where you want your nails to go, considering the placement tips above.
- Start the Nail (The Cap and Toe Technique):
- Hold the nail between your thumb and forefinger.
- Carefully touch the nail point to your desired spot.
- Use the palm of your other hand (your ‘cap’) to hold the nail head steady and tap it gently with the hammer’s face until it stands on its own. This is called ‘capping’ the nail.
- Once the nail is standing upright, remove your fingers!
- Now, use the ‘toe’ of the hammer (the front edge of the head), which gives you more control for precise taps.
- Driving the Nail:
- Swing the hammer with a controlled motion, focusing the impact on the nail head.
- For butt joints, aim to drive the nail straight down.
- For miter joints, angle the hammer slightly to match the angle of the nail.
- Keep your eye on the nail head. Don’t whale away at it; use steady, firm taps.
- Countersinking (Optional but Recommended): If you want a cleaner finish, you can drive the nail head slightly below the surface of the wood. Use the ‘toe’ of the hammer or a nail set tool for this to avoid damaging the wood surface. This creates a small dimple that can be easily filled with wood putty. For a truly professional look, consider using the nail set technique.
- Check for Gaps: Ensure the joint is tight and there are no visible gaps. If there are, you might need to adjust your pieces or consider using a different joining method.
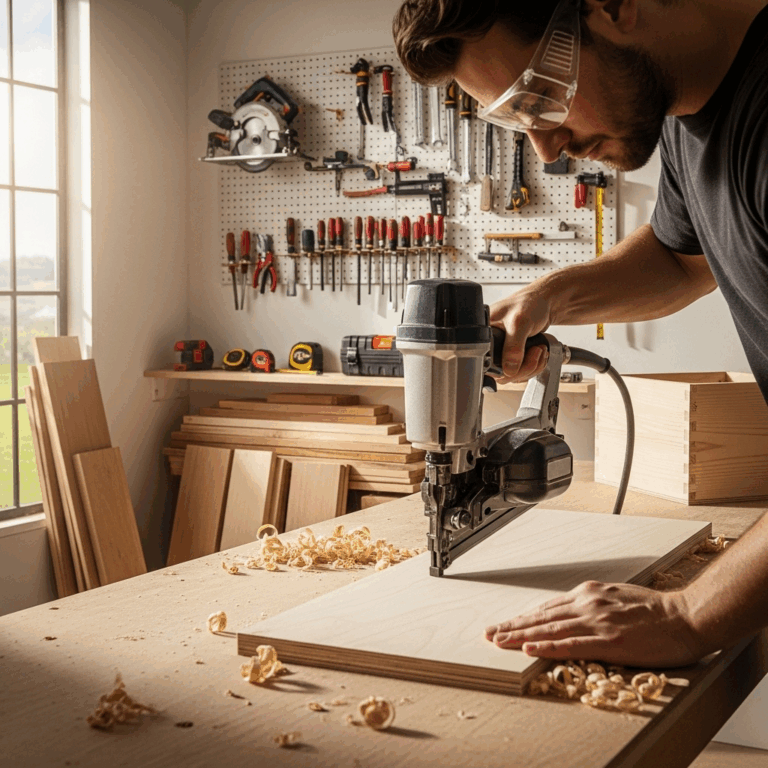
Method 2: Using a Brad or Finish Nailer
Nail guns make this process faster and often more accurate, especially for repetitive tasks.
- Prepare Your Nailer: Load your nailer with the correct size brad or finish nails. Ensure it’s connected to an air compressor (if pneumatic) or has a charged battery (if cordless).
- Secure Your Materials: Just like with a hammer, clamp your wood pieces firmly together at the corner.
- Set Nailer Depth (Most Important Step!): This is critical for preventing over-penetration or splintering. Most nailers have an adjustable depth setting. Start with a lower setting and test fire on a scrap piece of wood. Gradually increase the depth until the nail head is slightly countersunk or flush with the surface, as desired. You don’t want the nail head to pop through the other side or leave the nail standing proud.
- Aim and Fire:
- Position the tip of the nail gun consistently against the wood surface at your marked nail location.
- Press the safety contact tip firmly against the wood.
- Pull the trigger. The nail will fire instantly.
- Nailing at an Angle (for Miter Joints): For miter joints, you may need to angle the nailer slightly to get the nail to enter the second piece of wood effectively. Experiment on scrap to find the best angle. Sometimes, repositioning the nailer so it fires more directly into the face of the mitered piece works well.
- Follow Placement Guidelines: Nailing into end grain (butt joints) is still sensitive. Be mindful of how far in you are placing the nails to avoid blowouts. For thin materials, always consider the nail length and depth setting carefully.
- The Sequential vs. Contact Fire Debate: Most nailers offer two firing modes:
- Sequential Fire: You must press the contact tip to the wood then pull the trigger. This is safer and offers more precision.
- Contact Fire (Bump Fire): You hold the trigger down and bump the contact tip against the wood to fire nails. This is faster but less precise and can lead to accidental firing. For corners, sequential fire is generally recommended until you are very comfortable.
Common Problems and How to Solve Them
Even with the best intentions, you might run into a hiccup or two. Here’s how to deal with them.
Problem 1: Splitting the Wood
Cause: Driving a nail that’s too large, driving too close to an edge, driving into end grain without pre-drilling, or using too much force.
Solution:
- Always pre-drill pilot holes, especially for hardwoods or when nailing near edges.
- Use smaller diameter nails (brads or finish nails).
- Ensure your nails aren’t too long.
- When hammering, use controlled taps instead of forceful blows.
- If using a nail gun, adjust the depth setting to avoid driving the nail too deep and splitting the wood.
- For nail guns, ensure the nailer is not too powerful for the material you’re using.
Problem 2: Nail Won’t Go In Straight
Cause: Hammering with a bent wrist, hitting the nail at an angle, or the wood grain guiding the nail off course.
Solution:
- For hammering, focus on swinging your elbow and shoulder for a straight strike.
- Use the ‘toe’ of the hammer for more controlled, straight taps.
- Pre-drilling can help establish a straight path.
- For nail guns, ensure the gun is held perpendicular to the surface you’re nailing into, unless specifically angling for a miter joint.
- Experiment with slight adjustments to your angle on nail guns.
Problem 3: Nail Doesn’t Drive Fully (Stands Proud)
Cause: Wood is too hard, nail is bent, or not enough driving force applied.
Solution:
- For hammering, ensure you’re using enough force.
- If a nail is slightly proud after hammering, use a nail set to drive it flush or slightly below the surface.
- For nail guns, increase the depth setting or check if the nailer is faulty. Ensure you are pressing the contact tip firmly against the wood.
- If using a hammer and the nail bends, try to carefully pull it out with the claw and start a new nail nearby (or in the same hole if pre-drilled).
Problem 4: Nail Pokes Through the Other Side
Cause: Nail is too long for the thickness of the wood.</p