Have you ever tripped over shoes scattered all around your home? It’s frustrating, right? A DIY shoe bench can help solve that problem and bring a little fun to your space.
Imagine a simple place to sit while putting on shoes and a neat spot for storing them. A shoe bench lets you declutter your entryway and adds charm to your home.
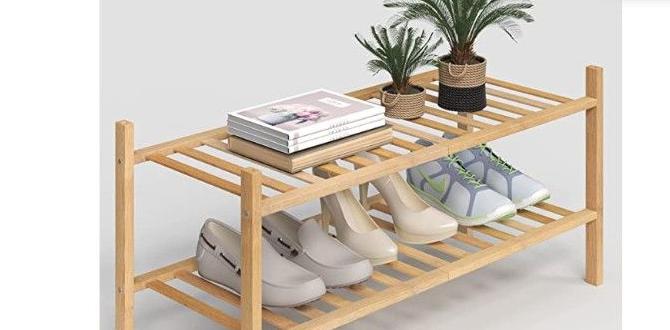
Did you know that a shoe bench isn’t just for shoes? You can use it to hold bags or boxes too! Building your own shoe bench can be easy and rewarding.
This step-by-step guide will show you how to create your very own DIY shoe bench. You’ll learn how to make a useful piece of furniture that fits your style.
So, are you ready to get started? Let’s dive into the world of DIY shoe benches and turn your clutter into a cozy, organized space!
Table of Contents
Diy Shoe Bench: Step-By-Step Guide To Declutter Your Space

DIY Shoe Bench: Step-by-Step Guide to Declutter
Building a DIY shoe bench can transform your entryway. With just a few materials, you can create a stylish and functional piece. Imagine a clutter-free space where shoes are neatly stored. This guide walks you through each step, from choosing the right wood to adding a comfy cushion. You’ll also learn how to personalize your bench to match your home decor. Why not start your project today and enjoy a tidier entrance!Benefits of a DIY Shoe Bench
Creates additional seating in your entryway. Helps organize and declutter shoes.Adding a DIY shoe bench to your entryway is like giving your home a warm hug. First, it creates extra seating, perfect for tying those pesky shoelaces without balancing like a flamingo. Second, it helps you organize and declutter shoes, turning chaos into calm. No more hunting for that missing shoe! Instead, they’ll be neatly tucked away, making your space look like a shoe store, minus the annoying salespeople.
| Benefit | Description |
|---|---|
| Extra Seating | A spot to sit while putting on or taking off shoes. |
| Organization | Helps keep shoes tidy and in one place. |
Materials Needed for Your Shoe Bench
List of essential materials (wood, tools, hardware). Tips on selecting budgetfriendly options.Building a shoe bench is exciting! First, gather the right materials. You will need:
- Wood (like pine or plywood)
- Tools (measure tape, saw, drill)
- Hardware (screws, hinges)
Choose budget-friendly options by visiting local hardware stores or checking online sales. Remember, secondhand wood can also work great! Why spend more when you can save?
What materials do I need for a DIY shoe bench?
You need wood, tools, and hardware.
Step 1: Design Your Shoe Bench
Importance of measuring the space. Sketching your design ideas.Start by measuring your space. This step is key. Measure the area where you want to put your shoe bench. Knowing the size helps you plan well. Next, sketch your design ideas. Use paper to draw what you want. Think about how many shoes to fit. Will it have shelves or drawers? Create a fun, comfortable design. This way, your shoe bench will look great and meet your needs!
Why is measuring important?
Measuring your space ensures your shoe bench fits perfectly. A bench that is too big or small can make your area look cluttered. It’s all about balance!
Tips for sketching your design:
- Use basic shapes.
- Think of storage space.
- Keep it simple and fun!
Step 2: Cutting the Wood
Detailed instructions on measuring and cutting. Safety tips for using saws.Start by measuring your wood carefully. Use a tape measure and mark where to cut. Remember, measure twice, cut once! No one wants a bench that’s the size of a doghouse. Next, grab your saw. Safety first! Always wear goggles to protect your eyes and gloves for your hands. A wise person once said: “Safety is no accident!”
| Measurement (inches) | Piece |
|---|---|
| 36” | Top of the Bench |
| 18” | Side Supports |
| 12” | Legs |
With your trusty saw, cut along the lines you marked. Let the saw do the work—no pushing or pulling! Once you finish, your pieces should fit together like puzzle pieces. Now you are one step closer to that shoe bench! Happy cutting!
Step 3: Assembling the Shoe Bench
Stepbystep assembly instructions. Tips for ensuring stability and durability.Time to create your shoe bench! Start by laying out all your pieces like a puzzle. Grab your screws, a drill, and follow your plans step by step. A little tip: Tighten everything well so your bench doesn’t wobble like a penguin on ice! For extra durability, consider using wood glue on the joints. Remember, nobody wants a shoe bench that collapses at the first pair of sneakers! Here’s a handy table to keep track of your assembly steps:
| Step | Action |
|---|---|
| 1 | Attach the bench top to the side panels. |
| 2 | Add legs securely and double-check. |
| 3 | Fasten the bottom shelf for shoe storage. |
And just like that, you have your shoe bench ready. Now, let’s pile those shoes and celebrate your handy skills!
Step 4: Sanding and Finishing Touches
Importance of sanding for a smooth finish. Options for paint or stain to personalize.Sanding your shoe bench is super important. It makes everything smooth and ready for looks! You don’t want splinters poking your feet, right? So grab some sandpaper and go to town. It’s like giving your bench a nice spa day!
Once you’re done sanding, it’s time for the fun part—choosing paint or stain! You can pick colors that match your style or even make a rainbow bench if you’re feeling wild! 🎨 Here’s a quick look at your options:
| Finish Type | Description |
|---|---|
| Paint | Bright, fun colors! Perfect for a pop of personality. |
| Stain | Enhances wood grain for a natural look. Classy and timeless. |
Remember, a little effort in sanding and finishing can make your bench sparkle! 🌟 Plus, everyone will ask where you got it. You can proudly say, “I made it!”
Step 5: Adding Functional Features
Ideas for integrations like storage bins or hooks. Creative ways to enhance organization.Once you’ve built your shoe bench, it’s time to level up! Consider adding storage bins underneath. They’re perfect for hiding away those runaway socks or stray dog toys. Hooks are another smart addition. Hang your favorite hats or bags for easy access. Want to keep your space looking stylish? Use colorful bins to add a pop of fun. Here’s how your setup could look:
| Feature | Purpose |
|---|---|
| Storage Bins | Hide clutter and organize small items. |
| Hooks | Hang bags, hats, and more for quick grab-and-go. |
Fun fact: Keeping your space organized can save you around 10 minutes a day! So, let’s get creative and make that shoe bench work hard for you!
Maintaining Your DIY Shoe Bench
Best practices for cleaning and upkeep. Tips for ensuring longevity of materials.To keep your shoe bench looking new, regular cleaning is key. Wipe it down with a damp cloth once a week. Be gentle on wood. Avoid harsh cleaners that can harm the finish. For metal parts, use a mild soap solution.
To make sure your bench lasts:
- Place it in a dry area to prevent moisture damage.
- Avoid overloading it with weight.
- Check for scratches and touch up paint as needed.
With care, your DIY shoe bench can stay neat and sturdy for years!
How do I clean my shoe bench?
Use a damp cloth and mild soap. Wipe away dirt and dust weekly to maintain its shine.
How can I protect my DIY shoe bench?
- Avoid excessive moisture. Keep it dry.
- Don’t overload it. Weight can strain the materials.
Inspiration for Custom Designs
Showcase of unique DIY shoe bench designs. Links to additional resources for ideas.Looking for fresh ideas? Check out these fun DIY shoe bench designs! Build a rustic wooden bench with hooks for hats or a colorful bench with storage baskets. Each design adds a personal touch to your home.
- Rustic Wooden Bench with Hooks
- Colorful Bench with Storage Baskets
- Minimalist Design for Small Spaces
- Eco-friendly Pallet Bench
Need more inspiration? Visit sites like Pinterest and DIY blogs. They offer plenty of photos and step-by-step guides!
What are some creative DIY shoe bench designs?
Here are **a few unique ideas**: A storage bench with a cushion, a two-tier shoe holder, or a bench that doubles as a planter. Each design can spark your creativity!
Conclusion
In conclusion, creating your DIY shoe bench helps declutter your space. You can easily organize shoes while adding style to your home. Follow the step-by-step guide to start building today. Remember to measure your space and choose materials wisely. We encourage you to explore more DIY projects for a fun experience. Let’s get crafting!FAQs
Sure! Here Are Five Related Questions On The Topic Of Diy Shoe Benches And Decluttering:Sure! Here are five questions we might ask about DIY shoe benches and decluttering: 1. What can we use to make a shoe bench? 2. How do we keep our shoes organized? 3. Why is it important to declutter our space? 4. What tools do you need for a DIY project? 5. How can we make our home look nicer with a shoe bench? Feel free to choose one question, and I’d be happy to help answer it!
Sure! Please share the question you’d like me to answer, and I’ll do my best to help.
What Materials Do I Need To Build A Diy Shoe Bench For My Entryway?To build a DIY shoe bench, you will need some wood boards. Get screws to hold everything together. You might want sandpaper to smooth the wood. Don’t forget paint or stain to make it look nice. Finally, grab a cushion for comfort when you sit.
How Can I Customize My Shoe Bench Design To Fit The Style Of My Home Decor?You can customize your shoe bench by changing its color. Paint it a shade that matches your room. You could also add cushions for comfort. If you like wood, choose a natural or painted wood finish. Lastly, add special decorations like baskets or hooks to make it unique!
What Are Some Creative Storage Solutions I Can Incorporate Into My Shoe Bench To Maximize Space?To make your shoe bench more useful, you can add baskets inside it. These can hold small items like socks or shoehorns. You can also use hooks on the sides for hats or bags. If you want, make a shelf above it for extra shoes. This helps keep everything neat and tidy!
How Do I Maintain And Clean My Diy Shoe Bench To Keep It Looking New?To keep your DIY shoe bench looking new, wipe it down with a damp cloth each week. Use warm soapy water for tougher spots. If you see scratches, touch them up with matching paint. Avoid placing wet shoes directly on it. Finally, check it often for loose screws or parts.
Can A Shoe Bench Also Serve Other Purposes, Such As Seating Or Additional Storage For Other Household Items?Yes, a shoe bench can do many things! You can sit on it when you put on or take off your shoes. It can also hold other items, like bags or toys, for extra storage. This way, it helps keep your space neat and organized!