Have you ever wanted to bring the beauty of nature indoors? Imagine hosting a party or a photo shoot with a stunning birch forest backdrop. It sounds magical, right? Creating a DIY birch forest photo backdrop is easier than you think.
Why choose a birch forest? Birch trees are lovely and white. They bring an airy vibe and look great in pictures. Plus, everyone loves the feeling of being in a peaceful woodland.
Here’s the fun part: you can make this backdrop yourself! All you need are a few supplies and a bit of creativity. Have you ever built something from scratch? It can be so satisfying!
In this article, we will share simple steps and tips to get started. Get ready to impress your friends and family with your amazing DIY skills. Let’s dive in and create your very own birch forest photo backdrop!
Table of Contents
Create A Stunning Diy Birch Forest Photo Backdrop
Creating a DIY birch forest photo backdrop can transform any space into a magical scene. Imagine a woodland getaway at your next party or event! This project is simple and budget-friendly. Using materials like brown paper, scissors, and glue, you can capture the charm of a birch forest easily. Adding branches and leaves enhances the look. Did you know that such backdrops are perfect for photos that stand out? Enjoy a creative experience while crafting unforgettable memories!
Understanding the Aesthetic Appeal of Birch Forests
Explore the natural beauty and tranquility of birch forests.. Discuss how birch trees contribute to a serene atmosphere for photography..
Birch forests are stunning places filled with peaceful beauty. The white bark of birch trees stands tall and bright against the green leaves. This makes them a great backdrop for photos. The soft rustle of leaves creates a calm sound, adding to the serene feeling. Here are a few reasons why birch forests are special:
- Tranquility: They provide a quiet space for relaxation.
- Naturally Beautiful: The unique color of birch trees catches the eye.
- Perfect Lighting: Sunlight filters softly through the branches.
Birch trees create an enchanting scene, ideal for capturing beautiful moments in photography.
Why Choose Birch Forests for Photos?
Birch forests offer natural beauty and calmness. Their bright bark and gentle surroundings can make any photo special.
Materials Needed for Your Birch Forest Backdrop
List essential materials including birch logs, fabric, and tools.. Suggestions for sourcing materials affordably and sustainably..
To create your birch forest backdrop, you need some simple materials. Gather these essentials:
- Birch logs: Use small, real or faux logs for an authentic look.
- Fabric: Light green or white fabric creates a nice sky effect.
- Tools: Have tape, scissors, and a stapler ready to hold everything.
Check local craft stores for deals, or look online for affordable options. You can also find items at thrift stores, which helps keep costs down and the planet happy.
Where can you find birch logs sustainably?
Look for fallen branches in parks or forest areas near you. They often allow collection. Also, check if your friends have extra logs from yard work. That’s a great way to reuse!
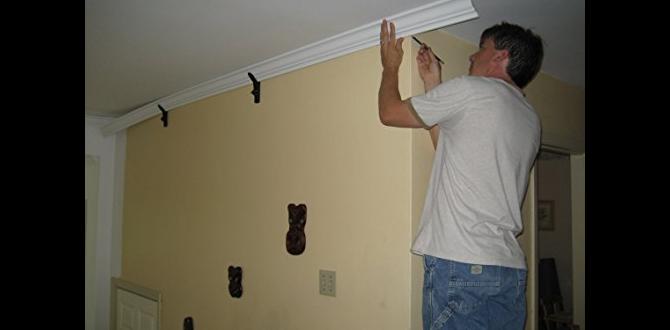
Step-by-Step Guide to Building Your Birch Forest Backdrop
Detailed instructions on constructing the frame and backdrop.. Tips for creating realistic textures and colors..
Building your birch forest backdrop is like crafting a tree house – fun and a little messy! Start by making a sturdy frame. Use wood or PVC pipes for a strong base. Next, cover it with fabric or cardboard painted to resemble birch trees. For a realistic look, add texture by crumpling paper or using sponges for the bark. Colors matter too! Use white, gray, and a hint of brown.
| Step | Materials | Tip |
|---|---|---|
| Frame | Wood or PVC | Make it sturdy! |
| Backdrop | Fabric/Cardboard | Crumple for texture! |
| Paint | White, Gray, Brown | Mix shades! |
After all, nobody likes a flat backdrop. Add some cute touches like artificial leaves or woodland critters, and voilà! You have a magical birch forest ready for photos. Who knew crafting could be this enchanting?
Creative Ways to Enhance Your Birch Forest Backdrop
Ideas for adding props and accents to enrich the backdrop.. Lighting techniques to create the perfect ambiance..
Make your birch forest backdrop extra special with fun props and clever lighting. Add things like colorful flowers, cute lanterns, or cozy blankets. These will bring warmth and joy to your scene. For lighting, try using fairy lights to create a magical glow. Here are some more ideas:
- Framed pictures of nature.
- Wooden signs with friendly messages.
- Soft, flowing fabrics to mimic leaves.
These touches can make your backdrop come alive!
How can I make my backdrop more interesting?
You can enhance your backdrop by using unique props like fairy lights and natural elements such as pinecones or stones. Adding personal items makes it inviting and fun!
Photography Tips for Capturing the Best Photos
Camera settings and techniques for photographing with the backdrop.. Composition tips to highlight the backdrop’s features..
Using the right camera settings is key for taking great photos with your DIY birch forest photo backdrop. Start with a low ISO setting for clear images. Use a wide aperture, like f/2.8, to make the backdrop stand out. Focus on your subject to blur the background slightly. Remember these composition tips:
- Position your subject off-center to add interest.
- Capture the natural lines of the birch trees.
- Use natural light for a soft, warm feel.
Experiment with angles. Sometimes a new view can create magic!
What are the best camera settings for portraits?
The best camera settings for portraits include a low ISO (100-400), a wide aperture (f/1.8 – f/4), and a fast shutter speed (1/125s or higher) to avoid blurry images.
Maintaining and Storing Your DIY Backdrop
Best practices for preserving the backdrop for future use.. Tips for easy disassembly and storage solutions..
To keep your backdrop ready for the next event, proper care is key. Store it in a dry place to prevent damage. Use a sturdy box for easy organization. Disassemble parts gently to avoid tears.
- Label each piece for quick setup.
- Wrap delicate parts in soft cloth.
- Keep it away from direct sunlight.
Replacing items is costly, so caring for your backdrop makes it last. Fun fact: a well-stored backdrop can be used for years, saving money and time!
How do I store my DIY birch forest backdrop?
The best way to store your backdrop is to keep it in a cool, dry place. **Use a box or container to prevent wrinkles or tears.** Label each part for quick setup later.
Inspiration and Ideas for Different Occasions
Showcase various uses of the backdrop for events like weddings and parties.. Recommendations for seasonal and themed photo shoots..
Need a fun idea for your next event? A DIY birch forest photo backdrop might be just the ticket! It’s perfect for weddings, birthday parties, or any gathering where sweet smiles and silly poses happen. Picture this: your friends standing among birch trees, striking memorable poses. For seasonal themes, try maple leaves in fall or snowflakes in winter. You’ll capture gorgeous moments while having a blast. Need a quick glance? Check the table below for some top ideas!
| Occasion | Themes |
|---|---|
| Weddings | Rustic Charm |
| Birthday Parties | Whimsical Fairytale |
| Seasonal Events | Autumn Leaves, Winter Wonderland |
Conclusion
In conclusion, a DIY birch forest photo backdrop is fun and easy to create. You can use simple materials like cardboard and paint. This project adds magic to your photos and is perfect for parties. Gather your friends, get creative, and start crafting today. For more ideas, check out tutorials online. Let’s make something beautiful together!
FAQs
What Materials Do I Need To Create A Diy Birch Forest Photo Backdrop?
To create a DIY birch forest photo backdrop, you need a few simple materials. First, get large sheets of white poster board or canvas. Next, find some black paint and a brush to make tree trunks. You can also use paper or fabric to add leaves. Finally, grab scissors and tape to put everything together!
How Can I Achieve A Realistic Birch Tree Appearance Using Paint And Cardboard?
To make a realistic birch tree with paint and cardboard, start by cutting a cardboard tube for the trunk. Use white paint for the bark and let it dry. Then, use a darker color to add lines and spots for texture. For branches, use smaller pieces of cardboard and paint them brown. Finally, add green paper leaves to make it look alive!
What Is The Best Way To Secure The Backdrop In Place During Photo Sessions?
To secure the backdrop during photo sessions, you can use clamps to hold it tight. You can also weight the bottom with heavy objects like bags or sandbags. Make sure the backdrop is straight so it looks good in photos. If it’s windy, use extra weights to keep it from moving. This way, we can take better pictures without distractions!
How Can I Incorporate Lighting To Enhance The Visual Effect Of A Birch Forest Backdrop?
To make a birch forest backdrop look amazing, you can use different lights. Try placing soft yellow lights to create a warm glow. You can also use green lights to make the leaves look fresh. For a fun effect, add some fairy lights to sparkle like stars. This will make the forest feel magical!
Are There Any Tips For Adding Additional Elements, Like Foliage Or Wildlife, To Make The Backdrop More Immersive?
To make your backdrop more exciting, you can add plants and animals. Use different kinds of leaves and flowers to create color. You can also draw or add stickers of birds, butterflies, or other wildlife. Think about what lives in the area and add those creatures. This makes your backdrop feel alive and fun!