Distressed hardwood flooring offers a timeless, lived-in look that adds character and warmth to any home. Perfect for DIYers, it hides imperfections well, making it a practical and beautiful choice for busy households. Learn how to choose and care for this stunning option to enhance your home’s charm.
Hey there, DIYers and home improvement fans! Jack Shaffer here, your go-to guy for all things woodworking and tools.
Ever walk into a room and feel an instant sense of history and warmth? Chances are, you were looking at distressed hardwood flooring! It’s that gorgeous, slightly worn, character-filled look that just makes a space feel more welcoming and authentic. But maybe you’re thinking, “Is that for me? Can I even pull it off?”
For many homeowners, the idea of installing or even owning hardwood floors can seem a bit daunting. You might worry about scratches, dents, and how to keep them looking pristine. Well, I’ve got some great news for you! Distressed hardwood flooring is designed with these concerns in mind, and it’s a fantastic option for those of us who love a beautiful space but also live a real life.
This type of flooring brings a unique charm that’s hard to replicate, and the best part? It’s surprisingly straightforward to understand and maintain. We’re going to dive deep into what makes distressed hardwood so special, help you pick the perfect style for your home, and share some tips on keeping that beautiful look for years to come. Ready to bring some timeless character to your floors?
Table of Contents
What Exactly IS Distressed Hardwood Flooring?
Let’s break down what “distressed” really means when we’re talking about wood floors. It’s not about damage; it’s about artistry! Distressed hardwood floors are crafted to look like they’ve been around for a while, showcasing a charming patina of age and character. Think of old farmhouses, historic homes, or cozy cabins – this flooring style captures that essence.
Manufacturers achieve this look through various techniques. It’s all about mimicking the natural wear and tear that real wood develops over decades, but done in a controlled and beautiful way. This means you get all the aesthetic benefits without the actual age or hidden structural issues that come with genuinely old floors.
Common Distressing Techniques Explained
You’ll see a few different methods used to create that sought-after distressed look. Understanding these can help you choose the specific style that speaks to you – whether it’s a subtle touch or a more pronounced vintage feel.
- Wire Brushing: This is a super popular technique. A stiff wire brush is used to drag across the wood grain. It scrapes away some of the softer wood fibers, leaving the harder grain lines more prominent. This gives the floor a textured, slightly rough feel, like it’s been walked on for generations. It also helps highlight the natural beauty of the wood’s pattern.
- Hand Scraping: Imagine someone literally taking tools to a plank of wood and scraping, gouging, and beveling the edges to create an uneven, handmade appearance. This technique gives each plank a unique, artisanal quality, almost as if it was crafted by a skilled artisan centuries ago. It adds a lot of depth and character.
- Chiseling and Denting: Small nicks, dents, and gouges are intentionally added to the surface and edges of the wood planks. These aren’t deep, structural damages, but rather light marks that simulate the bumps and knocks that real floors endure over time.
- Piping and Saw Marks: Manufacturers might use special tools to create subtle “pipe” marks (like those made by rough water pipes) or faint saw marks. These mimic the look of early milling techniques, adding to the historical charm.
- Beveled Edges: Many distressed floors have slightly beveled edges. This creates a subtle drop between planks, echoing the look of older floors where slight height differences were common. It also helps define each plank.
Why Choose Distressed Hardwood Flooring? The Appeal for DIYers
So, why is distressed hardwood flooring such a hit, especially with folks like us who love to get hands-on? It’s got a fantastic combination of beauty, resilience, and practicality that simply makes sense for many homes.
The Stunning Aesthetics
First and foremost, the look! Distressed hardwood flooring brings an unparalleled sense of warmth, character, and timeless elegance to any room. It’s not just flooring; it’s a statement piece that adds soul to your home. It has a way of making even a brand-new house feel instantly cozier and more lived-in, like it has its own story to tell.
This style pairs beautifully with a wide range of décor, from rustic farmhouse and bohemian chic to more transitional and even modern designs where it can provide a grounding, natural contrast. It can make a minimalist space feel more inviting or amplify the charm of an already character-filled home.
Practicality and Durability
Here’s where distressed floors really shine for the everyday homeowner and DIYer. The very techniques that give them their charm also make them incredibly forgiving!
- Hides Imperfections: Scratches? Dings? Minor dents? On a distressed floor, these often blend right in and can even enhance the character. This is a huge plus for busy households with kids, pets, or if you’re just prone to dropping things (we’ve all been there!).
- Less Worry: Unlike smooth, highly polished floors that show every little scuff, distressed wood gives you a bit more breathing room. You can enjoy your home without constantly fretting about every little mark.
- Long-Lasting Beauty: Because the “distress” is part of the manufacturing process, it’s built into the floor. This means the desired look doesn’t chip off or fade away easily, contributing to its long-term appeal.
A DIYer’s Best Friend
When it comes to installation, distressed hardwood can be a forgiving choice. Minor imperfections in your subfloor or slight variations in plank height are less noticeable with the textured surface. Plus, the varied look means you don’t have to stress about achieving a perfectly uniform finish.
For tools, you’ll often be working with standard flooring installation tools, and the consistent look means less pressure on achieving a flawless, factory-perfect surface. This makes it a more approachable project for those newer to flooring installation.
Types of Distressed Hardwood Flooring to Consider
When you venture out to find distressed hardwood, you’ll notice a few different options. These generally come down to the type of wood, how it’s manufactured, and the specific distressing techniques used. Understanding these will help you narrow down your choices.
Solid vs. Engineered Hardwood
Like most hardwood options, distressed styles come in both solid and engineered forms. Each has its pros and cons:
| Feature | Solid Distressed Hardwood | Engineered Distressed Hardwood |
|---|---|---|
| Construction | One solid piece of genuine hardwood from top to bottom. | Multiple layers of wood veneer or high-density fiberboard (HDF) with a real hardwood veneer on top. |
| Durability/Longevity | Can be sanded and refinished multiple times; lasts for generations. | The top veneer determines how many times it can be screened/recoated and possibly sanded (depending on veneer thickness). |
| Moisture Resistance | More susceptible to warping and expanding in humid or damp environments. | More stable and resistant to moisture fluctuations due to its layered construction. Can often be installed below grade. |
| Installation | Typically nailed or stapled down to a subfloor. Can also be glued. | Can be nailed, stapled, glued, or even floated (less common for distressed look, but possible). More versatile for different subfloors and locations (e.g., basements). |
| Appearance | Authentic, deep character. | Can achieve a very similar aesthetic to solid wood, especially with quality distressing. |
| Cost | Generally more expensive upfront. | Often more cost-effective, especially when considering installation versatility. |
Wood Species and Finishes
The type of wood species you choose will significantly impact the look and feel of your distressed floor. Different woods have varying hardness, grain patterns, and natural color tones, all of which play a role in how the distressing techniques appear.
- Oak (Red & White): The most popular choice for a reason. Oak’s prominent grain patterns and natural hardness make it ideal for wire brushing and hand scraping. Red oak has a warmer, pinkish tone, while white oak is cooler and has a more robust grain.
- Maple: Known for its fine, subtle grain and lighter color. Distressed maple can offer a softer, more contemporary rustic look. It’s a harder wood, so distressing might be more subtle but still effective.
- Hickory: One of the hardest domestic woods. Hickory has a very strong, varied grain and color, which makes its distressed versions incredibly dynamic and visually interesting. It’s perfect for achieving a bold, rustic character.
- Walnut: Offers a rich, dark color and beautiful grain. Distressed walnut can lend an air of classic sophistication with a touch of ruggedness.
- Pine: A softer wood, pine naturally shows wear more readily. Distressed pine offers a truly authentic, vintage feel, but it requires more care to avoid deep gouges.
The finish is just as important. You’ll find distressed floors with:
- Matte or Low-Lustre Finishes: These are most common as they enhance the natural, aged look and hide minor imperfections better than high gloss.
- Slight Sheens: Some distressed floors might have a very subtle satin or semi-gloss finish that adds a touch of polish without looking overly modern.
- Oil-Based vs. Water-Based Polyurethane: Oil-based tends to offer a richer, deeper color but takes longer to dry. Water-based dries faster and is more environmentally friendly, with less odor. Both can be applied in matte or satin sheens.
Choosing Your Distressed Hardwood Floor: Key Factors
Picking out your new floor is exciting! Here are some things to keep in mind to make sure you get exactly the look and feel you want for your home.
Consider Your Home’s Style
Think about the overall décor of your house. Is it farmhouse chic, modern minimalist, or a more traditional style? Distressed flooring can adapt, but some variations suit certain aesthetics better.
- Rustic/Farmhouse: Deeper hand-scraping, prominent grain (like oak or hickory), and darker or natural wood tones work wonderfully.
- Modern/Transitional: Lighter-toned woods (maple, light oak) with subtle wire brushing or hand-scraping can offer a touch of warmth without overwhelming a cleaner design.
- Traditional/Historic: Richer wood species like walnut or cherry, perhaps with hand-scraping, can evoke a sense of established elegance.
The Level of “Distress”
Distressing isn’t one-size-fits-all. Some floors have a light, subtle texture, while others are heavily hand-scraped with pronounced dents and marks. Look at samples closely and consider:
- Subtlety: Do you want a hint of age or a bold vintage statement?
- Texture: Can you feel the texture with your hand? Does it have a slightly rough feel (e.g., wire-brushed), or is it smoother with visual texture?
- Color Variation: Distressing often highlights natural color variations in the wood, which can be a great feature.
Budget and Installation
As we touched on, solid and engineered options have different price points and installation requirements. Factor in:
- Material Cost: Engineered is often more budget-friendly.
- Installation Complexity: If hiring professionals, engineered can sometimes be more versatile. If doing it yourself, both require careful planning, but engineered might offer more placement options (e.g., basements).
- Underlayment and Accessories: Don’t forget padding, trim pieces, and potentially moisture barriers, which add to the overall cost.
For the most accurate product information and safety guidelines on flooring installation, it’s always a good idea to consult resources from organizations like the Building Science Corporation, which delve into the science behind building materials and assemblies.
DIY Installation: A Beginner’s Guide to Distressed Hardwood
Alright, let’s talk about getting this beautiful distressed flooring into your home! Installing hardwood floors yourself is a rewarding project, and with distressed wood, you have a bit more room for error, which is great for beginners.
Safety First! Before we start, always wear safety glasses to protect your eyes from flying debris. Work gloves are a good idea too, and sturdy footwear is a must. If you’re using power tools, familiarize yourself with their operation and safety features. Check out resources from the Occupational Safety and Health Administration (OSHA) for general workplace safety guidelines.
Step 1: Preparation is Key!
This is arguably the most important step. A successful installation starts with a well-prepared space.
- Acclimate the Flooring: Most hardwood (solid and engineered) needs to acclimate to the room’s temperature and humidity for at least 48-72 hours. Keep the boxes sealed and lying flat. This prevents warping after installation.
- Clean the Subfloor: Your subfloor needs to be clean, dry, and flat. Sweep, vacuum, and check for any debris, paint, or old adhesive.
- Subfloor Imperfections: For solid hardwood, your subfloor (plywood or OSB, at least 3/4 inch thick) needs to be smooth and level. For engineered, check manufacturer guidelines; they can often go over concrete. If there are high spots, sand them down. If there are low spots, use a leveling compound according to its instructions. A laser level or a long, straight edge is handy here.
- Moisture Testing: If installing over concrete or in areas prone to moisture (like basements), perform a moisture test. Engineered floors are generally more forgiving, but always follow the manufacturer’s recommendations and consider a moisture barrier.
Step 2: Planning Your Layout
How you lay out your planks matters for both aesthetics and preventing awkward cuts at the end.
- Starting Wall: Choose the longest, straightest wall, usually the one you see first when entering the room.
- Plank Direction: Typically, planks run parallel to the longest wall. This makes the room feel larger.
- Expansion Gaps: Hardwood needs space to expand and contract. Leave a gap of about 1/2 to 3/4 inch around the perimeter of the room (walls, cabinets, doorways). Use spacers during installation.
- Staggering Joints: To avoid a “railroad track” look and for structural integrity, stagger the end joints of your planks. Aim for at least a 6-inch offset between planks in adjacent rows. You can achieve this by cutting your last plank and using the leftover piece to start the next row.
Step 3: Installation – Nailing/Stapling (for Solid/ some Engineered)
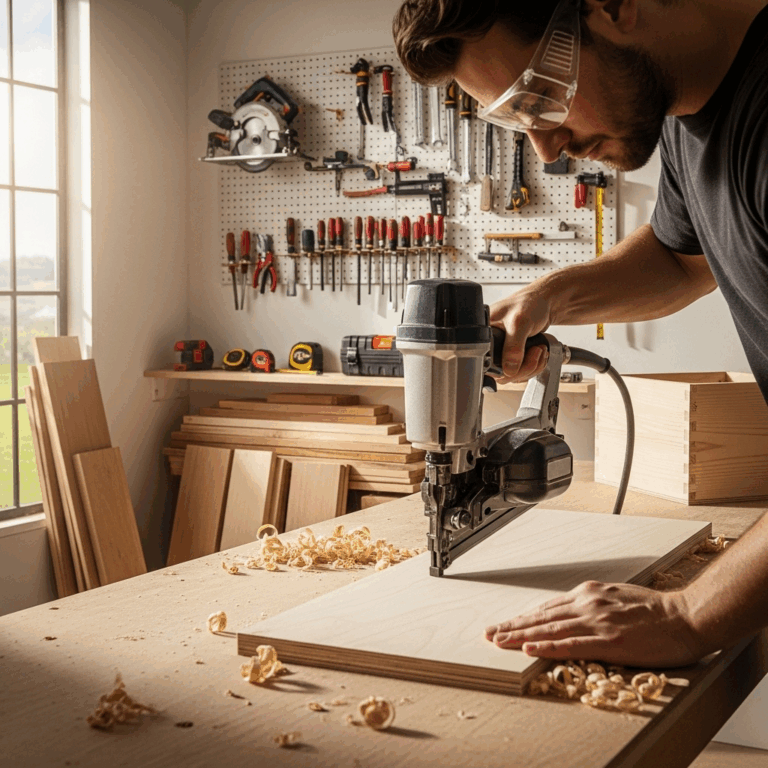
This is where your nailer comes in! A flooring nailer (manual or powered) is the tool of choice here. You’ll also need a miter saw or circular saw with a fine-tooth blade for cutting.
- The First Row: This is crucial as it sets the tone. You might need to snip off the tongue on the wall side of the first row of planks so they sit flat against the wall. Nailing the first row can be tricky; you may need to pre-drill and use screws or face-nail (nail through the face of the plank near the edge).
- Subsequent Rows: Use your flooring nailer. Position it so it drives the nail through the tongue of the plank at an angle into the subfloor. Aim for about a 20-30 degree angle. Refer to your nailer’s manual for proper technique. Most flooring nailers require a compressor.
- Hitting Joists: Ideally, your nails will hit floor joists for maximum security. Use a stud finder to locate them.
- Hand Nailing: For tight spots where the nailer won’t fit (like near walls or in corners), you’ll need to hand nail. You can use a hammer and specialized flooring nails, or pre-drill and use screws, then fill the holes later if necessary.
- Cutting Planks: Measure carefully and cut planks to fit. Remember to stagger your joints!
Step 4: Installation – Gluing/Floating (for Engineered)
Engineered hardwood offers more flexibility. Follow the manufacturer’s specific instructions, as methods vary.
- Gluedown: Apply a specialized hardwood flooring adhesive to the subfloor using a trowel as recommended by the adhesive manufacturer. Lay the planks into the wet adhesive, ensuring good contact.
- Floating: Plank edges “click