Framing nailers are for building the skeleton of a structure, using longer nails. Roofing nailers are specifically for attaching shingles and underlayment, using shorter, wider-headed nails. Choosing the right one is key for project success.
Hey there, fellow DIYers and woodworkers! Jack Shaffer here, your go-to guy for all things nail guns at Nailerguy. Ever found yourself staring at two different nailers, wondering what on earth makes them tick? You’re not alone! The world of nailers can seem a bit overwhelming at first, especially when you’re trying to figure out the difference between a framing nailer and a roofing nailer. It’s a common hang-up, but don’t sweat it! We’re going to break it down nice and simple, so you can pick the right tool for your next project and get that satisfying thwack of a perfectly driven nail. Stick around as we demystify these essential tools!
Table of Contents
Framing Nailers vs. Roofing Nailers: What’s the Big Deal?
So, you’re standing in the tool aisle, or maybe just browsing online, and you see two powerful-looking nailers. One is labeled “framing,” the other “roofing.” They both shoot nails, right? Well, yes and no! While they both use compressed air or electricity to drive fasteners, their designs, the nails they use, and the jobs they’re built for are remarkably different. Understanding this difference is not just about knowing tool names; it’s about ensuring your project is safe, sturdy, and built to last. Plus, using the wrong tool can damage your materials and even be dangerous. Let’s dive into what makes each one unique.
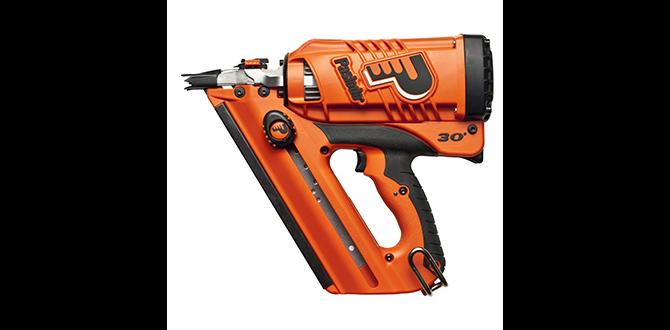
The Mighty Framing Nailer: Building the Bones
Think of a framing nailer as the workhorse for the structural heart of your project. Whether you’re building a deck, framing a wall for a new shed, or putting together a sturdy workbench, this is your go-to. Its main job is to join together those larger, thicker pieces of lumber that form the skeleton of your construction.
What makes a framing nailer special?
- Power: These nailers are designed for serious power. They need to drive long, thick nails through dense wood with ease. This power ensures that your framing connections are strong and secure.
- Nail Size: Framing nailers use longer nails, typically ranging from 2 inches up to 3.5 inches or even more. These are often called “framing nails,” and they have a shank diameter suitable for deep penetration into structural lumber.
- Nail Head: The nails they use usually have either a round head or a clipped-head design.
- Round Head: These are the most common and offer the best holding power. Most building codes require round-head nails for structural framing because they resist pull-out much better.
- Clipped Head: These nails have a portion of their heads “clipped” off to allow them to be stacked closer together on a strip. This means the magazine can hold more nails, reducing downtime. However, the clipped head offers less surface area, so it doesn’t hold quite as well as a round head. Some applications might not allow clipped-head nails due to code requirements or the need for maximum strength.
- Magazine Angle: Framing nailers come with their magazines at different angles – typically 21 degrees, 28 degrees, or 30 degrees. The angle affects how the nail strips are fed into the nailer and how compact the tool can be. A steeper angle (like 21 degrees) means a more compact tool, which can be easier to maneuver in tight spaces, but the nails themselves are often plastic collated. Nails for 28-degree or 30-degree framers are usually paper or wire collated, offering a more robust connection.
- Depth Adjustment: Most framing nailers have an adjustable depth feature, allowing you to set how deep the nail is driven into the wood. This is crucial for ensuring nails are flush or slightly countersunk without over-penetrating into the next piece of lumber.
The Versatile Roofing Nailer: Shingling and Sealing
Now, let’s talk about the roofing nailer. This tool has a very specific, albeit very important, job: attaching shingles, underlayment, and other roofing materials to the roof deck. It’s designed to work quickly and efficiently over large areas.
What sets a roofing nailer apart?
- Speed and Coverage: Roofing nailers are built for speed. They allow you to drive nails accurately and rapidly, which is essential when you’re covering hundreds or thousands of square feet of roofing.
- Nail Size: Unlike framing nailers, roofing nailers use much shorter nails, typically 3/4 inch to 1-1/2 inches long. These nails are designed to penetrate the shingle material and securely anchor it to the roof decking (usually plywood or OSB) without punching through. Too long a nail can damage underlying materials or even pose a hazard.
- Nail Head: This is a key differentiator. Roofing nails have a wide, flat head, often referred to as a “hat” or “washer” head. This wide head is crucial because it distributes the force of the nail over a larger surface area on the shingle. This prevents the fastener itself from tearing through the shingle material, especially as it expands and contracts with temperature changes.
- Magazine Angle: Most roofing nailers have a straight magazine (0 degrees). This design is simple and effective for feeding the collation across the wide head of the roofing nail.
- Contact Trip Mechanism: To prevent accidental firing and ensure safety, roofing nailers often feature a contact trip mechanism. This means the nailer will only fire when the nose is pressed against the material you’re nailing.
- Adjustable Nailing Depth: Like framing nailers, roofing nailers also offer depth adjustment. This is vital for ensuring the nail head sits just right – slightly below the surface of the shingle granules for optimal sealing, but not so deep that it tears the shingle.
For those interested in the technical specifications and safety standards for roofing materials, the National Roofing Contractors Association (NRCA) offers excellent resources on best practices and material requirements.
Key Differences at a Glance
To make it super clear, let’s put the main differences side-by-side. This table should help you quickly identify which tool is right for which job.
| Feature | Framing Nailer | Roofing Nailer |
|---|---|---|
| Primary Use | Building structural frames (walls, decks, joists) | Attaching shingles, underlayment, and roofing felt |
| Nail Length | Longer (2″ – 3.5″+) | Shorter (3/4″ – 1.5″) |
| Nail Head Type | Round head or Clipped head | Wide, flat “hat” or “washer” head |
| Magazine Angle | Angled (21°, 28°, 30°) to allow access to tighter spaces | Straight (0°) for efficient feeding of wide-headed nails |
| Nail Strength | Designed for high holding power in structural lumber | Designed to secure roofing materials without tearing |
| Power | High power for deep penetration into dense wood | Sufficient power for roofing materials and deck |
When to Use Which Nailer (And When NOT To!)
Knowing the differences is one thing, but knowing when to actually use them is where the magic happens. Let’s walk through some common scenarios.
Scenarios for a Framing Nailer:
- Building a shed or garage: You’ll need to frame the walls, put up rafters, and connect joists. A framing nailer makes quick work of these tasks.
- Constructing a deck: Joists, beams, ledger boards – all require strong connections. Your framing nailer is perfect for this.
- Framing interior walls for a renovation: Attaching studs to plates is prime framing nailer territory.
- Building sturdy furniture: For heavy-duty projects like workbench frames, bed frames, or robust shelving units, a framing nailer can be a huge time-saver and ensure a solid build.
- Rough carpentry and formwork: Any job involving joining large lumber pieces for structural purposes.
Scenarios for a Roofing Nailer:
- Replacing your roof: This is its bread and butter! Attaching asphalt shingles, metal roofing panels, or other roofing materials.
- Installing roof underlayment (tar paper or synthetic): You’ll need to secure this protective layer before shingles go on.
- Adding a new roof to a garden shed or doghouse: Smaller roofing jobs still benefit from the speed and specialized nails of a roofing nailer.
- Attaching exterior sheathing to walls (in some cases): While often done with framing nailers or screws, a roofing nailer with appropriate nails can sometimes be used for certain sheathing applications, especially if speed is paramount and the nailing pattern meets requirements. Always check local building codes.
- Temporary fastening of tarps or protection: In a pinch, the wide head can help hold down protective coverings, though this isn’t its primary design intent.
What NOT to Do:
- Don’t use a roofing nailer for framing: The short nails won’t provide adequate holding power for structural connections, leading to a weak and unsafe build. You risk failure of your structure.
- Don’t use a framing nailer for roofing: The long nails might go too deep, potentially damaging the sheathing or even poking through to the interior of your home. The round or clipped heads are also not designed to secure shingles evenly and could cause leaks or premature shingle failure.
- Don’t try to use a framing nailer with roofing nails, or vice-versa: The nail collation (how the nails are held together) is different, and the nail driver (the part that strikes the nail) is calibrated for specific nail diameters and head types. Forcing the wrong nails will likely jam the tool and damage it immediately.
A good resource for understanding fasteners and their applications in construction can be found through organizations like the Woodworking Network, which often covers material properties and best uses.
Understanding Nail Collations (How Nails Stick Together)
You might have noticed us mentioning “collated” nails. This refers to how the nails are held together in strips or coils, ready to be fed into the nailer’s magazine. The type of collation is often determined by the nailer’s angle and intended use.
Types of Nail Collations:
- Plastic Collated: Nails are held together by plastic strips. These are common for angled framing nailers, especially 21-degree models. The plastic can sometimes leave small fragments in the wood, but they offer good weather resistance for the nails.
- Paper Collated: Nails are glued together at an angle onto a paper strip. These are very common for 28-degree and 30-degree framing nailers. They often provide a stronger connection as less of the nail head is obstructed by the collation material.
- Wire Collated: Nails are welded or fastened together with fine wire. This is less common for typical construction framing nailers but might be found in some specialized tools or industrial applications.
- Plastic or Wire Strips for Roofing Nails: Roofing nailers typically use nails collated on plastic or wire strips that lay flat. The wide heads of the nails are protected by this collation, ensuring they feed smoothly into the straight magazine.
The collation type is directly tied to the nailer’s magazine design. You can’t mix and match — a plastic collated nail strip won’t fit a paper collated system, and the nail angle is crucial.
Choosing the Right Nailer For You
So, you’ve got the lowdown on the differences. Now, how do you pick the right tool for your specific needs? Consider these factors:
1. Your Projects:
- Frequent Framing? If you’re planning multiple framing projects, a good quality framing nailer is a worthwhile investment. Look for features like adjustable depth, selectable fire mode (single or contact actuation), and comfort features.
- Just Roofing? If your primary need is for roofing, a dedicated roofing nailer is the way to go. They are lighter and designed for the repetitive task of shingle installation.
- Both? Many DIYers start with a versatile framing nailer that can handle a good range of tasks. If you anticipate doing both framing and roofing extensively, you might eventually want both specialized tools. However, for occasional roofing, a framing nailer with a good range of nail sizes might suffice for very small, non-critical jobs, but it’s far from ideal. It’s always best to use the tool designed for the job.
2. Power Source:
- Pneumatic (Air-Powered): These require an air compressor. They are generally lighter, more powerful, and less expensive upfront than cordless models. However, you’re tethered by an air hose.
- Cordless (Battery-Powered): These offer the ultimate freedom of movement – no hoses or compressors needed! Battery technology has advanced significantly, making them powerful and efficient. The trade-off is a higher upfront cost and the need to manage batteries.
- Gas-Powered: Less common now for general framing and roofing, but sometimes used in specific applications for portability. They use fuel cells and batteries.
3. Budget:
Nailer prices can vary widely. Professional-grade tools will cost more but offer greater durability and performance. For DIY use, many excellent mid-range options are available from reputable brands that will serve you well.
4. Ease of Use and Safety:
Look for features that enhance usability, like tool-free depth adjustment or jam clearing. Most importantly, ensure the nailer you choose has safety features like a contact trigger to prevent accidental firing. Always wear appropriate personal protective equipment (PPE), including safety glasses and hearing protection, whenever operating a nailer.
For those who want to explore more about tool safety standards, the Occupational Safety and Health Administration (OSHA) provides guidelines on the safe use of powered nailers and staplers.
Maintaining Your Nailer for Longevity
No matter which nailer you choose, a little regular maintenance will go a long way in ensuring it performs reliably for years to come.
Basic Maintenance Tips:
- Read the Manual: Seriously, this is the best first step! Every nailer is slightly different. Your owner’s manual is your best friend.
- Cleanliness is Key: Keep the exterior of your nailer clean. Wipe it down after use, especially if working in dusty conditions.
- Lubrication (Pneumatic): For air-powered nailers, a few drops of specialized pneumatic tool oil (“air tool oil”) in the air inlet before each use helps keep the internal mechanisms running smoothly. Over-oiling can cause problems, so follow your manual’s recommendations.
- Check Seals and O-rings: Periodically inspect the seals and O-rings for any signs of wear or damage. Leaky seals can reduce power and efficiency.
- Clear Jams Carefully: If you get a nail jam, disconnect the air supply (or battery) immediately! Follow your manual’s instructions for clearing the jam. Never try to force it.
- Store Properly: When not in use, store your nailer in a dry place. For pneumatic tools, consider draining your air compressor tank to prevent moisture buildup.
Proper care ensures your tool is ready when you are, preventing frustrating downtime during your projects.
Frequently Asked Questions (FAQ)
Here are some common questions beginners ask about framing and roofing nailers:
Q1: Can I use a framing nailer for small roofing jobs, like on a doghouse?
A: While you might be able to drive shorter framing nails into a small structure, it’s not ideal. The nails aren’t designed for shingles, and the nail heads aren’t wide enough. You risk tearing the shingles. A roofing nailer is still the best tool for the job, even for small projects.
Q2: What’s the difference between a 21-degree and a 30-degree framing