Quick Summary:
Choosing between a 16 gauge and 18 gauge nailer hinges on your project’s needs. 16 gauge nailers are robust, perfect for framing and furniture, driving thicker nails for stronger holds. 18 gauge nailers are delicate, ideal for trim and molding, using slim nails for near-invisible fastening.
Hey there, DIY enthusiasts and aspiring woodworkers! Jack Shaffer here, your go-to guy for all things tools and woodworking. Have you ever stood in the aisle, staring at nail guns, feeling a little lost about which one is right for your project? It’s a common spot to be in! The “gauge” number on a nailer might sound technical, but it’s actually a super simple concept that makes a huge difference in your results.
Understanding the difference between a 16 gauge and an 18 gauge nailer is like knowing when to use a hammer versus a tack hammer. One is for serious strength, the other for subtle finesse. Get this right, and your projects will look more professional and hold together even better. Don’t worry, by the end of this guide, you’ll be a pro at picking the perfect nailer for any job. We’ll break down exactly what those numbers mean and where each type shines brightest.
Table of Contents
What Exactly is “Gauge” in Nailers?
In the world of nailers, “gauge” refers to the thickness of the nail itself. It’s a bit counter-intuitive, but a lower gauge number means a thicker nail, and a higher gauge number means a thinner nail. Think of it like a coat hanger versus a fishing hook – the coat hanger is thicker and lower gauge, while the finer fishing hook is higher gauge.
This difference in nail thickness directly impacts the nail gun’s capabilities, the strength of the fastening, and the appearance of the finished work. Let’s dive into the specifics of each type.
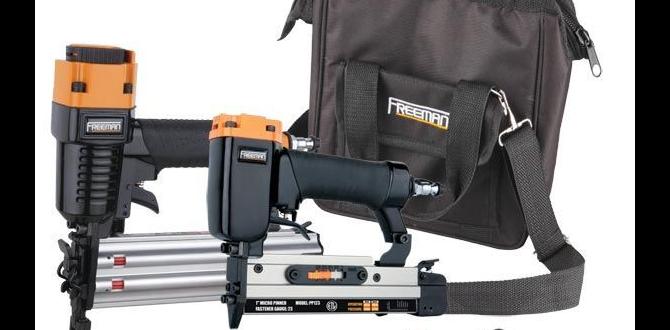
16 Gauge Nailers: The Workhorses
A 16 gauge nailer drives nails that are about 0.0625 inches (or 1.6 mm) in diameter. These nails are noticeably thicker than those used by 18 gauge nailers. Because they are sturdier, 16 gauge nails offer more holding power and are less likely to bend when driven into tougher materials.
When you need a strong, secure connection that can bear weight or withstand stress, a 16 gauge nailer is your best bet. They are the go-to for many structural and semi-structural applications in DIY and professional woodworking.
What are 16 Gauge Nails Used For?
- Trim Work: While 18 gauge is often preferred for delicate trim, 16 gauge can be used for heftier interior trim, baseboards, and crown molding where a bit more strength is beneficial.
- Cabinetry: They are excellent for assembling cabinet frames and attaching face frames, providing a robust hold.
- Furniture Construction: For building sturdy furniture pieces, especially where joints need to be extra secure, 16 gauge nails are a solid choice.
- Light Framing: Diyers might use them for very light framing tasks, like building small garden boxes, sheds, or sub-flooring where traditional framing nails are overkill but more strength than an 18 gauge offers is needed.
- Door and Window Casing: Attaching door jambs and window casings securely benefits from the strength of 16 gauge nails.
Pros of Using a 16 Gauge Nailer
- Superior Holding Power: The thicker nails provide a stronger, more durable fastening.
- Less Bending: Less likely to bend on hardwoods or when hitting knots.
- Good for Heavier Materials: Handles denser woods and slightly thicker trim with ease.
- Versatile for Structural Tasks: Suitable for various tasks beyond just trim.
Cons of Using a 16 Gauge Nailer
- Larger Nail Head: The nail head is more visible than an 18 gauge, potentially requiring more filling for a seamless finish.
- Can Split Thinner Wood: If not careful, the thicker nail can sometimes split delicate or thin pieces of wood.
- Slightly Larger Nail Hole: The hole left by the nail is also a bit more noticeable.
18 Gauge Nailers: The Finesse Builders
An 18 gauge nailer fires slim headless nails, typically around 0.047 inches (or 1.2 mm) in diameter. These nails are significantly thinner and finer than their 16 gauge counterparts. This makes them ideal for applications where a clean, nearly invisible finish is paramount.
Think of an 18 gauge nailer as your tool for delicate details. It drives nails that leave small, discreet holes, perfect for trim, molding, and projects where aesthetics are key. The nails might not offer the same sheer structural strength as 16 gauge nails, but their subtlety is often exactly what a project needs.
What are 18 Gauge Nails Used For?
- Finish Trim: This is where the 18 gauge truly shines – baseboards, window trim, door casing, and decorative molding.
- Picture Frames and Mirror Frames: The fine nails create strong bonds without marring the wood’s surface or being visible.
- Small Crafts and Hobbies: Perfect for model building, intricate craft projects, and anything requiring delicate fastening.
- Attaching Thin Wood Panels: Useful for securing thin plywood or decorative panels where a thicker nail would be too much.
- Upholstery: While specialized upholstery staplers exist, 18 gauge nails can be used for attaching fabric to light frames in some craft applications.
- Molding and Beadboard: Attaching delicate moldings or beadboard where a clean finish is essential.
Pros of Using an 18 Gauge Nailer
- Minimal Hole Size: The nails leave very small, almost invisible holes.
- No Nail Head or Minimal Nail Head: Most 18 gauge nails are headless or have very small heads, making filling or sanding much easier.
- Less Likely to Split Wood: The slim profile is less prone to splitting delicate or thin materials.
- Ideal for Fine Details: Perfect for decorative and finish work where appearance is critical.
- Lightweight and Maneuverable: Often smaller and lighter, making them easier to handle for extended periods.
Cons of Using an 18 Gauge Nailer
- Lower Holding Power: The thinner nails are not designed for structural or heavy-duty applications.
- Can Bend on Hardwoods: May struggle to penetrate very dense hardwoods or hit knots cleanly; the nail might bend.
- Not for Load-Bearing Joints: Don’t rely on them for joints that will experience significant stress or weight.
Head-to-Head: 16 Gauge vs. 18 Gauge Nailers
Let’s lay out the core differences side-by-side. Understanding these distinctions will make it crystal clear which nailer belongs in your toolbox for specific tasks.
| Feature | 16 Gauge Nailer | 18 Gauge Nailer |
|---|---|---|
| Nail Diameter (Approx.) | 0.0625 inches (1.6 mm) | 0.047 inches (1.2 mm) |
| Nail Thickness | Thicker | Thinner |
| Holding Power | High | Medium to Low |
| Visibility of Nail Head | Moderate to High | Very Low to None (headless) |
| Risk of Splitting Wood | Slightly higher, especially in soft or thin wood | Lower |
| Best For | Sturdier trim, cabinetry, light framing, furniture. Needs secure joints. | Fine trim, molding, picture frames, decorative work. Needs clean finish. |
| Common Names | Finish Nailer (can overlap with 15 gauge), Angled Trim Nailer | Brad Nailer |
Choosing the Right Nailer for Your Project
Deciding between a 16 gauge and an 18 gauge nailer really boils down to the primary goal of your project. Are you building something that needs to be sturdy and hold together under some force, or are you focusing on making things look beautiful with minimal visible fasteners?
Consider Your Materials
What kind of wood are you working with? If you’re using softwoods for basic projects, either nailer might work, but an 18 gauge will leave a cleaner impression. If you’re tackling hardwoods like oak or maple, where splitting is a higher risk, especially with thinner nails, a 16 gauge might be more forgiving for the actual fastening, though you’ll still need to be mindful of its thickness.
For example, attaching solid oak baseboards might benefit from the added power and less likelihood of bending from a 16 gauge nailer, but if the baseboard is very thin or you’re worried about damaging the wall behind it, an 18 gauge might be a safer bet when combined with a good adhesive.
Consider the Desired Finish
This is often the deciding factor for DIYers. If you want the nail heads to disappear or be easily covered by a tiny bit of wood filler or putty, the 18 gauge brad nailer is the undisputed champion. If a slightly more visible divot is acceptable, or if you plan on painting the piece anyway and will fill any holes, the 16 gauge becomes a strong contender.
Think about crown molding. You want those sharp, clean lines, and you don’t want nail heads glaring at you. That’s prime 18 gauge territory. Now, think about the frame of a workbench or a sturdy shelving unit. You just need it to hold strong, and a slightly larger nail head is perfectly acceptable, making the 16 gauge a good choice.
Consider the Project Type
For projects where strength and stability are key:
- Building furniture frames
- Assembling cabinet boxes
- Installing heavier door casings or window frames
- Creating sturdy shelves or small utility structures
These are the situations where the thicker nail of a 16 gauge nailer will provide a more robust and reliable hold.
For projects where appearance and minimal damage are key:
- Attaching delicate trim and molding
- Building picture frames or decorative boxes
- Adding decorative accents to furniture
- Working with thin or delicate wood pieces
Here, the slim profile and minimal impact of an 18 gauge nailer will give you that professional, clean finish.
Types of Nailers by Power Source
Beyond the gauge, nailers also differ in how they’re powered. This choice affects portability, continuous use, and sometimes, suitability for certain jobs. Both 16 and 18 gauge nailers come in these types:
Air-Powered (Pneumatic) Nailers
These are the most common type. They connect to an air compressor via a hose. The compressor stores compressed air, which is released to drive the nail. They are powerful, reliable, and generally more affordable in the long run.
- Pros: Lightweight tool, consistent power, wide range of models, excellent durability.
- Cons: Requires an air compressor and hose, tethered to an outlet, noise of compressor.
- For more on air compressors, check out resources like the U.S. Department of Energy’s guide to compressed air, which highlights their importance in efficiency.
Cordless Electric Nailers (Battery-Powered)
These nailers use a rechargeable battery to power a motor that either drives a spring-loaded plunger or an air compressor built into the tool itself. They offer maximum portability and convenience.
- Pros: No cords or hoses, completely portable, easy setup, quieter than pneumatic blowouts.
- Cons: Heavier due to battery, battery life limitations, can be more expensive, power might not be as consistent as pneumatic for heavy jobs.
Corded Electric Nailers
These plug directly into a wall outlet. They are great for stationary work or extended projects where you’re always near power. They are often lighter than cordless models and don’t require battery management.
- Pros: Unlimited runtime (as long as you have power), generally lighter than cordless, no fuel cells or batteries to buy.
- Cons: Tethered by a power cord, less portable than cordless or pneumatic.
Fuel Cell Nailers (Gas-Powered)
These use a small disposable fuel cell (like propane or butane mixture) and a battery. The battery ignites a small amount of fuel, creating tiny explosions that drive the nail. They are powerful and very portable but have ongoing fuel costs.
- Pros: Extremely portable, powerful, good for remote locations.
- Cons: Ongoing fuel cell costs, fumes from combustion, potentially less consistent power in very cold weather, tools can be more complex to maintain.
Safety First, Always!
No matter which nailer you choose, safety is paramount. Nail guns are powerful tools that can cause serious injury if not used correctly.
Essential Safety Practices:
- Always Wear Safety Glasses: This is non-negotiable. Protect your eyes from flying debris or ricocheting nails.
- Read the Manual: Familiarize yourself with your specific tool’s operation and safety features.
- Never point the nailer at yourself or others: Treat it like a loaded firearm.
- Keep your fingers away from the trigger and nosepiece: Many nailers have a safety contact tip that prevents firing unless pressed against a surface, but don’t rely solely on this.
- Disconnect the power source (air hose, battery, or unplug) when:
- Loading or unloading nails.
- Clearing jams.
- The tool is not in use.
- Moving to a different work area.
- Performing maintenance.
- Use the correct nails: Always use the gauge and type of nails recommended by the manufacturer for your specific nailer. Wrong nails can cause jams and hazards.
- Work in a well-ventilated area: Especially important for fuel-powered nailers.
- Be aware of your surroundings: Ensure no one is behind the material you are nailing into, as nails can pass through.
Frequently Asked Questions
What is the main difference between 16 and 18 gauge nailers?
The main