Choosing the right nail gauge is essential for project success. A smaller gauge means a thinner nail, ideal for delicate trim work and preventing wood splitting. Larger gauges, with thicker nails, are best for structural framing and holding heavy pieces together. Understanding nail gauge ensures strength, prevents damage, and makes your DIY projects look professional.
Hey there, DIY enthusiasts! Jack Shaffer, your Nailerguy, is here to help you navigate the sometimes confusing world of nails. Ever grabbed a handful of nails, only to find they’re too thick and split your beautiful hardwood, or too flimsy for the job you’re tackling? You’re not alone! It’s a common stumbling block, but it doesn’t have to be. Knowing how to choose the right nail gauge can make all the difference between a project you’re proud of and one that leaves you frustrated. We’re going to break down exactly what nail gauge means, why it matters, and how to pick the perfect nail for any task. Get ready to nail it!
Table of Contents
What Exactly is Nail Gauge? The Simple Explanation
Let’s demystify nail gauge. In simple terms, nail gauge refers to the thickness of the nail’s shank, or its body. It’s a bit of a backward system: the higher the gauge number, the thinner the nail. Think of it like wire: a thicker wire has a lower gauge number. So, a 16-gauge nail is thicker than an 18-gauge nail, and an 18-gauge nail is thicker than a 20-gauge nail.
Why is this important? The thickness of the nail directly impacts its strength and its ability to penetrate wood without causing damage. A thinner nail is less likely to split delicate wood like trim or molding, while a thicker nail provides more holding power for structural applications.
Why Nail Gauge Matters: It’s All About Performance
Choosing the correct nail gauge isn’t just about aesthetics; it’s about the performance and longevity of your project. Here’s why it’s so critical:
- Preventing Wood Splitting: Thinner gauges (higher numbers) are a lifesaver for delicate materials. Trying to drive a thick nail into a thin piece of trim or a softwood can easily result in unsightly splits, ruining the finish and the integrity of the material.
- Holding Power: For structural projects where strength is paramount, you need a nail that can withstand significant force. Thicker gauges (lower numbers) offer superior holding power, ensuring that your framing or deck boards stay securely in place.
- Aesthetics: The hole left by a nail can be a significant visual element. For fine woodworking or visible nail heads, a thinner gauge often leaves a cleaner, less noticeable mark.
- Tool Compatibility: Different nail guns are designed for specific nail gauges. Using the wrong gauge can jam your tool, damage it, or deliver the nail incorrectly.
Common Nail Gauges and Their Uses
Let’s break down some of the most common nail gauges you’ll encounter and what they’re best suited for. This will be your go-to reference!
The Thinnest: 18-Gauge and 16-Gauge
These are your go-to choices for finer woodworking and trim work. They are slender enough to minimize wood splitting and leave a small, easily filled nail hole.
- 18-Gauge (Finish Nails): These are very thin, often referred to as “brad” nails. They are perfect for attaching delicate trim, molding, baseboards, window casings, and any situation where a clean, barely visible fastener is needed. The small head also makes them easy to countersink and fill.
- 16-Gauge (NuAail) Nails: Slightly thicker than 18-gauge, 16-gauge nails offer a bit more holding power while still being fine enough for many trim applications and smaller cabinetry projects. They are sometimes called “finish” nails as well, but have a slightly larger head than 18-gauge brads, offering a bit more surface grip.
The Workhorses: 15-Gauge and 12-Gauge
Stepping up in thickness, these gauges are ideal for more robust applications that require more strength but aren’t quite heavy-duty structural framing.
- 15-Gauge (Angled Finish Nails): These are a popular choice for installing baseboards, chair rails, and other decorative trim. The slight angle of the nail head allows for easier access into corners and tight spots, especially when using an angled finish nailer. They provide good holding power without being overly thick.
- 12-Gauge (Siding and Construction Nails): While not as common in DIY trim work, 12-gauge nails are used in some construction and siding applications. They offer significant holding power for their size but are thicker than finish nails.
The Heavy-Duty Boys: 8-Gauge and 10-Gauge
When you need serious strength for structural work, these are the nails you’ll reach for. They are much thicker and designed to bear significant loads.
- 10-Gauge (Common Nails): These are thicker nails used for general construction framing, attaching plywood sheathing, and other applications where strength and durability are key. They are less common in DIY settings unless you’re involved in framing or more robust building projects.
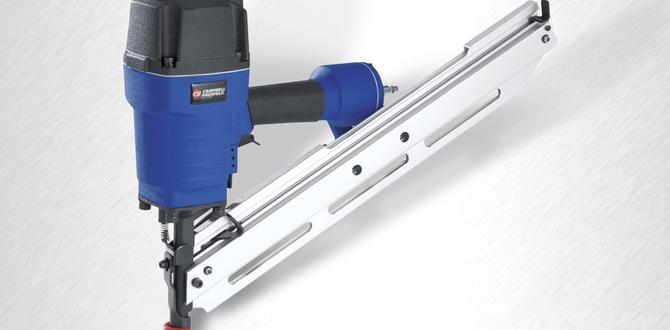
- 8-Gauge (Framing Nails): These are among the thickest nails commonly used in construction. They are designed for framing walls, attaching joists, and any application that requires maximum strength and resistance to stress. You’ll typically find these used with framing nailers.
Understanding Nail Diameter (Gauge) vs. Nail Length
It’s important to remember that nail gauge (thickness) is separate from nail length. Both are crucial for selecting the right fastener.
- Gauge (Thickness): As we’ve discussed, this determines the nail’s strength and its potential to split wood.
- Length: This determines how deeply the nail penetrates the material and how much of the nail is embedded in the supporting piece.
For example, you might need 1 1/4-inch long 18-gauge nails for attaching a thin piece of decorative molding to a solid wood frame. Or, you might need 3-inch long 8-gauge nails for framing a wall stud.
How to Choose the Right Nail Gauge for Your Project: A Step-by-Step Guide
Ready to put this knowledge to work? Follow these steps:
Step 1: Identify Your Project Type and Materials
What are you actually building or fixing? What kind of wood are you working with?
- Delicate Trim/Molding: Think baseboards, crown molding, window or door casings, decorative elements. These are usually thin and prone to splitting.
- Cabinetry/Furniture: Often involves joining smaller, sometimes thinner pieces of wood, or attaching drawer slides.
- General Woodworking/DIY Repairs: Could range from attaching a shelf bracket to building a birdhouse.
- Structural Framing: Building walls, decks, fences, or other load-bearing structures.
- Siding/Exterior Work: Needs durability against weather and good holding power.
Consider the thickness of the primary material you are fastening from and the material you are fastening into. For instance, if you’re attaching a thin piece of plywood to thicker framing, the nail needs to go through the plywood and securely into the framing without splitting the plywood edges.
Step 2: Determine the Required Holding Power
How much stress will the joint or fastening point need to withstand?
- Low Stress/Visual Appeal: Trim, decorative items, small craft projects. Here, preventing damage is key, and holding power is secondary.
- Moderate Stress: Cabinet carcasses, attaching hardware, smaller furniture. You need reasonable holding power.
- High Stress/Structural Integrity: Framing, deck boards, load-bearing shelves. Maximum holding power is essential.
Step 3: Consult a Nail Gauge Chart (or this handy guide!)
Now, use the information we’ve covered to start narrowing down your options. Here’s a quick reference table:
| Nail Gauge (Approx. Diameter) | Common Names | Typical Uses | Pros | Cons |
|---|---|---|---|---|
| 18 (0.0475 inches) | Brad Nail, Micro Pin Nail | Fine trim, molding, delicate repairs, beading, craft projects. | Minimizes wood splitting, leaves small hole, easy to fill. | Low holding power. |
| 16 (0.0625 inches) | Finish Nail | Trim, cabinetry, paneling, furniture construction. | Good balance of holding power and minimal damage, small head. | Can split softer woods if driven too close to edges. |
| 15 (0.072 inches) | Angled Finish Nail | Baseboards, chair rails, crown molding (especially in corners). | Good holding power for trim, angled head allows easier access. | Slightly larger hole than 16-gauge. |
| 12 (0.109 inches) | Siding Nail, Construction Nail | Some siding applications, lighter construction tasks. | Good holding power for its size. | Can be overkill for fine work, thicker than finish nails. |
| 10 (0.131 inches) | Common Nail | General framing, furring strips, attaching subfloors. | Good strength for many construction tasks. | Leaves a noticeable hole, can split softer woods. |
| 8 (0.162 inches) | Framing Nail | Wall framing, deck framing, heavy-duty construction. | Excellent holding power, maximum strength. | Significant wood splitting risk, large hole, not for visible work. |
Note: Nail diameters can vary slightly by manufacturer. Always check the specifications if precision is critical. For more detailed specifications, you can often find helpful charts on sites like the American Wood Council (AWC).
Step 4: Consider Your Tool
Are you using a hammer and nails, or a nail gun? If you’re using a nail gun, you’ll be restricted to the gauges that your specific tool accepts.
- Hammer and Nails: You have the most flexibility here. You can drive any nail by hand, but be mindful of the potential for over-driving or bent nails.
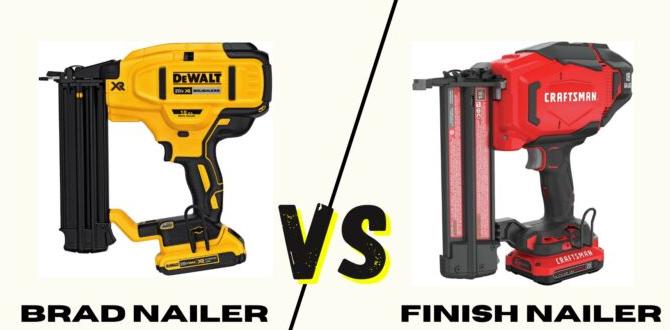
- Brad Nailer (18-Gauge): Perfect for 18-gauge nails.
- Finish Nailer (16-Gauge and/or 15-Gauge): These are versatile and can shoot both 16-gauge straight finish nails and 15-gauge angled finish nails.
- Framing Nailer (8-Gauge, 10-Gauge, etc.): Designed for thick structural nails.
Using the wrong nail size in a nail gun can cause jams, damage the tool, or result in improperly set nails. Always verify which nail gauges your nail gun is designed for.
Step 5: Test, Test, Test!
Before you commit to firing nails into your main project, especially if you’re unsure, do a test drive. Grab a scrap piece of the same material (or similar) and try driving a few nails.
- Does the nail split the wood?
- Does it sink in cleanly?
- Is it flush with the surface, slightly proud, or sunk too deep?
- Does it feel secure?
This step is invaluable for confirming you’ve made the right choice and for calibrating your nail gun if you’re using one.
Common Mistakes to Avoid When Choosing Nail Gauge
Even with the best intentions, it’s easy to make a few slips. Here are some common pitfalls and how to steer clear of them:
- Using Brads for Strength: 18-gauge brad nails are for holding trim in place, not for holding up shelves or framing walls. They simply don’t have the diameter or holding power.
- Oversizing for Trim: Driving thick 10-gauge nails into delicate baseboards is a recipe for disaster. You’ll undoubtedly split the wood, and the large nail head will be difficult to conceal.
- Ignoring Wood Type: Softwoods like pine are more prone to splitting than hardwoods like oak. You might get away with a slightly thicker nail in oak than you would in pine. Always adjust your nail gauge based on the wood’s density.
- Not Matching Nail to Gun: This is a big one for nail gun users. A 16-gauge nail gun only takes 16-gauge nails. Trying to force a different size will damage your tool and your project.
- Confusing Gauge with Length: Remember, gauge is thickness; length is depth. You need the right combination of both for a successful hold.
Nail Finish Matters Too!
While we’re focused on gauge, it’s worth a quick mention that the finish of the nail (e.g., galvanized, stainless steel, painted) is also important, especially for exterior projects or areas exposed to moisture, to prevent rust and staining. For interior trim, painted or vinyl-coated nails are common to match woodwork and hide the fastener visually.
A Look at Nail Gun Compatibility
If you’re using a nail gun, understanding its compatibility with nail gauges is paramount. Nail guns are precision tools designed for specific fastener types. For instance:
- Brad Nailers: Typically fire 18-gauge nails.
- Finish Nailers (Straight): Usually fire 16-gauge nails.
- Finish Nailers (Angled): Often fire 15-gauge nails, with the angle of the nail head allowing them to reach corners more easily.
- Framing Nailers: Designed for much thicker nails, like 8-gauge or 10-gauge nails, for heavy-duty construction.
Always refer to your nail gun’s manual to confirm the acceptable nail gauges and lengths. Using an incompatible nail can lead to jams, tool damage, and poor fastener performance. For a comprehensive guide on nail gun types, resources like OSHA’s guidelines on pneumatic nail guns provide important safety and operational information, highlighting the importance of using the right fasteners.
Quick Recap: When to Use Which Gauge
Let’s crystalize this with a few common scenarios:
- Attaching thin decorative trim around a mirror: 18-gauge brad nails.
- Installing baseboards in a living room: 15-gauge angled finish nails or 16-gauge finish nails.
- Building a simple bookshelf for your garage: 16-gauge finish nails for the shelves to the sides, maybe 10-gauge for any structural bracing if needed.
- Framing out a new wall in your basement: 8-gauge or 10-gauge framing nails.
It’s always better to err on the side of caution. If you’re unsure between two sizes, consider the material you’re working with. For softer woods or thinner pieces, go with the thinner gauge (higher number). For situations requiring more strength, opt for the thicker gauge (lower number).
FAQ: Your Nail Gauge Questions Answered
Q1: What is the difference between nail gauge and nail size?
Nail gauge refers specifically to the thickness of the nail’s shank (body). Nail size usually refers to both the thickness (gauge) and the length of the nail. So, while 18-gauge is a thickness, “1 1/4 inch 18-gauge nail” is a complete size description.
Q2: Can I use a nail gun if I don’t know the nail gauge?
No, absolutely not. Using the wrong nail gauge in any nail gun can cause it to jam, damage the tool, or lead to improper nail driving. Always check your nail gun’s specifications for compatible gauges and lengths.
Q3: Which nail gauge is best for preventing wood splitting?
The thinnest nail gauge (highest number) will cause the least amount of splitting. For delicate work, 18-gauge brad nails are usually the safest bet. However, technique also plays a role – pre-drilling pilot holes can help even with thicker nails.