Choosing the right nail gun as a professional woodworker is key to efficiency and project success. This guide breaks down types, features, and power sources to help you find the perfect nailer for your woodworking needs, ensuring speed, accuracy, and a professional finish every time.
Hey there, fellow woodworkers! Jack Shaffer here, your go-to for all things tools and woodworking. If you’ve ever stared at a wall of nail guns, feeling a little overwhelmed, you’re not alone. Picking the right nail gun can feel like a big decision when you’re aiming for that professional finish and smooth workflow. But don’t worry, it doesn’t have to be complicated! We’re going to break it all down, simple as can be, so you can confidently choose the nailer that will make your projects sing.
We’ll cover everything from the different types of nail guns out there to what features really matter for professional work. By the end of this guide, you’ll know exactly what to look for. Let’s get you armed with the knowledge to make the smartest choice!
Table of Contents
Understanding the Core Differences: What Makes a Nail Gun Tick?
At its heart, a nail gun is a tool that drives nails into wood (or other materials) using compressed air, electricity, or even powder. The main thing that separates them is how they’re powered and the types of nails they use. This might sound simple, but these differences are crucial for picking the right tool for your specific job.
Think of it like this: you wouldn’t use a tiny finishing nail to frame a house, and you wouldn’t use a giant framing nail to attach delicate trim. The same logic applies to nail guns. The power source and the nail size directly impact what you can do with the tool and how efficiently you can do it.
The Power Behind the Punch: Fuel Sources Explained
The way a nail gun is powered is arguably the biggest factor in choosing one. Each power source has its own set of pros and cons that will affect its performance, portability, and cost.
1. Pneumatic Nail Guns (Air-Powered)
These are the workhorses of the professional woodworking world. Pneumatic nail guns use compressed air from an air compressor to drive nails. They are known for their power, speed, and durability. Because they have fewer moving parts than some other types, they tend to be very reliable.
- Pros:
- Most powerful and fastest for high-volume tasks.
- Generally lighter than electric or cordless models of similar power.
- Lower initial tool cost compared to some other types.
- Very durable and made for heavy-duty use.
- Cons:
- Requires an air compressor, air hose, and sometimes an air tank, which can limit portability and add setup time.
- The noise from the compressor can be considerable.
- Requires maintenance for the compressor and hose system.
2. Cordless Nail Guns (Battery-Powered)
Cordless nail guns have become incredibly popular for a good reason: portability. They run on rechargeable batteries, often using either a gas cartridge and battery combination or just battery power to drive the nail. The all-battery models are becoming more common and, for many, the preferred choice for on-site work.
- Pros:
- Extremely portable, no cords or hoses to manage.
- Quick setup and easy to move around a job site.
- Modern battery technology offers good power and run time.
- Cons:
- Can be heavier than pneumatic tools due to the battery.
- Initial cost can be higher due to the battery and charger.
- Battery life can be a limiting factor if you’re doing very high-volume work without spares or a charging station.
- May not deliver quite as much raw power as the strongest pneumatic models, though this gap is narrowing.
3. Electric Nail Guns (Corded)
These plug directly into a wall outlet. They are a good option for stationary projects or workshops where an outlet is readily available. While less common for professional fieldwork, they can be a cost-effective choice for home workshops.
- Pros:
- No need for batteries or air compressors, making them ready to go as long as you have power.
- Generally less expensive upfront than pneumatic or cordless models.
- Lighter than battery-powered models as they don’t have a heavy battery pack.
- Cons:
- Limited by the length of the power cord and the availability of outlets.
- Can be less powerful than pneumatic or higher-end cordless models.
- The cord can be a tripping hazard or get tangled.
4. Fuel Cell Nail Guns
These nailers use a small, disposable fuel cell (like a propane cartridge) in combination with a rechargeable battery. The battery powers the fan and ignition system, while the fuel cell provides the power to drive the nail. They offer good power and portability but require ongoing purchase of fuel cells.
- Pros:
- Powerful and portable, often rivaling pneumatic performance.
- No hoses required.
- Cons:
- Requires ongoing purchase of fuel cells, adding to running costs.
- Can emit fumes, making them less ideal for poorly ventilated indoor spaces.
- Can be sensitive to temperature changes.
The Anatomy of a Nail: Nail Gun Types
Beyond the power source, nail guns are categorized by the type of nail they drive. This is directly tied to the woodworking task you’re performing. A smart professional knows which nailer is best suited for trim work versus framing versus roofing. Let’s look at the most common types you’ll encounter.
1. Framing Nailers
These are the heavy-duty heroes designed for construction and framing. They drive large nails (typically 2 to 3.5 inches long) used for building walls, decks, and other structural elements.
- Best for: Structural framing, rough carpentry, building decks, fences.
- Nail types: Clipped-head, offset-round head nails (check local building codes for permitted nail head types, as some areas restrict clipped heads due to potential pull-out issues).
2. Finish Nailers
Finish nailers are versatile tools for attaching trim, molding, paneling, and smaller cabinetry. They use thinner, longer nails (1.5 to 2.5 inches) that leave smaller, more easily filled holes, leading to a cleaner finished look.
- Best for: Installing baseboards, crown molding, door and window casings, chair rails, cabinet assembly.
- Nail types: 15-gauge and 16-gauge nails. 15-gauge nails offer a bit more holding power, while 16-gauge leave a nearly invisible hole.
3. Brad Nailers
Brad nailers are similar to finish nailers but use even finer, smaller nails (18-gauge). They are perfect for delicate trim work, attaching small moldings, or any project where minimal marking is essential.
- Best for: Very delicate trim, attaching small craft elements, securing lightweight moldings, DIY projects.
- Nail types: 18-gauge nails.
4. Pin Nailers
These are the most delicate of the bunch, using extremely thin headless pins (23-gauge). They are ideal for tasks where you want to secure pieces without any visible nail marks at all, or for very fine woodworking situations.
- Best for: Upholstery, attaching delicate wood pieces, temporary holding of small parts, fine craft work.
- Nail types: 23-gauge headless pins.
5. Roofing Nailers
Specifically designed for attaching shingles and other roofing materials. They have a wide, flat “head” that presses the nail into the shingle without damaging it and a magazine often set at an angle for easy access on a roof.
- Best for: Installing asphalt shingles, underlayment, and other roofing materials.
- Nail types: Roofing nails, typically with a 1-inch head and a ring or screw shank.
6. Flooring Nailers
These tools are specialized for installing hardwood flooring. They drive L-shaped nails at an angle into the tongue of the flooring board to secure it to the subfloor without penetrating the visible surface.
- Best for: Installing solid tongue-and-groove hardwood flooring.
- Nail types: Specialized L-shaped flooring nails.
Understanding these types is your first major step to picking the right nail gun. You wouldn’t use a framing nailer for your crown molding, and you wouldn’t use a pin nailer to build a deck frame. Matching the tool to the task is professional woodworking 101!
Key Features That Make a Difference for Professionals
Once you’ve narrowed down the type of nailer you need, it’s time to look at the features that will make your life easier and your work better. For professional woodworkers, efficiency, precision, and safety are paramount.
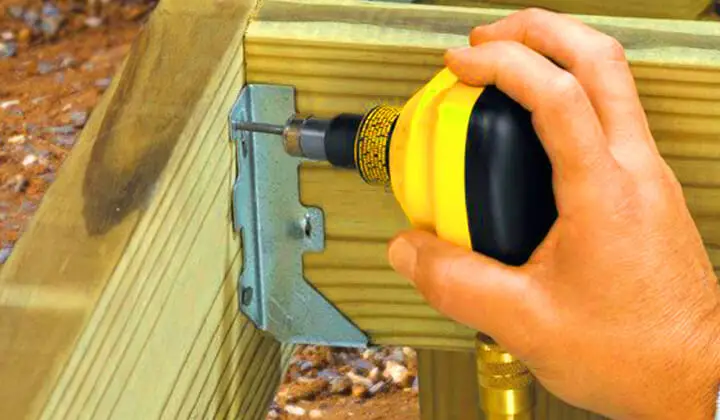
1. Depth Adjustment Mechanism
This is a crucial feature! It allows you to control how deep the nail is driven into the wood. Being able to adjust this on the fly is essential for working with different wood thicknesses and densities, from soft pine to hard oak, and for ensuring nails are flush, countersunk, or slightly proud as needed.
- Tool-free adjustment: Makes it quick to change depths without searching for tools.
- Detents or clear markings: Help you know exactly what depth setting you’re on.
2. Firing Modes: Sequential vs. Contact Actuation
How you want your nailer to fire can greatly impact your speed and safety.
- Sequential Firing (or “Hit the Trigger”): You must press the trigger and touch the nose of the gun to the wood for it to fire a nail. This is the safest mode and is ideal for precision work and situations where you absolutely don’t want accidental firing. Think delicate trim or working near finished surfaces.
- Contact Actuation (or “Bump Firing”): You can hold the trigger down, and each time the nose touches the wood, it fires a nail. This mode is much faster for tasks like framing or attaching large panels where speed is key. However, it requires more control to prevent accidental “nailing” of unintended spots.
- Selectable Firing Mode: Many professional nailers offer a switch to choose between sequential and contact actuation, giving you versatility for different jobs. This is a highly sought-after feature for pros.
3. Dry Fire Lockout
This smart feature prevents the nail gun from firing when it’s out of nails. Continuously “dry firing” can damage the tool’s internal o-rings and drivers. A dry-fire lockout extends the life of your tool and saves you from frustrating, ineffective triggers.
4. Magazine Capacity and Loading
A higher magazine capacity means fewer reloads, which translates to more work done in less time. Also, consider how easy the magazine is to load. Some have convenient side-loading mechanisms, while others might be a bit more fiddly.
5. Nail COLLATION Angle
This refers to the angle at which the nails are held in the magazine. Common angles are 0 degrees (straight), 15 degrees (coil nailers), 20-22 degrees (plastic collation, common for framing), and 30-34 degrees (stick nailers). You need to match this to the nails your nailer uses. Stick nailers (20-34 degrees) are often preferred for trim work because the magazine is narrower and can get into tighter corners more easily than coil nailers.
6. Weight and Ergonomics
If you use a nail gun all day, every day, its weight and how it feels in your hand are critical. A lighter tool or one with better weight distribution can significantly reduce fatigue. Look for comfortable grips and well-balanced designs.
7. Jam Clearing Mechanism
Nails can jam, especially with extensive use. A nail gun with an easy, tool-free jam clearing mechanism can save you precious minutes (or even hours) on a job site. Some have quick-release nose covers that make clearing jams a breeze.
Choosing the Right Nail Gun for Specific Woodworking Applications
Let’s talk practical application. Knowing the types of projects you tackle most often is the surest path to choosing the best nail gun for your workflow.
Framing and Rough Carpentry
For building framing, decks, fences, and other structural work, you need power and speed. A heavy hitter is required.
- Nailer Type: Framing Nailer.
- Power Source Recommendation: Pneumatic is often the go-to for sheer power and continuous use without battery concerns. However, high-performance cordless framing nailers are rapidly closing the gap and offer superior portability if you’re often working on sites without easy access to power.
- Key Features: High magazine capacity, ability to drive large nails (2.5″ to 3.5″), sequential firing for safety, robust construction.
Trim, Molding, and Finish Carpentry
This is where precision and a clean finish are paramount. You need a tool that leaves minimal marks and can handle intricate work.
- Nailer Type: Finish Nailer (15-gauge or 16-gauge) or Brad Nailer (18-gauge).
- Power Source Recommendation: Cordless is king here for portability and ease of use around finished surfaces. Pneumatic is also a solid choice if you’re in a workshop setting or have easy air access.
- Key Features: Selectable firing mode (sequential for precision), tool-free depth adjustment, slim nose for tight spots, dry-fire lockout, rear exhaust (to blow dust away from your work). A 16-gauge finish nailer is often considered the most versatile for trim work.
Staircases and Cabinetry
These projects often involve both structural elements and fine finishing. You might even need two different nailers, but if you’re choosing one, think about versatility.
- Nailer Type: A versatile finish nailer (15-gauge) can often handle much of this work. For more robust connections, a framing nailer might still be needed for structural elements of a cabinet carcass, but for assembled cabinets and stair components, a finish nail gun shines.
- Power Source Recommendation: Cordless provides the freedom to move around cabinets and stairs.
- Key Features: Excellent depth control, selectable firing modes, compact nose for tight angles.
Wainscoting and Paneling
Attaching large sheets of material or individual wooden strips requires a good balance of speed and precision to avoid damaging the material or leaving visible holes.
- Nailer Type: Brad Nailer (18-gauge) or a narrow-crown stapler.
- Power Source Recommendation: Cordless is ideal for moving around large panels easily without a hose.
- Key Features: Consistent nail depth, lightweight for extended use, good magazine capacity.
DIY Furniture Making
For hobbyists and DIYers building furniture, a good all-around tool is a great start.
- Nailer Type: A 16-gauge finish nailer or an 18-gauge brad nailer.
- Power Source Recommendation: If budget is a concern and you have a workshop, a corded electric nailer can be excellent. For more freedom, a cordless model is fantastic.
- Key Features: Ease of use, reliable performance, good depth adjustment.
Putting It All Together: A Decision-Making Framework
Ready to pull the trigger? Here’s a structured way to make your final decision. Think about these questions:
- What are your primary woodworking tasks? (Framing, trim, cabinetry, furniture, general repairs?)
- What types of materials will you be working with most often? (Softwoods, hardwoods, engineered wood?)
- How important is portability? (Will you be on job sites often, or mostly in a dedicated workshop?)
- What is your budget? (Consider both the initial tool cost and ongoing consumables like nails, batteries, or fuel cells.)
- Do you already own an air compressor? If so, pneumatic might be a cost-effective path.
Here’s a table that can help visualize common choices:
| Project Type | Recommended Nailer Type | Primary Power Source | Key Features |
|---|