Choosing a framing nail gun for beginners is straightforward when you understand power sources, nail types, and key features. This guide breaks down everything you need to know to pick the perfect nailer for your DIY projects, ensuring you nail it the first time!
Hey there! Jack Shaffer here, your go-to guy for all things nail guns and woodworking. Tackling a new DIY project can be super exciting, but picking the right tool can feel like a puzzle. One tool that can really speed things up and make your projects stronger is a framing nailer. But with so many options, how do you know which one is best for a beginner? It’s a common question, and I’m here to make it super simple. We’ll walk through it step-by-step, so you can confidently choose the perfect framing nail gun for your needs. Let’s get started on building something great!
Table of Contents
Why You Need a Framing Nail Gun for Your DIY Projects
If you’re building decks, fences, sheds, or even just framing out a new wall in your home, a framing nail gun is a game-changer. It drives nails quickly and powerfully, saving you a ton of time and elbow grease compared to using a hammer. For beginners just getting into bigger DIY tasks, this tool can make a project feel much more manageable and professional. It ensures your structures are sturdy and securely fastened, giving you peace of mind. Plus, learning to use one safely and effectively is a skill that will serve you well on countless future projects.
Understanding the Powerhouse: Types of Framing Nailers
The biggest decision you’ll make when choosing a framing nail gun is its power source. Each type has its own pros and cons, and understanding them will help you find the best fit for your workspace and type of projects. Here’s a breakdown:
1. Pneumatic Framing Nailers
These are the classic workhorses. Pneumatic nailers are powered by compressed air from an air compressor. They’re known for their power, speed, and reliability. You’ll often see these on professional job sites.
- Pros: Very powerful, fast, lightweight to hold (the nailer itself), and generally the most affordable option for the nailer. They typically require less maintenance.
- Cons: You need to buy an air compressor, hose, and air fittings. Dragging the hose around can be a bit cumbersome, and the compressor can be noisy.
If you’re planning on doing a lot of heavy-duty framing or already have an air compressor, a pneumatic nailer is a fantastic choice. You can often find great deals on them.
2. Cordless Electric Framing Nailers (Battery-Powered)
These are becoming increasingly popular for DIYers because they offer freedom from cords and compressors. They use a battery to power a motor that drives the nail. Some models also use a small gas fuel cell for added impetus, similar to some finish nailers.
- Pros: No air compressor or hoses needed, offering incredible portability and convenience. Easy to set up and use.
- Cons: Can be heavier than pneumatic nailers due to the battery. They are often more expensive upfront. Battery life is a consideration for long days of work, though most have decent runtimes. Nail driving power might be slightly less than top-tier pneumatic models for very dense woods.
For the ultimate convenience and if you don’t want to invest in an air compressor, a cordless electric framing nailer is an excellent option. They are perfect for smaller to medium-sized projects or when you need to move around a lot.
3. Electric Corded Framing Nailers (Plu-in)
These rely on a standard electrical outlet to power their motor. They don’t use batteries or air.
- Pros: No need for batteries or an air compressor. Generally less expensive than cordless models. No issues with battery life.
- Cons: You are tethered to an electrical outlet by a cord, which can limit your mobility and be a tripping hazard. They can be heavier and bulkier than pneumatic nailers. Power might not be as robust as pneumatic or some cordless models.
These are less common for framing specifically, as their power and portability are often outmatched by pneumatic or cordless options. However, if you have a dedicated workshop and do smaller framing tasks, they can be a budget-friendly choice.
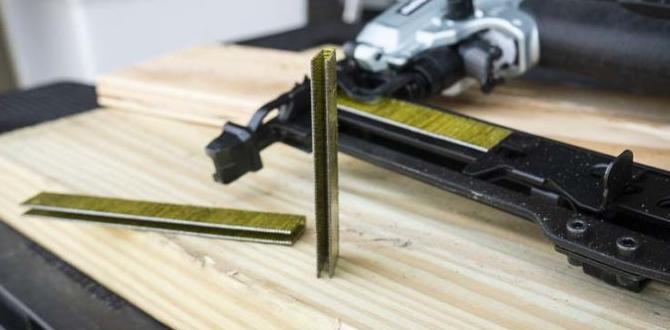
Decoding the Nails: What Kind of Nails Does Your Nail Gun Fire?
Framing nail guns use specific types of nails that are designed to hold heavy structures together. The most common are:
- Round Head Nails: These are the most common type for framing. Their heads are round, allowing them to sit flush or slightly below the surface of the wood. They are designed to meet building codes in most areas. You’ll find them in different angles and finishes.
- Offset Round Head Nails: Similar to round heads but with a slight offset (the nail head is offset from the shank). These are often used because they can be manufactured in a way that allows more nails to fit into the magazine, making them more space-efficient and potentially cheaper. Building codes typically accept these as well.
When you look at nail guns for sale, they will specify the type of nails they accept (e.g., “21-degree round head nails”). Always check this to ensure you buy the correct nails for your gun, and also check local building codes if your project requires inspection. Organizations like the International Code Council (ICC) provide standards that often dictate nail types for structural applications.
Key Features to Consider for Beginner-Friendly Use
Beyond the power source, several features can make a framing nailer easier and safer for beginners to use. Let’s look at the important ones:
1. Firing Modes: Sequential vs. Contact Actuation
This refers to how the nailer fires. Most framing nailers offer both modes, which you can usually switch with a trigger lever.
- Sequential Mode (or Single Fire): To fire a nail, you must press the tip of the nail gun against the surface (actuate the safety contact trip) AND pull the trigger. This is the safest mode and allows for precise placement of each nail. For beginners, this is highly recommended to start with to avoid accidental nail fires.
- Contact Actuation Mode (or Bump Fire): In this mode, you can fire nails simply by holding the trigger down and bumping the tip against the wood. This is much faster for laying down a lot of nails quickly, like when building a wall frame. However, it’s also easier to accidentally fire a nail if you’re not careful, so practice is needed.
Beginner Tip: Always start with sequential mode until you are comfortable and confident with the tool. This will help you avoid accidents and get precise nail placement.
2. Depth Adjustment
This is a crucial feature! It allows you to control how deep the nail is driven into the wood. You want nails to be flush with the surface or slightly countersunk for a clean finish and good holding power. You don’t want nails sticking out or driven too deep, which can split the wood.
- Tool-less Adjustment: Many modern nail guns have a dial or lever near the nose of the gun that lets you quickly adjust the depth without needing tools. This is fantastic for making quick changes when working with different wood thicknesses or densities.
- Tool-Required Adjustment: Older or simpler models might require you to change a setting using a wrench or screwdriver.
Beginner Tip: Learn how to adjust the depth correctly. It often takes a few test nails on scrap wood to get it just right for your specific project and materials. Look for tool-less adjustment if possible – it’s super convenient!
3. Nail Loading Mechanism
How you load nails into the gun is important for speed and ease. Most framing nailers have a magazine that slides open and then closes with a spring-loaded mechanism.
- Easy Loading: Look for magazines that operate smoothly and don’t require excessive force to open or close.
- Capacity: Most framing nailers hold around 50-70 nails. A higher capacity means you’ll reload less often, which saves time on larger projects.
4. Weight and Ergonomics
You’ll be holding this tool for extended periods, so comfort is key. Heavier nail guns can lead to fatigue, especially when working overhead or in awkward positions.
- Balance: A well-balanced tool feels better in your hand.
- Grip: A comfortable, non-slip grip is essential for control and reducing hand fatigue.
- Size: Some nailers are more thân thiện for tight spaces.
Beginner Tip: If possible, try to hold a few different models in a store before buying. Feel how they balance and if the grip feels good in your hand. Even a slight difference can matter over a long day.
5. Rafter Hook
This might seem like a small detail, but a rafter hook is incredibly useful. It’s a metal hook attached to the side of the nailer that allows you to hang it from a rafter, belt, or ladder rung. This keeps the nailer handy and out of the way when you need to step back or grab materials.
6. Dry-Fire Lockout
This feature prevents the nailer from firing when the magazine is empty. It’s a great way to prevent wear and tear on the tool and avoid making an empty “bang” that can startle you. Some models have an indicator light to show when it’s empty.
Comparing Popular Framing Nailer Types: A Quick Look
To help you visualize the differences, here’s a table comparing the most common types of framing nailers:
| Feature | Pneumatic Framing Nailer | Cordless Electric Framing Nailer (Battery) | Corded Electric Framing Nailer |
|---|---|---|---|
| Power Source | Air Compressor | Rechargeable Battery | AC Power Outlet |
| Portability/Mobility | Limited by hose length | Very High | Limited by cord length |
| Upfront Cost (Tool Only) | Low to Medium | High | Medium |
| Setup Time | Moderate (compressor, hose, power) | Very Fast | Fast (plug in) |
| Weight (Tool) | Lightest | Heavier (due to battery) | Moderate to Heavy |
| Continuous Use Capacity | High (limited by compressor tank size) | Moderate (depends on battery life) | Very High |
| Best For | Heavy framing, workshops, professional use, those with compressors | Versatile DIY, portability needs, no compressor desired | Fixed workshop locations, smaller framing tasks, budget-conscious |
Choosing Your First Framing Nailer: A Step-by-Step Process
Ready to find your perfect nail gun? Follow these steps:
- Assess Your Projects: What will you be building? Are they small weekend projects, a large deck, or occasional home renovations? For occasional use and maximum convenience, a cordless model can be a great investment. For frequent, heavy-duty work or if you already own an air compressor, pneumatic is often the way to go.
- Set Your Budget: Consider not just the nailer itself but also any necessary accessories. For pneumatic, factor in the compressor, hose, and fittings. For cordless, consider extra batteries if you do long projects.
- Decide on Power Source: Based on your projects and budget, choose between pneumatic, cordless electric, or corded electric. This is often the biggest deciding factor.
- Prioritize Key Features: For beginners, focus on sequential firing mode, easy depth adjustment (tool-less is a big plus), a comfortable grip, and a rafter hook.
- Read Reviews and Compare Models: Once you’ve narrowed down your choices, read reviews from other DIYers and professionals. Look for reliability and ease of use. Reputable brands often offer better support and durability.
- Test if Possible: If you can, go to a tool store and hold different models. See how they feel in your hand, how easy the trigger and depth adjustment are to access.
Safety First: Essential Tips for Using a Framing Nail Gun
Framing nail guns are powerful tools, and safety should always be your top priority. Here are some essential tips:
- Always Wear Safety Glasses: This is non-negotiable. Flying debris or a ricochet can cause serious eye injury.
- Read the Manual: Every tool is different. Familiarize yourself with your specific model’s features, operation, and safety warnings. You can find many manuals online from manufacturers like Dewalt, Paslode, and Bostitch on their official websites or through OSHA guidelines for tool safety.
- Use Sequential Mode First: As mentioned, start with sequential firing mode until you are completely comfortable and practiced.
- Never Point the Nail Gun at Yourself or Others: Even when not powered.
- Keep Fingers Away from the Trigger and Nose: Don’t rest your finger on the trigger while handling the tool, and be aware of where the nose is as you’re moving it.
- Be Aware of Your Surroundings: Ensure no one is behind the surface you are nailing into. Nails can sometimes go all the way through wood.
- Disconnect Power When Not in Use or Performing Maintenance: For pneumatic, disconnect the air hose. For cordless, remove the battery. For corded, unplug it.
- Inspect the Tool Regularly: Check for any damage to cords, hoses, or the tool itself before each use.
Following these safety practices will ensure you have a positive and productive experience with your framing nail gun.
Frequently Asked Questions (FAQ) about Choosing a Framing Nailer
Q1: What’s the difference between a framing nailer and a finish nailer?
A framing nailer is heavier duty, designed for structural work like framing walls or building decks, and uses larger nails. A finish nailer is for attaching trim, molding, or paneling, and uses much smaller, thinner nails that leave tiny holes.
Q2: Can I use a framing nailer for smaller woodworking projects?
While you can, it’s usually overkill for small projects. The large nails can split delicate wood, and the nail size isn’t ideal for fine joinery. A finish nailer or brad nailer is better suited for smaller tasks.
Q3: What’s the most important feature for a beginner to look for?
The most important feature is the firing mode, specifically the ability to use sequential (single fire) mode. This ensures you only drive a nail when you intend to, making it much safer for beginners.
Q4: Do I need an air compressor to run a framing nailer?
Only if you choose a pneumatic framing nailer. Cordless electric framing nailers run on batteries and don’t require compressed air.
Q5: How much do framing nailers typically cost?
Prices vary widely. Basic pneumatic framing nailers can start around $100-$150, while high-quality cordless models can range from $200 to $500 or more, plus the cost of batteries and a charger.
Q6: What kind of nails should I buy for my framing nailer?
You need to buy nails specifically designed for framing nailers, typically 2-inch to 3-1/2-inch long, with either round heads or offset round heads. Always check your nail gun’s manual for the exact size and angle (e.g., 21-degree, 28-degree) it accepts.
Conclusion: Your Framing Nailer Awaits!
Choosing your first framing nail gun doesn’t have to be daunting. By understanding the different power sources – pneumatic, cordless electric, and corded electric – and focusing on beginner-friendly features like sequential firing and depth adjustment, you’re well on your way. Think about the types of projects you’ll tackle, your budget, and your need for portability. Whether you opt for the raw power of pneumatic or the ultimate convenience of cordless, the right framing nailer will dramatically improve your DIY experience, making your projects stronger, faster, and more professional. Take your time, do a little research, and remember to always prioritize safety. Happy building!